This week I gave a talk on copyright law at the annual convention of the National Cartoonists Society (always a fun event). My talk included an Eight Minute History of Thievery in Cartooning, recounting some of the colorful disputes over who created what. This post is taken from that talk.
The history of comics is streaked with plagiarism like bacon is streaked with fat.
In fact, the very first comic strip resulted in a huge copyright battle. Richard Outcault, who created the Yellow Kid in 1895, found himself competing with a duplicate Yellow Kid in a rival newspaper:
dueling Yellow Kids by Outcault (left) and George Luks (right)
Rudolph Dirks created The Katzenjammer Kids in 1897 but when he asked for a vacation his syndicate tried to replace him with another artist, Harold Knerr. Dirks sued to regain his strip but after a long court battle, Dirks and Knerr ended up with two virtually identical strips: The Captain and The Kids andThe Katzenjammer Kids. The two strips competed for audiences for 67 years, from 1912 to 1979. When The Captain and The Kids finally folded, both creators were already dead.
Virtually identical characters by Dirks (left) and Knerr (right)
In 1933, Ham Fisher hired a young assistant, Al Capp, to help with his comic strip, Joe Palooka. Capp noticed that one of the characters in the strip, a large bumbling mountain man called Big Leviticus, was popular with readers so Capp quietly developed his own strip about another large bumbling mountain man, Li'l Abner, and sold it to a rival syndicate.
A strong resemblance: Fisher's Big Leviticus (left) and Capp's Li'l Abner (right)
When Fisher discovered what Capp had done, he went ballistic. He claimed that Capp had stolen his ideas, and reminded readers that "the original hillbillies" were in Joe Palooka. His ads urged readers not to be "fooled by imitators." Capp and Fisher descended into a bitter feud which lasted 20 years. When Fisher finally committed suicide in 1955, Capp crowed that he considered it “a personal victory,” saying that driving Fisher to suicide was his "greatest accomplishment.”
As you can tell, the early years of cartooning saw a lot of heated battles involving different kinds of borrowing, copyright infringement and plagiarism. But cartoonists in the early decades never dreamed how sophisticated and lucrative theft could be. In later years, what was once criticized as "theft" came to be renamed "appropriation art" or "repurposing" or "transformative use" or "sampling" or "re-contextualiation." What all of these new categories have in common is that they represent minor, unimaginative art.
The legitimization of this type of borrowing began with pop art. Bill Overgard's panel from his 1961 strip, Steve Roper was copied by Roy Lichtenstein. When reporters questioned Lichtenstein he responded, "What I do is form, whereas the comic strip is not formed in the sense I'm using the word." Overgard replied, "he said he never copies them exactly, [but] he comes pretty close..."
Fast forward a couple of decades and you encounter the fine artist Erró (Guðmundur Guðmundsson) who specializes in copying other people's comic art, redrawing it in a mash up, and selling it as his own fine art. When cartoonistBrian Bolland visited the gift shop at the Pompidou Center in France, he found that Erró had copied Bolland's cover for Tank Girl in a fine art poster. Bolland's name had been carefully deleted from his picture.
Bolland standing in front of Erró's poster
Bolland wrote a long, thoughtful letter on social media which shamed Erró into turning over his unsold inventory of prints to Bolland.
But Lichtenstein and Erró are amateurs compared to Richard Prince who shamelessly steals from illustrators, cartoonists and other commercial art. For example, Prince copied this cartoon as a work of fine art...
...which recently sold at auction in 2012 for $812,500:
Once when Prince was sued for copyright infringement, he offered this legal theory for his borrowing, along with his personal opinion of the lawyer who filed the lawsuit:
I hated that lawyer; that lawyer was really an asshole. I just wanted to be like-- my attitude was like, Dude, this is my artwork, and you are a square. You are a fucking square. For me, it's like I wasn't going to be a part of his world, I wasn't going to acknowledge his world. ... Copyright? That's absurd."
Finally, no history of theft in cartooning would be complete without mentioning ebay. An excellent example is the following gentleman who, under the name "fosworld," was selling fake Calvin & Hobbes artwork as originals on ebay.
The scam was easy to confirm because the cartoonist, Bill Watterson, had donated those originals to The Billy Ireland Cartoon Library and Museum at Ohio State University where they reside today. When confronted, the seller continued to sell the fake strips, dodging and weaving and offering various excuses. Complaints to ebay about the seller were slow to get a response; ebay is notorious for ignoring intellectual property rights in situations where ebay might make a quick buck from somebody else's fraud.
Finally the outrage over the Calvin & Hobbes forgeries became hot enough that fosworld quietly shifted to other, less troublesome inventory. To my knowledge none of fosworld's victims ever got their money back. If you encounter one of them, tell them to write fosworld.
Theft in cartooning continues to mutate and evolve as fast as cartooning itself, and the internet is the perfect petri dish. Be careful out there!
After a while, I realized that Procedural Animation is really different from Manual Animation. Both creates movements and beautiful visual that can entertain many, but the thinking is different. This is probably obvious for long time animators that got exposed to both. Not something that you need to think about, when working. It just happens.
What I mean by Manual Animation in computer is what is rooting originated from Traditional Animation, frame by frame, pose to pose. We can more about the pose of characters, or how non animated objects can tell story.
Procedural Animation, however, it is more like about automation. Generated. Sometimes accidental, sometimes complex to create. But more closely related to the beats of music.
NOTE: If you happened to know any "Animation Mentor" students, they might mention "beats and rhythm in animation" while animating a character. It's advanced stuff.
I have personal interest in both manual and procedural animations. Sometimes I think manual animation is too tedious, some can be automated, like Walk Cycles. Currently the best usage of generated animation and real animation is in robotic or video games industry.
ELECTONIC MUSIC
Talking about beats of music, I think creation of procedural animation can learn by observing electronic music, sampling and loops.
Few apps for iPhone and iPad gave me this inspiration to write this article:
Auxy
KORG iDS-10 (like Nintendo DS one)
Loopy HD
Those example apps basically allow user to create musical loops. If you can get a hand on it, it's highly recommended. Watch some YouTube DEMO it will help you to understand what I am attempting to do here.
Apple's Garage Band does this too, although not so obvious. Basically any music apps or programs out there, for PC or Linux, that actually loops sampling and show MIDI UI is nice.
Some AN developers actually have similar ideas. But I think it's a pending task. Basically a way to make it easier to construct animation in Blender, using Animation Nodes, in a way we can create songs using MIDI apps. It's in the AN Github forum somewhere. https://github.com/JacquesLucke/animation_nodes/issues/332
In short, I am attempting to visualize AN to use: BEATS and LOOPS and PATTERNS to MAKE PROCEDURAL ANIMATION.
PROCEDURAL ANIMATION LOOPS
Before I jump right ahead trying to build node tree of LOOPS that further LOOPS, and get complicated, I will start simple.
(Actually, this is my 3rd time trying to get my head around how I could write this and explain my thoughts. I make 3 different node trees trying to achieve similar thing.)
I need to make a very simple node looping thing.
Let say, create animation of a jumping / bouncing Suzanne head. All procedurally created, and the animation will simply loop. But the height of jump of Suzanne needs to be able to be controlled per beat or depending on pattern.
Do you reckon you can make this?
IDEA 1: You can use some math expression to achieve bouncing effect. You learned this already if you happened to read my old, old article. It's using the SINE and ABS you can create this bouncing motion animation.
I did try it using AN Expression, the math.sin() formula is a bit strange that it ask for Radian... anyway, see the last image in this article to see my attempt.
IDEA 2: To actually create and using Animation Curve. Wait... did you say Anim Curve? Isn't that a Manual Animation? Semi-Procedural animation, I think it's the most correct term.
I mean, creating certain animation Curve using Math Formula... c'mon, it is stupidly complex and unnecessary for artists to having to create formula for a curve. A much better thinking is to visually create the curve and further use it procedurally.
So in procedural animation, we should care more about animation curve in between keyframes and how we can break them into elements.
The node tree I built looks like below:
I really started from "Interpolation from Curve Mapping". That is my very 1st step.
I quite like this node. It is visual. Kind of like something that can be use to "Ramp" values and maybe to create random looking curve, and can be used for lots of things.
I think the node has a bug that is causing it so the first and last value has "jump". But if we use Debug Interpolation node as viewer, we can see the real value being sampled from 0 to 1.
Next thing I did is to use the Evaluate Interpolation node. It's obvious node to use for this case. We just want to "translate" that Anim Curve into animated value, that we can use to animate any object in 3D scene. Just the Translate Z value of an object, in this case.
You see how I use Time Info and Repeat Time (it's looping!) to control the looping jump motion. It's really easy up to here.
Next, I add some more nodes just to MIX thing a bit.
Above, I am using a simple list in "Text". The text looks like this: 1, 0, 1, 0 ....
Some kind of pattern value that generates number list to be used to mix and multiply the translated Anim Curve values.
This way, I can make the bouncing goes like this: BOUNCE, OFF, BOUNCE, OFF.
If we use values like this: 2, 6, 3, 2, 2, 1, 2
It will translate to the jump so the jump heights changes depending on how it multiply the curve. Very neat actually!
START THINKING ABOUT LOOPS...
So.... from here, really you can sort of starting to get an idea how we can utilize LOOP to make animation that actually does look natural and believable and the cool thing about procedural animation, is we can quickly create variations.
I leave it here for now. But you go ahead.
Roughly, I think it's possible to create a "MIDI like animation loop" setup using AN, without visual. It's just by using that Text Pattern thing.
I need to look for more inspirations around. Maybe by learning already existing works.
Few things I found during my study:
Blender's Time Line started from frame 1, start using frame 0
Start thinking about Length of animation for main loops, let say, we have the running timeline, which extend continously. But maybe our loop is 200 frames. Maybe our LOOP has 4 BEATS (it can be 4, 8, 12, etc) , each BEATS is 50 frames in length.
ANIM CURVES or MDD CACHE?
Below is the big node tree I first built when I was marking around to get AN to repeat beats patterns and move every click and loop back.
One Loop can goes to the next Loop or branching. But then it started to become like game animation?
I think it can be simplified, really, become AN GROUP node that just does the job.
Here, all the loop is just a single value for an attribute. It's the most basic, elemental. Would be nice if we can utilize something like MDD animation or cached animation.
Or even Blender's own Action, if that's simpler for mind.
I personally don't quite understand animation like NLE, or layering of animation. I sort of can think animation in term of BLOCKS, BLENDING, but maybe noding is needed too somewhat to have more control.
Mind you also that this loop business, it's really similar to programming too. But just a bit more visual and easy to understand that we use node.
Silly attempt to try looping.
PATTERN GENERATOR EXAMPLE
This might be useful for you.
A CHALLENGE: Animation spider legs procedurally using the method above?
Here is a quick AN exercise: "How to make Epicycloid?".
I decided to write this real quick after receiving email from Eli S earlier this morning. Thanks for your email asking about this, I guess nothing wrong to try to review old thing. Maybe I was missing a step in my explanation in my old writing.
Not long ago I must have done this using Sverchok. Either way, they both can do cool stuffs that overlap with each other. Just slightly different way of thinking.
Animation Nodes (AN) add-in in Blender is really fantastic to build a quick prototype to study motion. Like Steve Jobs would say: "It's INSANELY GREAT." I would say AN is INSANELY AWESOME!
AN Script Node for Epicycloid
You can create this Epicycloid shape using a few Math and Number nodes or perhaps Expression node in AN, however, I decided to use AN Script Node. Why? Because I want to show clearly INPUT and OUTPUT things the simple way.
This is really simple to build, actually.
1) Research the Formulae for Epicycloid
You must love Math, like I do :) Not the complexity per se, I mean, the complex stuff will be dealed by smarter geniuses people. We, computer artist, very often can skip that part and simply use the formula. For epicycloid shape, I found this on Wiki, super useful: https://en.wikipedia.org/wiki/Epicycloid
2) Write it down I quickly jump into Blender and rewrite the formula inside Blender Text Editor. I do not write this in single typing. Basically I started just by typing this:
x = r * ( k + 1 ) * cos(a) - r * cos ( (k + 1) * a) y = r * ( k + 1 ) * sin(a) - r * sin ( (k + 1) * a)
THEN, it become something like below:
Few things changes, depending on what variable names I give, what are going to be the INPUTS and how it fit the requirement of AN script node. You add input and output variables as needed.
3) Noding it AN Script node does all the magic. You could actually make your own custom (real) node for AN that simply creates Epicycloid shape.
For our purpose, we use Script node, which is like a quick prototype node. It's really fast to make and super handy for a lot of things.
Keep in mind that this Script node is linked to your script earlier.
4) Build the Node Tree The rest is piece of cake. You simply use the actual Script Node and test it in 3D View.
I am applying the Epicycloid formulate to create this epicycloid motion to the default Cube.
The shape will be created as we play with the ANGLE variable. I use the Time Info node, and plugging in the output to the angle. Watch out here that I convert the Degrees to Radian in order to make this working properly.
5) Viewing the Motion Now, in order to view the motion, you need to see it in Playback. As this is really just a motion in shape of Epicycloid.
What nice is that Blender has a way to display a keyframed motion, and this is build in on object transform, under "Motion Paths" subpanel.
What I did below, is I am using AN Set Keyframes to bake the motion, then I simply draw view the curve motion.
Drawing Epicycloid Curve using AN
I was going to stop writing here. But then I am thinking... You must be curious on how you can draw this using AN?
If you read my previous blog writing, you should be able to build the setup.
The aim is to generate Vector List using Loop. It's easy. This way we can pipe the Vectors => Points for Curve aka Spline.
We can smooth the spline, bevel it etc, and then voila, a 3D cycloid mesh.
And... moreover, why did we do all this steps? Because in node based system, you can always go back, change variables, improve it and you get different result.
That's all folks, Merry Christmas 2015, since it's already pass, hope you all have an insanely awesome new year 2016!
You can skip all my rambles to the actual topic by direcly go to (*) below.
Few days ago, I was watching this 2 hours video regarding "Python and CG Pipeline. There is one part about ANIMATION that I am interested in: A mention of MDD Cache for animation transfer between softwares.
You can watch the video here: (original video is in Russian by Russian TD, then translated by another Technical Director) https://vimeo.com/88080700
Basically this Technical Director (TD) was giving an example scenario where Python might be useful to pass on DATA between softwares, like in this case from Maya to Houdini (it can be IN and OUT from and into Blender too of course).
FBX format is apparently (still) not perfect for exporting and importing. Houdini FBX Import from Maya does not guarantee a fully compatible correctly read data. This is a common situation in any production, the format conversion is often not perfect out of the box. Using Python, the TD wrote this "translator" that export out MESH data as BGEO format (Houdini native, more robust than the basic OBJ) and the ANIMATION data as MDD Cache.
I remember that Blender has a pretty good MDD tool built in, and it is part of Blender's Modifier. Cool, let's talk how this later relate to the AN business.
ROUGH PIPELINE SUMMARY
I will try to explain a bit of summary about "CG Pipeline":
In CG Production, there will always be a stage where everything is "baked" prepared for (Final) Rendering. Asset and Rig are baked, Camera animation is baked, Shader is baked, Character animation is baked, VFX is baked, and so on.
BAKED DATA can be "final", but does not always mean final, meaning that artist can always go back and make edit, just in case there is an issue.
However having this BAKING STEP implementation allows for CHECKPOINT and VERSIONING before re-assembly. Definitely allows for flexibility for a lot of situations.
BAKING can sometimes expensive, especially for VFX simulations.
Ideally, the whole production is made inside "just one" software/tool that does every stage of production smoothly. For example, Blender is one tool with a complete and robust tools. Including compositing.
In typical film or game productions, many artists may use different tools: - MODELING: ZBrush, Mudbox, Sculptris, Blender - RIGGING: Maya, Houdini, Softimage - ANIMATION: Maya, Houdini, Softimage - VFX: Houdini, Maya, Softimage - RENDERING: Arnold, Renderman, VRay, Octane - COMPOSITING: Nuke, After Effects - VIDEO EDITING: Premiere
Blender, I believe, WILL eventually fit every stages to help artists. If not already.
What really important is usually the way we "BAKE" animation or "TRANSFER" data between tools, along the pipeline, to ensure smooth process.
Remember this: For any "procedural" workflow, at some point we need to bake.
WATCH OUT: Although baking of animation is nice, sometimes this is also not always possible. Sometimes Anim Curves need to be retained and re-applied to the RIG ASSET.
I believe current convention in CG industry is to use Alembic for baking mesh data. Sometimes we actually need to bake the Animation Curves into generic data that can be passed on between softwares. All this needs to be taken into consideration.
In the past, I have experienced in using Maya and Houdini as ASSEMBLY tools. Blender actually has this potential to be the assembly tools because of its open source and always available to use in any system.
But well, it's all back to the Studio Production Pipeline.
MDD CACHE FOR BAKING ANIMATION
MDD Cache, although old and may does not seem much, has a lot of potential and advantages. It is really simple to use too.
ALEMBIC is probably the next thing to look at, once Blender implemented it (!)
Anyways, MDD Cache allows DEFORMING MESH ANIMATION to be baked fully. By doing this, we are no longer dealing with hundred of animation curves (f-curvds) which is good!
NOTE: One note, althouth mesh caching is great for film animation, maybe not for Game Animation that requires joint, but there is always a way to "reverse engineer" MESH ANIMATION to JOINT ANIMATION.
ANIMATION NODES TO CONTROL MDD ANIMATION (*)
Ok, FINALLY .... we got to cover the actual topic on using Animation Nodes toolset for MDD Animation.
Above, I am trying to give us a background scenario of typical MDD usage to bake animation in pipeline. Beyond that, MDD can be used to create complex animation. For examples, maybe we want to: - Generate multiple VARIATIONS of animations - Create OFFSET ANIMATIONS for same rig - Have easier control over thousands of rigs (simple crowd system)
What I really want to cover here is one way we can think procedurally using nodes to offset animations :-)
Simple right? Well, apparently not that simple.
Although we already have "F-Curve Animation Offset" AN Template, that can help offset animation curves, but I believe it works only for a single object transformation, and that its function is simply to offset animation to INSTANCES (duplicate) of same object.
What if we have a rig with many controls? Do we need to deal with bunch of controls and f-curves and then re-apply it back into rig? Although this is probably possible, I think it's really too complicated for now.
That is why I am looking at MDD Cache for now.
Caching/baking animation really simplifies a lot of animation complexity. By baking, we don't have to deal with hundreds if not thousands of Animation Controls and Animation Curves and Attributes.
BLENDER ACTION BLOCKS AND NLA (Non Linear Animation) Blender has this function built in to turn animation curves into block of animations, and we can sort of arrange and edit animation like NLE Editor.
It might be handy for certain scenario but I honestly have very little experience with Blender NLE, animation block layering, etc. I think it can do what we are trying to do (offseting animation) using block of Animation Actions, but we will take it a little further and tackle the problem procedurally using animation nodes.
I am definitely more familiar with MANUAL ANIMATION and PROCEDURAL ANIMATION, and SEMI-PROCEDURAL ANIMATION is really my desire to achieve using Blender and Animation Nodes. It needs to be simple enough concept that animators can learn in technical level.
LET'S BEGIN...
We will use a simple rig to explain this concept. By understanding this example, you will learn further about LOOP and data GENERATOR of AN.
1 Rig and Multiple Controls You can use your own rig. Or download from Blend Swap. But basically you need a deforming mesh that you can export animation as MDD.
2 Export out MDD Activate MDD exporter from the User Preferences. Maybe it should always be ON by default, because Blender's MDD reader is always part of Blender Modifier feature. Anyway, "Save User Settings" if you like.
Then, you select the mesh that is deforming and then export the animation as MDD.
3 Use the MDD Cache Once you have the MDD, all you need is the "original mesh" duplicate or imported into the 3D scene, and apply Mesh Cache Modifier, read the MDD cache from disk, and to apply it to the mesh. Then you get the animation back.
The mesh needs to be identical to the mesh used for rigging and animation in term of vertex order. We will be using AN to "drive" the "Evaluation Frame", so I set it to "Custom".
WEIRD BUG: Sometimes after you save the Blend file, and re-opening, the path into the MDD might change, for example:
Wrong: (when opened back, was working...) //MDD_TEST/simple_single_surface_rig_001.mdd
Make sure you put the //../ dot dot.
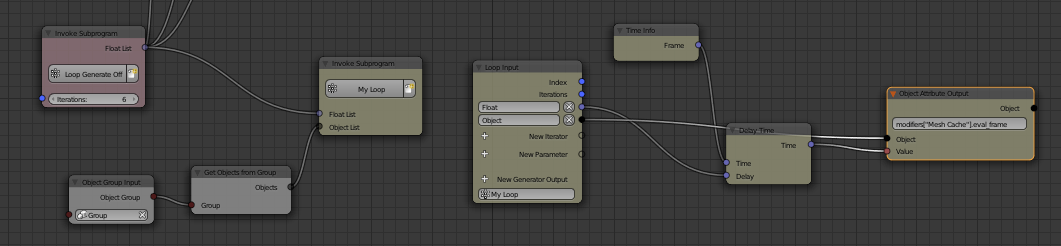
4 Offseting MDD Cache using AN Node This part is pretty straight forward and simple. You just need "Object Attribute Output" node that can directly drive any attribute of an object.
The DATA PATH here is: modifiers["Mesh Cache"].eval_frame.
At this stage, note that we can actually have MULTIPLE caches, different kind of objects ANIMATION. Later on below, when things get serious, you will see how we can orchestrate many objects using AN node LOOP.
5 Using Loop Node Now, this is the FUN part.
If we were to manually connect nodes for multiple object with MDD Cache, and create offset, we might have something like below:
Above is not wrong, in many software packages (such as Maya), this is actually what is happening under the hood. It's pretty crap, however easy to connect nodes to create offset using script, user will still end up with web crap of noodles and nodes. What if we have hundreds of objects? It will be a pain to connect.
You could write Python that randomize the "Object Attribute Output" node's attribute ("Delay" attribute, in this case), but still that is not efficient.
AN actually has a nice looping system that is pretty robust, yet pretty simple to understand.
How do reduce the connections above into a nice system? First, I look at which ATTRIBUTE that will have MULTIPLE values applied FOR EACH. In the way, AN Loop is similar to Houdini's "For Each" node conceptually.
Above we can see: - DELAY: will have different values per object. How many? As many as user wanted. - OBJECT: will have different input, whether the user supplied objects via "Group" node, or
So, I was first experimenting with generating the random values, this will be LIST of random values we can plug into DELAY attribute. It's a floating values.
LOOP in AN will do either of below: - To "do something" for each LIST of input - Generating LIST with certain number of iteration
6 Loop that generates LIST of OFFSET values
Above, you see, those network in light maroon color, is responsible to generate LIST of values for our OFFSET DELAY attribute.
7 Loop that take LIST of OFFSET and apply to MANY OBJECTS with MDD
I am plugging in the OUTPUT into another LOOP. The setup will then magically takes the generated offset value, and loop iterate it for X many objects we supply via "Group".
Don't you think it's such a revelations?
At this stage, you should already see things happening. You could Blender duplicates the mesh + mdd mesh cache modifier, and each one of this object will be controlled by our setup, each being offset slightly in random fashion.
This is a rather complex setup. Well, still a "simple" basic procedural magic example. But creating this any other way probably will not be as elegant.
HEY, CAN'T ONE JUST USE PYTHON?
SURELY, you can always make Python script that generate random values and apply it ONCE OFF to randomize the offset, and then create driver expressions that drive each "Evaluation Frame" of MDD objects so that we are getting the same effect.
However, this is one ideal situation when we set everything nicely, we have full control over the whole things. And more over, you could expand from this and make all kind of tweak and variations.
I WANT MORE... The setup can be more elegant and reusable if we maybe create an AN GROUP CONTAINER for our node. AN prodives this way of organization to reduce clutter of node noodles.
You might want to check AN Subprograms "Group". It's like a way to nodify node network and reduce it into a CUSTOM NODE container that takes INPUT(S) and spit out OUTPUT(S).
If you check some of the AN Templates, you will see this "Group" custom node is used quite often. At first, this might feel like an extra unnecessary step, but when our network grows over 100 nodes or perhaps we often use a certain node setup, this will become very helpful.
I like to really explore Splines using Animation Nodes (AN).
Splines aka Curves is often the odd one, the one that do not get much attention these days because the popularity of Polygon mesh. Luckily, I started 3D by learning about NURBS and Curves and Surfaces in Maya, so I kind of have an equal love between Curves and Polygons (!).
In Blender, Curves object is a special one (just like Text object or Metaballs). It's more than just a curve, it can "morph" into lots of other objects really quickly via Modifiers or other ways.
In order to really understand Curves, we need to look at it slowly and thoroughly.
The Simplest Curve...
.... is made of 2 Points.
I am using Sverchok point index viewer because as far as I know, Blender is not showing points in Object level, needs to go to Edit mode, but that's a hassle.
Two points will create a (straight) Line. Blender case, we need to care whether it is a Poly object or Bezier object.
"Spline from Points" node does the hard job, connecting the dots. But you may notice automatically created "Create List" node.
To be honest, I personally don't care about the naming, but I believe "Poly" curve is linear and always create straight lines. While Bezier is curvy.
Ok, next, when we have more than 2 points, we can start to have interesting shapes. And we can care whether it is "Cyclic" or NON "Cyclic".
Cyclic just means that the last point will make a close loop of the Curves (like a closed Circle), while Non-Cyclic means the curve is open, no connected lines between first points and last point.
Non Cyclic Curve
Cyclic Curve
Appending Point(s)
You can Append Point to Spline using that exact node like above. Soon you will realize that AN create these "Create List" node and "Get List Element" node quite often. A little confusing may be, even for me. But there might be a reason behind it, perhaps inside a single Curve object, we can have multiple Splines to create surface? Maybe. Something to keep in mind.
Anyways, we keep "Append Point" in mind, in case we like to extend a curve (?)
UPDATE CORRECTION FROM JACQUES:
You were right this Spline list is because a curve object in Blender can hold multiple splines. Nevertheless these extra get list element and create list node are redundant. You should manipulate the spline first and then create the list from it.
What you did there is: making a spline -> make a list with that spline -> take the spline out of the list -> append a point -> create the list again -> set the spline list on the curve object
Instead it should be:
making a spline -> append a point -> create the list -> set the spline list on the curve object
Random Vector Points Generators >>> Curve
Random Vector node can be used to generate random point positions, that feeds into the Curve.
Wiggle Points >>> Curve
Like wise, Wiggle Points node, special node that generate wiggly points over time, also can be fed to generate Curve.
Sometimes, in order to really understand what's happening, it's better to see in 2D what's really happening. So, let say we are looking through the Front camera, only Z is wiggling, Y is all zero, and X equals to "index" (0, 1, 2, 3, 4...) we can see more clearly the wiggly lines.
JACQUES: Use Wiggle Number node! Simpler! It exists!
Smoothing the Curve
Below you see node called "Smooth Bezier Spline" node that can help to create a smooth curve. Based on the Wiggly line above.
Make sure you set to "Bezier" for the Spline from Points.
Revolve Curves
Let's jump into another topic using Curves: to create DONUT shape by revolving Circle using another Circle.
Below is probably one of simplest example. It generates a Donut shape, but really depends on how you orient the 2 Curves.
TEMPLATE: Distribute Instances on Spline
There is a fun template you can try to instance many duplicates of X objects, along Curve. This is actually one feature that Blender does not have but made possible using AN because of the node setup and this is actually useful.
Animating Instances along Curve
Supposed we have a bunch of Torus along Circle curve.
Knowing that each one of duplicate instances are in order, we can use the Index to push and offset delay every instance.
NODE: Get Spline Samples
Using this node called "Get Spline Samples", similar to template above, we can place locate object directly along curve, and also know the orientation.
NODE: Spline From Edges
Another handy node is to generate Splines, that is based on Polygon Edges. This conversion from Mesh to Curve is LIVE, so if the mesh is changing, the curve is also changing.
Lofting Splines
If you ever loft a bunch of splines to create a mesh, the process can be less destructive this way.
Blender Polygon object is usually easier to work with, than Splines/Curves (I think) so sometimes maybe you want to do something like below where we have bunch of polygon edges, and we like to LOFT it into a surface.
There are plenty more topics we can talk about Splines, but that's probably enough for now. Save the rest for some other times.
If you are somewhat new to Blender and 3D, Mesh Edges and Spline Curves are two different things but each can be related to each other. Just like Vector and Point Positions, are two different data type, however can be used interchangeable sometimes.
And as always, knowing the fact that you suddenly have so many controls over many things can be overwhelming. If not careful, creating chaotic mesh is only a node away.