


 |
| Procedural Centipede in Blender. |
I am a little bit side-tracked, but I still want to think Pixar and procedural monster. I will focus on one character: Dean Hardscrabble.

UPDATE 2013.10.15:
Watch also this video:
http://youtu.be/kuAsOyzawNY
This lady here, according to Pixar Wikia, is based on creepy crawling insect, the Centipede:
"Dean Hardscrabble’s character was modeled after a type of centipede called Scolopendra Gigantea, also known as the Amazonian giant centipede."
http://pixar.wikia.com/Dean_Hardscrabble

MODELING CENTIPEDE PROCEDURALLY
I wonder which one is actually more "tricky" to create, maybe each one gives different challenges:- Procedural Insects
- Procedural Monster
- Procedural Human (Biped)
- Procedural Anime Character
- Procedural Human Heads
GREAT EXAMPLE: Procedural Spiders by Esther Zuidgeest - Houdini
http://www.youtube.com/watch?v=2b11iiBjS9Y
3D printed Octopod Robot:
http://www.youtube.com/watch?v=HfiHOpv6HtI
Let's look at Pixar's Dean Hardscrabble again. She is modeled quite "realistically" based on Centipede especially her lower part of body/torso and legs. While her face and wings, are more like Dragon. It is a very interesting in term of design. I do not 100% agree with the wings, but flying crawling creature is pretty "scary" monster, I guess.
http://www.youtube.com/watch?v=ySapzrgfImc
This character may seems simple, but she is certainly not "simple" when we really look at every details. This is what makes a Pixar: a simple character but complex shadings.
I guess we can focus on the Dean's CENTIPEDE's SPINE and LEGS parts for now...
CENTIPEDE SPINE AND LEGS
If we are to model such creature with many repeating legs in Blender, how would we do it?
There are many techniques that I could think of. Not just Skin Modifier, but many others as well.
Below are some of the list of Blender features that might be useful to model a Centipede SPINE AND LEGS:
- Skin Modifier
- Grease Pencil
- Curve Object
- Curve Modifier
- Array Modifier
- Joint Sketching
- Blender Particle Intancing
- Python + NumPy and MathPlotLib stuffs
- Dupliverts or Dupliframes or Dupliface
I actually found a lot of other interesting informations (that is not totally related to Centipede modeling) while observing this idea of modeling and creating a Centipede using Blender.
SKIN MODIFIER: VERTICE RADIUS AND PYTHON = SPINE PART
Yesterday, I have a bit of exploration of Skin Modifier but from Python context.
I am always curious with how we can access the "weight" of each point (vertex) of Skin Modifier via Python. You know, kind of like when we apply Skin Modifier to an edge, go to Edit Mode, and do Ctrl+A for some vertices to Scale the Radius size of each segment.
I did Google Search everywhere, and the only clue is this blog post:
It mentions about Skin Vertice and Radius.
Blender API reference on this Radius values:
I also asked the same question at Blender Stack Exchange, and thanks to answer by Dealga aka Zelffi (Blender Scripting guy), this became very clear:
What more interesting is that there is not actually 1 Value for Radius Weight Value for each vertex, but a set of 2 Values:
import bpy
# Get selected mesh with Skin Modifier applied
skin = bpy.context.active_object.data.skin_vertices[0].data
# Iterate every point/vertex and get/set the Radius
for i, v in enumerate(skin):
print ("vertex", i, v.radius[0], v.radius[1])
# Change the Radius Value for all vertices
v.radius[0] = v.radius[1] = 2.0
Give the code above a try to understand what I mean. The above code will do 2 main things:
1. Printing out the values of Vertex Radius (2 values)
2. Setting the radius of every vertex to certain value (if you like).
By default, apparently the Radius is set to (0.25, 0.25). Remember, there are 2 values for each vertex.
Now, do you know that we can constraint Blender Skin Modifier in one axis X or Y, apart from its ability to scale in both axis proportionally? All this time and I only found out about this feature today!
 |
| Flat Skin Modifier |
This means, we can create a FLAT MESH, instead of Boxy or Sausage like MESH (when subdivided). A BIG revelation!
This means, we can model Australian Boomerangs with a minimum of 2 Edges + Skin Modifier:
 |
| Australian Boomerang |
 |
| Modern plastic boomerang toy. |
We can also create all sorts of wooden Paper Airplanes:

3D printing Paper Airplanes? Why not. Unfortunately, I don't have 3D printer at the moment.
Anyways, it is really quite interesting that we can actually create "flat mesh" based on Skin Modifier.
MANUAL: Go to Edit Mode (TAB), select vertice(s), do the usual CTRL+A then constraint in X or Y axis, using Shift+X or Shift+Y to adjust the Radius.
INFO: This is a bit Similar to Blender Curve Object
The Skin Modifier ability to have 2 x Radius is equivalent to Blender Curve Object, in its ability to set Feather Radius that will affect the Extrude property.
Curve Object also has special Tilt attribute for each point and this is not built in inside Skin Modifier.
 |
| Procedural Drill using Curve Object ONLY by adjusting the Tilt. |
import bpy
# Make Tilting Curve Spiral based on Curve
# you need to select NURBS object first
curve = bpy.context.active_object.data
# get points
points = curve.splines[0].points
for i, point in enumerate(points):
# tilt X degree of every points of curve
point.tilt = i * 2 # 2 degree tilt
However, I am guessing that we can always use Armature Skinning and Twisting. We probably can try that at some point in the future.
BACK TO CENTIPEDE PROCEDURAL MODELING...
I like the Skin Modifier solution, because it is very robust. Of course, Skin Modifier is only the base model, but it can be easily repeated and adjustable along the way before we commit to any parts of the Centipede.
One QUIRKY thing about Skin Modifier, in relation to the original Edge is that we don't always get Vertex Indices that is in order. Unless you create the Edge properly.
This is quite strange for me at first. I found this quirk when I try to create CONE Tentacle like object using Skin Modifier and Python.
You can check Vertex Index in two ways:
1. Using Python in Edit Mode
2. Using Blender App Debug mode
Activate debug mode:
bpy.app.debug = True
Go to Edit Mode and select Vertices with Indices option checked.

My tips when modeling Edges for Skin Modifier is like this:
1. Start with Cube or other mesh.
2. Go to Edit Mode, merge At Center. So you have a single Vertex now.
3. Instead of Extruding, use CTRL + Click, Click, Click method instead.
Why? The reason is the Vertex Index Order will be different. The one with CTRL+Click, Click, Click method will guarantee to have a nice sorted index from 0 (beginning) to end number.
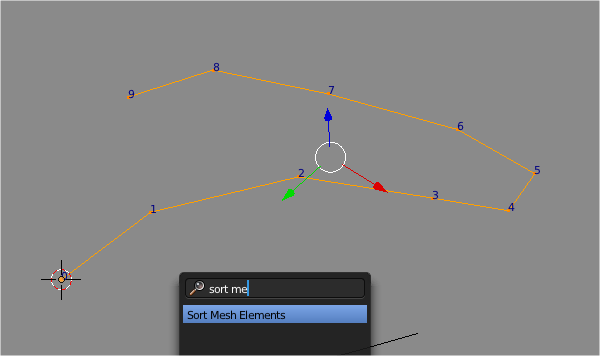
Of course you can always sort the mesh using Sort Mesh Elements operator, but it is always better to do it right the first time. So remember to use CTRL+Click, Click, Click method when you are creating edges for Skin Modifier. I know, it is tempting to just extrude.
UPDATE 2013.07.10 Correction: Ctrl+Click,Click,Click and Extrude Vertex give no different.
Regarding the CTRL+Click,Click,Click method OR Extrude Vertex, both will actually give same result. Let say you start with a single vertex. When you extrude you get 2 vertices with index 0 and 1. If you continue to extrude right away, you will get Vertex Order Index List like below:
0,1 (original edge)
0,2,1
0,2,3,1
0,2,3,4,1
0,2,3,4,5,1
0,2,3,4,5,6,1
You got the idea. The sorting is not right.
In order so that you have a nice ordering, you start with a single vertex in edit mode, extrude it once so you have an edge to start with. Then go out of Edit Mode to Object Mode. Jump back to Edit mode, now you can extrude from vertex index 1, and the index list is now properly sorted:
0,1
0,1,2
0,1,2,3
0,1,2,3,4
0,1,2,3,4,5
The advantage of having an edge with sorted vertex index is the ability to re-arrange mesh as you like.
 |
| Number Pattern to rearrange edge into any kind of curve you like. |
 |
| Number Pattern to re-arrange pre-existing Edge. |
Maybe one day, we can go deeper into low level Point Vertex and using Algorithm to arrange points using complex Math.
Having this information will ensure that later on when we use Python to modify the RADIUS of each Skin Vertice, everything will be as we expect it. Such as if we create a Tentacle kind of object, we want the radius to go from MIN to MAX value, and with vertex order correctly sorted, we can easily adjust the radius using Python.
Sorting matters can be complicated, if you want to read some, I think this blog post is related:
I think, in the future, when I have better grasp of Python, we can really Procedurally code the creation of Centipede.
BLENDER ARMATURE: Skeleton Sketching = SPINE PART
In my research on creating Procedural Centipede, I also encounter this super interesting Blender feature that easily overlooked: Skeleton Sketching.

This feature is also quite interesting and potentially useful in relation to modeling or rigging: Tentacle, Snake, Tail, or Centipede.
Remember my old talk about Curve Resampling or finding a way to place objects evenly in a Curve Path? Well, I think this Skeleton Sketching might actually be useful to do that.
We will keep this Skeleton Sketching for future usage.
DUPLIFACE/DUPLIVERT/DUPLIFRAME: Spine or Leg Part
DUPLIFACE/DUPLIVERT/DUPLIFRAME: Spine or Leg Part
These features of Blender is always kind of interesting and handy for a lot of reasons. Even for Centipede. You definitely want to study this feature on your own:
Pablo Lizardo creating Array of Rooftop Tiles:
http://www.youtube.com/watch?v=yso0RC9hqoI&feature=youtu.be
Pablo Lizardo creating Array of Rooftop Tiles:
http://www.youtube.com/watch?v=yso0RC9hqoI&feature=youtu.be
BLENDER GREASE PENCIL: Drawing Curve = SPINE PART
Grease Pencil is also potentially nice to draw Centipede Backbone/Spine. Always keep Grease Pencil handy for all situation. When we convert Grease Pencil to Curve, it will have nicely sorted index too.
MODIFIER: Array Modifier and Curve Modifier = LEG PART
The final key here is to use Array Modifier, Curve Modifier, and a Curve in order to duplicate legs of centipede along the Spine path.


The result:

Ok, now, we have pretty must the foundation of how to model Centipede Procedurally using Blender.
DETAILING AND FURTHER REFINEMENT
We are not finished, this is in fact, just only covering the base.
You can continue to refine the model by Sculpting, but I think with the Skin Modifier for the body, for example, we can probably first create Segmented lines using Python script.
For example, something like below:
ADJUST RADIUS FOR EVERY N VERTICES

import bpy
# Get selected mesh with Skin Modifier applied
skin = bpy.context.active_object.data.skin_vertices[0].data
# Iterate every point/vertex and get/set the Radius
for i, v in enumerate(skin):
print ("vertex", i, v.radius[0], v.radius[1])
# Change the Radius Value for all vertices
v.radius[0] = v.radius[1] = 0.5
# Change the Radius Value for every N vertices
if(i % 2):
v.radius[0] = v.radius[1] = 1

 |
| With Displace Modifier and Noise Texture. |
JOINING THE LEGS INTO EACH SEGMENTS OF SPINE
If we later want to JOIN every leg segment back into the body, we can also use Python scripting.This makes me think: maybe the whole thing can be scripted too? I bet it can. Normally for "procedural" stuff, where everything is repeated and can be solved by step by step procedure, things can be scripted.
Let say we do it another way. we firset created an Array of Edges that makes a pair of legs, then we connect the center point of every pair of legs using Python, that might possibly works as well.

RIGGING AND ANIMATING CENTIPEDE
Continue on, if we are to rig the Centipede for animation, we probably want to use Drivers to control the movement of the legs.
GAKKEN MECHAMO CENTIPEDE ROBOT
Post a Comment