


BACK TO BASIC
Today, I decided to properly write about some really super basic Blender topics to help people out there that really have no idea about 3D or 3D tool, but have a desire to use this open source 3D software called Blender. For example, if you are a photographer, you may be curious to use a Blender setup by Pat David:
http://blog.patdavid.net/2012/03/visualize-photography-lighting-setups.html
BLENDER = UNIVERSAL
I believe in universality of Blender and because this amazing tool is available to everyone as an open source tool, this only means no boundary in creativity on how you can use Blender!
There are 3D commercial packages used in the industry (Maya, Houdini, Softimage, 3DSMAX, Cinema4D, Modo, etc), but Blender stands as one of a kind being open source, developed by collaborations of developers and passionate artists.
Amazingly enough, the more you learn the ins and outs of Blender, the more you realize that Blender is somewhat as superior as commercial packages. For sure, commercial packages have some high end features, but don't be surprised if Blender actually have plenty of jaw dropping features.
Do you need expensive 3D software to create great feature film/animation? The answer is: NO. Blender already provides most of the tools.
What you need is the actual 3D skills, the visual eyes and mastery in:
- Modeling
- Sculpting
- Texturing
- Rigging
- Animation
- Lighting
- Rendering
- Cinematography
- Programming
The true power in everything is to collaborate and to build a team and work together on one project.
ZEN OF BLENDER
If Blender is a religion, I supposed Blender is equal to Zen Buddhism :] No kidding. You can achieve enlightenment, only by continuous training, practicing, meditating and self-reflecting.
 |
| It's like the Matrix, no? |
http://gamefromscratch.com/post/2012/04/20/Blender-BMesh-in-action%E2%80%A6-what%E2%80%99s-so-special-about-ngons-anyways.aspx
At this stage, Blender new Particle system (node-based) is also now starting to come to realization. Blender developers have been really busy in the past few years, continue to improve Blender slowly but surely. This is the 3D package that can be used in any operating system.
Is Blender difficult? Not at all. Just like any other 3D packages. You just need to go through the learning curve and actually try your hand on it. The "hard part" is usually in creating a good quality 3D works because it takes time to train yourself for it. As a tool, Blender is actually really practical.
User Interface of 3D package is everything. It needs to be intuitive, easy to adapt. Old Blender (version 2.49 and older) has very strange UI that I could not adapt, BUT the New Blender from version 2.5x up has really intuitive design.
At the very basic, you just need to know few Blender navigation method.
From personal observation, I could see that younger generation (age 10 and under, then age 10-20) can somewhat pick up Blender and 3D really easily. Age 20-30 is kind of the ripe age to pickup information. After 30+, it is all going to be self-learning adventure. But whatever your age group or your background, Blender will suit your needs.
So, like some great philosopher said, if you want to learn something: "Empty your bowl!". Learn things like you know nothing. Eventually all this "basics" will become your second nature just like when you learn driving, it feels difficult at first, but after a while it's easy.
Learning 3D is not for the faint hearted, be brave.
BASIC VIDEO TUTORIALS
There are some great video tutorials out there that teaches Blender basics, I will list them here:
http://www.blendtuts.com/2010/06/blender-25-interface.html
http://cgcookie.com/blender/get-started-with-blender/
http://processdiary.com/?p=821
BLENDER EBOOKS to get you started
UPDATE 2012.06.14: http://www.cdschools.org/Page/455
http://www.amazon.com/Complete-Guide-Blender-Graphics-Animation/dp/1466517034
http://www.blender3d.org/e-shop/product_info_n.php?products_id=134
http://blendercourse.com/English/blendercourse-basics-v2
BLENDER WIKI
Don't forget there is online Blender Wiki:
http://wiki.blender.org/
Blender Wiki is continuously being updated. You need to know that Blender version 2.5x up is totally different in term of workflow and user interface to Blender version 2.49 down. You want to always check the version of Blender you are working on and the related documentation.
THE ORIGINAL OUTLINE
This Blender basic article will be using the outline that Autodesk XSI Softimage has provided for beginner as below. I happened to be learning a bit of Softimage as well and I think this simple introduction (videos) shown on Softimage Help menu really helps me in getting started.
 |
| The 10 Basics Fundamental |
LETS LEARN BLENDER!
BLENDER USER INTERFACE (UI)

Blender is very Panel and Context, and keyboard hotkeys sensitive, where you place or hover your mouse is where you will apply a certain function or hotkey. For example:
- Hovering over a Channel/Attribute value allows you to COPY and PASTE those values
- Blender has a lot of hotkeys such as H = hide, P = start Game Engine (hit ESC to escape), X = delete (with confirmation dialog). Beginner might accidentally hit the hotkeys.
- When Copying and Pasting Text Code or Animation Keyframes, you need to place the mouse exactly where you want to paste it.
0. PANEL EDITOR
When you open Blender for the first time, you will see the default UI arrangement like below:

The default UI layout is showing you some of the most commonly used Panel Editor. Each of this Editor helps you to focus on specific attributes/parameter, while at the same time, each editor is also connected to each other to help your working on certain task.

On the default UI layout configuration you see 4 Panel Editor (RED OUTLINED):
A. 3D View (3D viewport where you work most of time)
B. Timeline (for animation)
C. Outliner (displays your scene as list of objects outline)
D. Properties (this panel is like the most useful in relation to what is happening on 3D view, you can adjust all kinds of parameters from this panel)
Here, you can also see that extra panel at the very top (BLUE OUTLINED), that is called Info Editor, that you usually think as Menu Bar. In fact, each panel has its own Menu Bar that specific to that Editor. Anyhow, this Info Editor panel is special and I quite like having this one up there at all time. I provides some useful information on what happening on screen.
Blender UI Panel is fully customizeable to your own liking so you can split the panels vertically, horizontally, and switch panel to any kind of editor you like just by clicking on the little icon on the left side of any Editor Menu Bar.
After using Blender for a while, I personally think that Blender UI is really one of the most beautiful and practical compared to any other 3D package.
All the MAIN editor panels available inside Blender: (there are few more SUB editor)

On the Info Editor (BLUE OUTLINE) menu bar, there is this dropdown menu (currently set to Default) that give you more recommended UI panel presets: (you can quickly jump into different UI panel configuration using CTRL + LEFT-RIGHT ARROW).

You can certainly add your own. For now, it is totally fine that you just simply work using the Default UI Panel Layout. Let's talk a little bit about each panel editor that is available on the Default UI. You can toggle maximize each editor by CTRL + UP/DOWN ARROW.
The 3D View

This is one panel editor that you will be using most of the time. It gives you the typical 3D viewport. In fact, for the rest of this post later, I will talk about how to navigate around this 3D view.
Now, you may think this 3D view looks a bit complicated. Yes and no, you will soon get used to it.
- Additional Left Panel = Tool Shelf (hotkey T) . This will give you some most used Tools and also often give you extra options for operation you are doing right at that very point.
- Additional Right Panel = Properties (hotkey N). This panel gives you lots of parameters that you can adjust in relation to that shown on 3D view.
- Menu Bar at the bottom = this is the actual 3D View Menu Bar. Feel free to look through each one of this menu. All kinds of hotkeys that you can perform is usually all accessible from the menu.
- The 3D View itself = by default when you open Blender, you will see some default objects already created for you: a Cube, a Lamp, a Camera, and that weird thing called 3D Cursor. The 3D view is set to Perspective View, but you can easily jump into different view (orthographic Top, Side, Front, or perhaps the Four-View).
UPDATE 2014.03.24
As for Blender 2.7 and up, we officially get this SIDE TABS inside the TOOL SHELF.
At first, I was really surprised and shocked by the decision to add this SIDE TABS. Because I think it adds extra clutter to the UI and I found that my eyes keep looking and focusing on the tab, which is annoying.
However, I guess there is a reason for this, I guess Blender will need a SHELF area that needs TAB of some sort. I am never a big fan of SIDE TAB for my own reasons, based on experience. SIDE TABS is always a bit difficult to read.
They have dimmed the SHELF TABS with darker color, but I still think it's a clutter and they need a way to HIDE the TAB. It should be an option.
I still don't like how the SHELF TAB is breaking down the OPERATOR area. Hiding the OPERATOR area will make the TAB feels more acceptable as part of the UI. However, it is still taking plenty of space on the side.
I tend to hide the TOOLSHELF using the Hotkey T, anyway. I try to live with it. We can take advantage of PINNING for the TOOLSHELF, that way, we kind of have our own CUSTOM SHELF.
Eventually, I think Blender TOOLSHELF will behave more like Maya or Houdini's SHELF. More easy to customize for our own custom commands.
I imagine the TOOLSHELF could also be just ICONS. Let say if we want to store POSES thumbnails or assets thumbnails to import or link from another place.
There are few Hotkeys you might want to use in relation to TOOLSHELF:
- F6 => bring the OPERATOR area. Try creating a cylinder and hit F6.
- W => is an interesting Hotkeys, in relation to the mode you are in.

Let's explore Blender further based on the outlines.
1. NAVIGATION
So you already know this panel editor called 3D View, in which you will be looking and working at most of the time. User Persp (Perspective) view is the default view.
Here are the basic hotkeys you will use to navigate this 3D view: (LMB = left mouse button, MMB = middle mouse button, RMB = right mouse button)
To navigate in the 3D viewport:
MMB drag = Orbit/Tumble
Shift + MMB drag = Pan
CTRL + MMB drag = Dolly Zoom in and out
Mouse Wheel = alternative Zoom in and out (Dolly)
CTRL + Mouse Wheel = horizontal pan
SHIFT + Mouse Wheel = vertical pan
ALT + Mouse Wheel = move forward or backward in timeline
To bring in objects:
If you want to add some object primitives into the 3D scene, simply SHIFT+A and select some objects from the available menu. Or you can always find some Blender files examples:
http://www.blendswap.com
The dusty NUMPAD Buttons: (usually you hardly use this part of keyboard, but Blender does utilize it well)

7, 1, 3 = jump to Top, Front, Right view.
CTRL + 7, 1, 3 = jump to Bottom, Back, Left view.
5 = toggle between Perspective and Ortographic View
2, 4, 6, 8 (the arrows) = to rotate around incrementally
0 = jump to active camera view
/ = solo view, allow you to just work on selected object, with all other objects hidden.
Del key = focus on selected object / center on selected object(s)
HOME = take you back to default home view / reset camera
CTRL+ALT+0 = set Active Camera to the current view
CTRL+0 = look through selected / make current selected camera as Active and jump to the view
To Save Selection
In Maya, Max, I think we can do save Quick Selection for future selection.
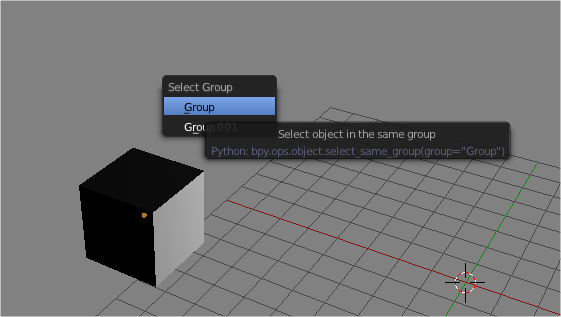
In Blender, one method I know is to use Gropuin. This is probably a quick hack to save selected objects, but you certainly can use the Group feature in Blender. So the steps goes like this:
1. Select some objects.
2. Group them (Ctrl+G), name the Group if you like.
3. Now, next time you want to select group, simply Shift+G and select the Group you like..
4. Group can overlap. Let say, Group A = object A, B, C. Group B = object A, C, D, E.


There is also Vertex Group if you want to save component for future selection. The Vertex Group is of course has other functions than just for selecting.
Anyhow, you can also quickly use Blender Python, write a little code that does this. There must be script around that does save selection in Blender.
Fly Mode
SHIFT+F will allow you to navigate in Fly mode like in a game. Use your mouse movement and AWSD.
NOTE: For Maya users out there, Blender can be set to use Maya Interaction model, but I really recommend you: to get use to Blender style of interaction because it will benefit you in the long run! For beginner Blender users, just follow the native Blender ways on navigating and you will be fine.
2. THE OUTLINER
The way to view your Blender project as a list. I personally only use The Outliner occasionally because I would do thing mostly on the 3D view, but this editor is actually quite useful to see the details of what is happening in the scene as a list of informations.
You can quickly setup so that an object is: Viewable, Selectable, Renderable. You can filter by name very easily here by using that search slot. You can even dig further to see the Datablocks from here.

3. SELECTION
Different way to select an object on 3D View. Selected object is highlighted with orange outline, last selected object is highlighted with yellow outline.

RMB = select an object
RMB drag = quick select and move an object
LMB = relocate your 3D Cursor in 3D space *

The 3D Cursor?
*NOTE: You may notice Blender reserved its Left Mouse Button (LMB) for something called "3D Cursor" While for normal object selecting, you have to use Right Mouse Button (RMB), instead of the typical LMB. For your typical RMB for Context Sensitive Menu, you use W instead.
Why you may ask? Apparently 3D Cursor plays an important role in manipulating objects in 3D space especially in relation to its Creation Location, Transform Pivot, Placement, and Snapping. I would typically snap objects using Pivot of 3D Cursor. You can do all kind of quick snapping by tapping Space and type: snap.... then select one of those.
Any new objects you created will be born at the location of 3D Cursor.
More on 3D Cursor:
http://blendersushi.blogspot.com.au/2011/07/ui-that-pesky-3d-cursor.html
SHIFT+RMB = Toggle Add Selection or Substract Selection
CTRL+LMB = Lasso Select
B = marquee select
C = paint select (press Esc or RMB after you select)
A = toggle select all / deselect all
4. PROPERTIES
Blender Properties Editor is probably one of the most exhaustive but also the most useful because it gives you access to many tools and many scene setups. It is advisable that you spend a bit of time here.
You see each icons on the top of panel? Each icon will take you to different subpanels properties, take a look at each properties:

All the tabs:
- Render
- Scene
- Object
- Object Constraints
- Object Modifiers
- Object Data
- Material
- Textures
- Particles
- Physics
Blender has some really awesome modifiers stack which you will eventually use. This Blender modifier stacking gives a little bit more "procedurality" to Blender. Meaning, you can apply and effect but you can delete them, re-stack them, adjust its value while you are working.
Lots of cool features are hiding here, some of my favourites:
- Displace --> use this modifier together with a texture to displace object based on its normal, you get real time effects.
- Multiresolution --> for sculpting purpose. Activate this and go to Sculpt Mode in 3D View.
- Solidify --> give thickness of your flat mesh.
- Mirror --> mirror your mesh
- Subdivision Surface --> allow you to subdivide and smooth at render time or while working
- Array --> copies of your objects

5. MANIPULATION
The idea is, for every object in 3D viewport, you can easily select using RMB (right mouse button) click and then you move (translate) around, rotate around, or scale as you please. Use different Perspective (tumble your view) or Top, Front, Side view to locate the object exactly where you want to.
 |
| If you prefer to work with Manipulator Transform or the Gizmo, simply activate it by clicking on that little icon buttons pointed by the arrow. That buttons show you the move, rotate, and scale manipulators on 3D view. |
G = grab and move tool (translate)
S = scale tools
R = rotate tool, rotate object in 3D viewport plane clock or counterclockwise.
R, R = rotate in all 360
X/Del = delete selected object
To Translate/Rotate/Scale in certain axis, you type X, Y, Z, right after you tap G, S, R. You could also click MMB in direction to get you to constraint in one axis. You can then type some number to give the exact value of transformation you like to apply.
For example:
- tap G, X will constraint along global X axis.
- tap R, X, and then type 90 will rotate 90 degree in X axis.
- tap S, Z, and then a number like 2 will scale 2 x size in Z axis
Even cooler hotkeys is Shift+X, Shift+Y, Shift+Z, which enables you to Move, Scale, Rotate constrained to 2 axis.
For example:
- tap S, Shift+X, means you will scale in both Y and Z axis.
TAP SPACEBAR FOR QUICK SEARCH OF MANY COMMANDS
Spacebar = quick access to many of commands in Blender by typing the command. Kind of like Spotlight (Mac) or Everything Search Engine (PC) within Blender to call commands or do certain things. Super handy.
See also Dynamic Spacebar Menu Add-On (comes with Blender, you just need to activate it from Preferences) that gives you a lot more handy access to almost all Blender tools within a single tap and few letter of keyboard typing:
 |
| Awesome Dynamic Spacebar Menu, which is also Context Sensitive, depending on what you are working on. |
W = context sensitive special menu
F6 = bring some tool option into popup
Shift+A = Add objects into scene
Shift+D = Duplicate selected object(s)
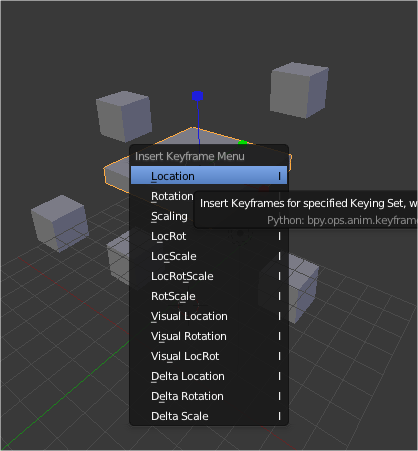
6. KEYFRAMING
Keyframing is something you perform in relation to animation in Blender, where you set keyframe on certain attribute/parameter and then Blender will interpolate the value.
The most useful hotkey button for this is I keyboard button. It will give you a quick pop-up list of some most keyed attributes (transforms, etc).
Almost everything can be keyed in Blender.
You will also be looking at the Timeline where you will see keyframes, able to playback, scrub, turn on Autokey, etc.
The animation workflow is outside the scope of this basic foundation article. I may discuss about animation and application of animation principles at some other time.
Anyhow, feel free to read:
http://wiki.blender.org/index.php/Doc:2.4/Tutorials/Animation/BSoD/Principles_of_Animation/InBlender/Squash_and_Stretch

The real power of Blender animation can be revealed only if you work using the animated editor, Blender gives you all the typical animation editor: Graph Editor, Dope Sheet, Action Editor, Drivers, NLA Editor, etc. There are plenty animation tools and quite robust. Everything you need to do animations.
Inside Graph Editor or Dope Sheet:
Many general shortcuts or hotkeys function the same here inside Animation Editor, such as:
A to select all keyframes
RMB = select keyframe
B = box select kefyrame(s)
G = grab and move keyframe
S = scale keyframe
Other useful hotkeys:
R = change Keyframe type (normal keyframe, breakdown, etc)
T = to set and change Keyframe Interpolation (Constant (Hold) Linear, Bezier)
Anywhere in Blender, the directional Arrow is related to animation
U = next keyframe
D = prev keyframe
L = prev frame
R = next frame
There are some more Blender tools and add-ons specially made for Animation, but basically Blender provides all the basic common 3D CG animation tools.

7. VIEWPORTS
What you see on the 3D view is your viewports. There are many ways to view the shading of objects in 3D view. You can view it as wireframe, shaded, textured, or rendered (live GPU render using Blender Cycles render engine). Of course there is also the Render View (bring to front with F11).
F12 will "render you scene from active camera". So make sure you set your camera first. Pressing 0 (zero) on the Numpad will let you jump to the camera view. From here if you want to tumble, dolly, pan like in 3D viewport, you may want to activate the Lock Camera To View.

You can switch between different shading by choosing one of the Viewport Shading:
 |
| To use real time rendering, activate Blender Cycles from top heading bar. |
8. MATERIALS
Now, we will probably won't be going too deep with materials inside Blender. But I will just mention few things. Blender comes with 3 different rendering engine (as I know of):
1. Blender Internal Renderer (the original renderer)
2. Blender Cycles (the new real time GPU based renderer)
3. Blender real time Game Engine (to test this, just press P to see in Game environment and escape)
So Blender Material itself will relate to each Blender Render Engine. And you can choose whether you want to work in a panel mode (Material Properties Editor) like below:

Or in Blender node based material creation:

Blender Material and Renderer are quite unique in itself and the resulting render is quite standard, even beyond what people may think.
9. COMPONENTS
When talking about components, that means we are looking into objects components For polygon: vertex, edge, face. For Curve: points/control vertex and surface.
To go into component level, you just hit TAB on the 3D view while selecting a polygon object for example. TAB is basically the toggle to let you jump from Object level to Components level.

You can work on vertex, edge, or face just the way you transform objects with G (grab), R (rotate), S (scale). You can use Soft Modification if you turn on the Proportional Editing (transform with fades).
10. COMPOSITING
Blender has a built in Compositing network editor that is really quite powerful as it is.

If you want to get into Blender compositing, the best tutorial I know is from Sebastian Koenig at CMIVFX:
http://www.cmivfx.com/tutorials/view/255/Blender+3D+Compositing
Or from Blender Guru, Andrew Price:
http://www.blenderguru.com/videos/introduction-to-the-compositor
MORE BLENDER FEATURES
- Powerful BGE (Blender Game Engine) and Game Logic to create game
- Blender Add-Ons
Blender has many artists/developers contributing their scripts and add-ons (like plugins). This is also something I found Blender to be good at. The add-ons are easy to install and uninstall. All you need to do is to go to File - User Preferences and find the Addons menu in there:
 |
| Some addons already come together with Blender, but probably not yet activated. You can also download other addons available online. Even better, if you can script, you can create your own addons. |
- Powerful Python Scripting
 |
| Python Console, Blender System Console, Feedback of Commands, Scripting Text Panel, it's all provided for you. |
- Great dynamics, particles, and physics: Smoke, Fluid, Dynamic Paint, Bullet
- 3D Paint and Projection Mapping
- Video and Audio Editing
- 3D and 2D Camera Tracking
- Multiresolution Sculpting (like ZBrush and Mudbox)

In combo with other package, like Unity for creating game, or even in combination with 3D Commercial Package, Blender is really powerful. Your ultimate secret tool.
BLENDER FUTURE POTENTIAL
- 3D Printing
- Augmented Reality / 3D Interactive
- Game Creation Production
- Film, movies, animation.
- VFX
- Experimental (Kinect, ect)
- Virtual Photography Studio
- Motion graphics works
- Graphic Designer's 3D toolsets
Example use of Blender for Photographers:
PAT DAVID'S VIRTUAL STUDIO
Thanks to Patrick, you have this great setup for Human Lighting inside Blender which allows you to preview and setup lighting similar to how you would set it up in the studio.Download the original setup here in which you use Blender Internal Render to get the resulting render:
http://blog.patdavid.net/2012/03/visualize-photography-lighting-setups.html
I like the way Pat set this scene, well thought on everything, including the layout of camera and lights.
Below is my modification so that it works using Blender Cycles (real time GPU render):
https://docs.google.com/open?id=0B0ogUwJ-NEFgRGlCR25uWW1RczA
For photographers brave enough trying their hand on Pat's human lighting setup in Blender, I will give you few pointers on how to navigate around the Cycles version (I just reupload the Blend file)

- LAYOUT: On the left side is your Active Camera View, already set and constrained to always pointing at the CG human model. On the right side, those are your orthographic view (TOP and SIDE) so you can easily move around the camera and lighting from that angle.
- NAVIGATION: First of all, navigating around the 3D View and panel. Scroll wheel up and down will give you zoom in and out. SHIFT+MMB drag will give you pan.
- If you ever accidentally goes outside of this view (maybe you click drag Middle Mouse Button), don't worry, you can quickly go back by pressing Numpad 0 (back to camera view), Numpad 9 (back to Side View), and Numpad 7 (back to Top view). If you accidentally press P, it goes into Game Mode, just press Escape.
- MANIPULATION: You can select and move around objects by RMB click on object then, G for grabbing and translating. You don't really need to rotate because it has been set so that you can only translate the object in certain way.
- VIEW RENDER: You can view the scene in Real Time GPU rendering by changing the Viewport Shading to Rendered. Make sure that you setup Blender to render using Cycles and GPU renderer is active, it will render really fast.
 |
| Switch Viewport Shading to Rendered to get live rendering. You need to make sure you are using Blender Cycles. |
- I included HDRI World setup so you can plugins any 360 panorama photos and get the approximate environment lighting. Photos taken using mobile phone will works as well, for certain extent. You need to further do Compositing works to adjust the actual background.

 |
| 3D model being lit by the image background. |
- You might want to switch OFF the Area Light (the plane) when you are in HDRI mode. Simply turn of the Light Material to ZERO.

- Add extra light if you want by selecting the "plane" area light and SHIFT+D. A new light will be created. You can delete the light if you don't want it anymore. You can "scale" the area light plane, which means you are increasing or decreasing the light area. If you wan to adjust the distance of the camera, do it from Constraints menu.
- Try adding different kind of lights and adjust the shadow as well, read documentation on Blender lights. You could in fact create all kinds of Studio Lighting Setup, even a really sophisticated one.
- You can play with Camera Focal Length and DOF (Depth Of Field) and see the result in realtime if Cycles GPU render is active, it might be tricky to get the blur just right because of the Blender Cycles camera unit scale. If you create an Empty in the scene (some kind of locator in 3D space), you can use this object as reference focus that you can specify.
 |
| Camera Properties to adjust Focal Length, Perspective, Depth of Field (DOF). Increase Aperture size big a little number to get that bokeh. |
- Try using different 3D models (check Blendswaps for open source Blends model) or model your own 3D objects, but that is beyond the scope of this post. Everything takes time, you don't just pick up camera and become a photographer.
 |
| Mazinga Model by GAMERA http://www.blendswap.com/blends/sci-fi/mazinga/ |
 |
| Hatsune Miku Model by KIO http://www.blendernation.com/2008/12/17/hatsune-miku-rigged-blender-character-available/ |
From the day I picked up on Blender version 2.5x (it was not long ago) until today, it has been quite a journey. There was really no one to guide me back then so I rely on whatever documentation available online. Eventually, I met many Blender artists (online) along the way that help me get to this level of confident with the tool.
So, for beginner Blender users, don't be afraid, Blender is just like any other tools, just a lot more robust. It is up to you how much you like to explore.
Myself is still a Blender newbie because I have only learning and experiments with things, I have not used it much in real productions. But I guess from today, I will try to use Blender into real world productions. I wanted to make my own indy animation projects small or big. Hopefully also I could meet the right people to work together.
Just ask me any Blender questions that you may have, I am happy to help you. If I can't answer, Blender Artist Forum is the place you want to post questions.
ADDITIONAL NOTES 2012.10.12
Custom UI Color
How to change Blender 3D Scene View Background Color?
It is all under Windows Background, inside User Preferences.

Same process works for Compositing background, for example.

Post a Comment