Earlier today, I wrote an article for my Maya Spiral blog. Basically the article was written based on an idea that was done using Softimage ICE, a way to create some kind of layout workflow, where you are basically setting up proxy 3D geometry, and then to replace the proxy with the real geometry:
http://mayaspiral.blogspot.com.au/2012/04/trick-bounding-box-replace-objects.html
I am not going to write all over the whole procedure, but basically if I were to do that in Blender, I would do it like below.
BOUNDING BOX OF AN OBJECT
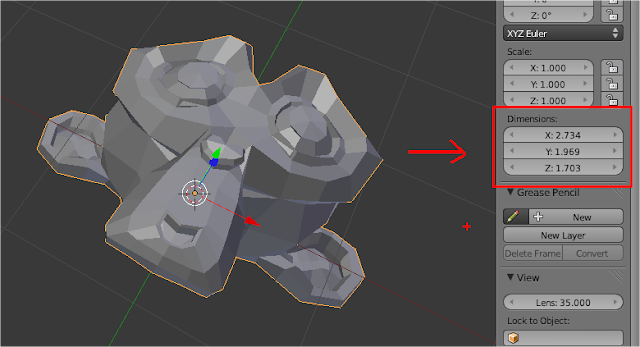
How do we get the bounding box of an object in Blender? If we were to look around, there must be a script that does this. Anyhow, I think we can just use Blender built in "Dimensions" information.
With that dimensions information, we can simply hover on it, copy the value, and paste it into a Cube object.
INSTANCE COPY REPLACEMENT
Once you got a Cube that is more or less the representation of bounding box of the original object, simple Apply Transform (CTRL+A) and choose Scale, to freeze the transformation.
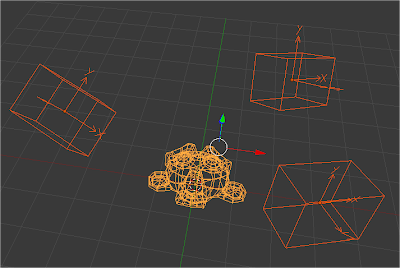
This object can now function as the dummy proxy objects where you want to create Instance Objects. Let's give this a try, just spawn and randomly place the proxy bounding box:
Now, if you want to replace the bounding box proxies with the original object as Instance, you simply select all the proxy objects, and lastly select the actual geometry and then do CTRL+L (link) and select Object Data. Magically your proxy is now become an Instance Copy of the original geometry:
Another way to do this, you can also simply use the dropdown box slot inside Object Data Panel.
MAKE INSTANCE REAL
If you ever want to turn Instance Copy into a real individual object, you simply tap Space, and select Make Single User (U is the hotkey), and check Object Data option box available on the left hand corner under Object Tools menu.
So you can see how Blender interestingly handle data like this.
REAL WORLD APPLICATION
Let's apply this to the scene I created in Maya:
So, we already have the layout setup. Now, we need a way to select object with Same Material (Color), how do you do this in Blender? Shift+L gives you the options to do so.
Now that we have the proxies selected, simply replace them by selecting the actual object, and CTRL+L again to link the Object Data. Do this for all your Proxy and replace them with the real object.
There you have it, hopefully this simple post is useful. Remember how I always say the Blender Particles can be really useful when instancing many geometry on the fly.
Can't wait till Blender Particles Node System become more solid!


Post a Comment