


 |
| Thanks to Python and Blender, orchestrating and flipping many cards is a breeze. |
While exploring and researching on NLA (Non Linear Animation) in Blender — which will actually be my next article topic — I stumbled on my old post on Flipping Card animation:
http://blendersushi.blogspot.com.au/2012/02/vfx-multilayers-triggering-of-effects.html
In the past, the setup of Flipping Cards thing was done manually.
Now, since we have a bit of knowledge of Python, I think we could improve the workflow of Flipping Cards and take it further.
FLIPPING CARDS CASE STUDY
This effect of Flipping Cards is actually a really good and fun exercise in thinking about Python programming, Blender and technical animation because it provides multiple layers of interesting problems that can and should be tackled using Python and some motion graphics thinking:1. Many objects needs to be animated or orchestrated in a certain way.
2. Need a simple control.
3. It needs to be robust enough to give variations of flipping cards.
4. The texturing of both side of cards.
From my old article, we know that the trick here is to use these features in Blender:
- Transformation Constraint
- Vertex Groups
- Displace Modifier
- Dynamic Paint
We will use the same techniques, but with additional enhancement. We want to put all of them together in a nicest possible way.
PROBLEM 001: Placing Cards in a Grid
How to easily create multiple Cards in a grid?
There are many ways to do this in Blender, but the simplest way is to use Grid object.

You can also use:
- Blender Particle Instancer to duplicate and place objects in grid
- Using Python to create row and column of objects
IMPORTANT UPDATE 20130514:
SPECIAL PROBLEM: The Sorting of Cards (or Mesh Faces)This is something that I just found out, but VERY IMPORTANT. Please read.
While going through all the process again, I figure out that the Sorting of Face Index is very important.
By default Blender Grid Face Index is NOT in Order.

You can see what I mean by going to Edit Mode, and back to Object mode and run the script below:
import bpy
'''
Check Active Face Index
'''
object = bpy.context.active_object
faces = object.data.polygons
#for face in faces:
# print(face.select)
for i in range(len(faces)):
#print(i, faces[i].select)
if (faces[i].select == True):
print(i)
You can also use Bartious Script to display the Index of Mesh Components:
https://sites.google.com/site/bartiuscrouch/scripts/index_visualizer_25
Although, unfortunately, above script is no longer existed somewhat but this forum leads to...
http://blenderartists.org/forum/showthread.php?180683-Index-Visualiser-for-Blender-2-5/page3
Although, unfortunately, above script is no longer existed somewhat but this forum leads to...
http://blenderartists.org/forum/showthread.php?180683-Index-Visualiser-for-Blender-2-5/page3
...an information that we can actually activate DEBUG mode that allows us to check Index (Indices) of Components:
bpy.app.debug = TrueBy activating that DEBUG via Python Consode, Blender can actually display Face and Vertex Index in Edit Mode by default. Which is neat, I only figure it out today.
While doing this below will give you a lot more informations that will give feedback for every bpy.ops you do on windows console:
bpy.app.debug_wm = True
Anyways, you must the Face Indices to have everything works correctly. You need to do this more importantly on the Grid of Cards.
 |
| A better and sorted, but still not 100% correct. Read below. The most correct sorting that will work with my script will have the number goes from 0 at top right corner and going down, and then continue on to the left. |
Below is few methods to sort the card grid.
SOLUTION ONE:
Do Mesh Sorting before you continue with all the steps below.
When you are in Edit Mode, notice that you can select all Component, tap on Spacebar, and run "Sort Mesh Elements" function.
This does not always work the way you want it, so try multiple time from different 3D View angle, play around with the option from the Tool Bar (left side), eventually you get the right sorting.
This is key to make your mesh properly sorted.
The MOST correct sorting is like below:
SOLUTION TWO: Use Houdini

Houdini is probably the best package out there to handle Component Level, simply by connecting nodes. It has this Sort SOP node that does the job.
Blender's own Component Sorting function does not always work properly, I tried many times. But occasionally you get it right.
Use Houdini instead. It allows you to import and export OBJ and sort the component easily.
This does not always work the way you want it, so try multiple time from different 3D View angle, play around with the option from the Tool Bar (left side), eventually you get the right sorting.
This is key to make your mesh properly sorted.
The MOST correct sorting is like below:
 |
| This is really the MOST CORRECT and guarantee to work nicely with the Template object. |
SOLUTION TWO: Use Houdini

Houdini is probably the best package out there to handle Component Level, simply by connecting nodes. It has this Sort SOP node that does the job.
Blender's own Component Sorting function does not always work properly, I tried many times. But occasionally you get it right.
Use Houdini instead. It allows you to import and export OBJ and sort the component easily.
SOLUTION THREE: Create the Grid by using Particles
Create the Grid of Cards using Particle and Instance on every Vertex. This way, you actually will end up with a correct face ordered TEMPLATE + GRID.If you are still confused, feel free to leave comments below.
MY POINT IS:
Basically, the Face Indices of the Grid of Cards and Template object MUST be in order for you to get the proper Flip Card Effects.
Basically, the Face Indices of the Grid of Cards and Template object MUST be in order for you to get the proper Flip Card Effects.
PROBLEM 002: Separate Each Face
From the Grid object, we want to turn every face into row and column of cards. In Blender terminology, we like to simply separate every face component of the mesh.
How do we go about doing this in Blender?
- Mark (Edge) Sharp
- Edge Split Modifier
Go to Component Mode of your Grid (hit Tab), select all Edges (or Faces) and Mark Sharp.

Back to Object Mode (toggle by hitting Tab again), and Apply Edge Split Modifier.

Make sure you click on "Apply" button to confirm the modifier. Default setting is fine.
You can check now that each faces have been separated.

PROBLEM 003: Object Level Control for Every Face
In Blender, we know that there is a handy tool called Hook that is able to give the user Control over Component (Vertex, Edge, Face) in Object Mode.
That is exactly what we will use in here.
To give this a try, go to Edit Mode, select a Face, and CTRL+H to setup a Hook.

Now, back in Object Mode, you will see an Empty that controls the Face (you can do all kind of transformation, translate, rotate, scale):

For our purpose, we need to do this for every Face, here Python comes to the rescue.
BLENDER SUSHI SCRIPT: Hook Every Face of Mesh
## HOOK EVERY FACE OF MESH

import bpy

"""
Hook every selected Faces. This works best for object
with all faces separated.

Copyright (c) 2013 Jimmy Gunawan at Blender Sushi Blog
Name: hookEveryFace.py
Version: 001
Author: Jimmy Gunawan
Contact: blendersushi@gmail.com
Date Created: 2013.05.12

How to use the script:
    1. Select object which every face will be booked
    2. Run the script

"""

# Get current active object
object = bpy.context.active_object
object_name = object.name
print(object_name)


# Get all faces
faces = bpy.context.active_object.data.polygons

# This is less Pythonic but works.

for i in range(len(faces)):

    # Deselect Everything in Edit Mode
    bpy.ops.object.mode_set(mode = 'EDIT')
    bpy.ops.mesh.select_all(action = 'DESELECT')
    bpy.ops.object.mode_set(mode = 'OBJECT')

    # Select a face
    bpy.context.active_object.data.polygons[i].select = True

    # Hook face to new object
    bpy.ops.object.mode_set(mode = 'EDIT')
    bpy.ops.object.hook_add_newob()

    # Reselect original object
    bpy.context.scene.objects.active = bpy.data.objects[object_name]


# Deselect everything in Edit Mode
bpy.ops.object.mode_set(mode = 'EDIT')
bpy.ops.mesh.select_all(action = 'DESELECT')
bpy.ops.object.mode_set(mode = 'OBJECT')

"""

# More Pythonic, but failed to work, I do not know why

for face in faces:

    # Deselect Everything in Edit Mode
    bpy.ops.object.mode_set(mode = 'EDIT')
    bpy.ops.mesh.select_all(action = 'DESELECT')
    bpy.ops.object.mode_set(mode = 'OBJECT')

    # Select a face
    face.select = True

    # Hook face to new object
    bpy.ops.object.mode_set(mode = 'EDIT')
    bpy.ops.object.hook_add_newob()

    # Reselect original object
    bpy.context.scene.objects.active = bpy.data.objects[object_name]

    face.select = False

"""
Use the script above to set Hook on every face.

PROBLEM 004: Simple Control for Flipping of Many Objects
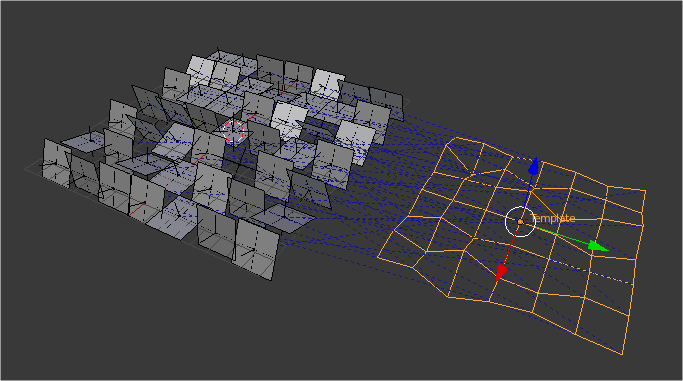
This is probably the trickiest part. However, we already know the solution from previous post: Vertex Group of another object can be referenced by Transformation Constraint.
What do we need? Another Object that will act as our Flip Cards Controller, let's name it "Template".
In our case, our Control Object is quite special, in which we will create Vertex Group for every Vertex of that mesh, this will be referenced by our Card Grid Objects via Transformation Constraint.
The "Template" Object
If we have 12 x 12 grid, our Template Object just need to be 11 x 11 grid, so that the Vertex Total Number will match to the number of Card Grids (Total Number of Faces).
Let's just create Grid with 1 less number in row and column, and name it "Template" object.

I made the "Template" object Display as Wire and to display All Edges.
Next, we need to assign Vertex Group for every Vertex of our Template object. For this, we also use Python script:
BLENDER SUSHI SCRIPT: Vertex Group Every Vertex
## Vertex Group Every Vertex


import bpy


'''

Assigning each and every vertex of a mesh into own Vertex Group

'''


# Specify Object to Create Group
obj = bpy.context.scene.objects.active

# Make Specified Object Active
# bpy.context.scene.objects.active = obj

# Accessing Vertex Groups Data
# obj.vertex_groups

# Get total vertex number
total_vertices = len (obj.data.vertices)

# Create Vertex Group based on total vertex number
for i in range(total_vertices):
    vg = obj.vertex_groups.new(name='groupy.%03d' % i)

    # Assign each Vertex to Vertex Group
    vg.add([i], 1, "ADD") # index, weight, operation


# http://www.blender.org/forum/viewtopic.php?t=25776&sid=a7610ca4988d2ad669308cc517d104c9

Select the "Template" object, and run the script, you should then end up with Vertex Group (VG) for every vertex of the "Template" mesh.
With my rough script above, I use a hardcoded name for the Vertex Group called "groupy.###", you can change this if you like.
PROBLEM 005: Power of many Transformation Constraint
Now that we have the "Template" Control ready, we simply need to connect it to our Flip Cards object.
Transformation Constraint is the man for this job and we need many Transformation Constraints, each for every Card and we tell Blender to reference Vertex Groups of "Template".
Transformation Constraint is interesting because it has plenty of options to set whether we like to: Translate, Rotate, or Scale the constrained object.
With our purpose we want it to Flip (Rotate) the constrained object, based on reference. As shown in my previous post, the setup for flip rotation using Transformation Constraint is like below:
 |
| FLIP EFFECT |
I hard-coded the Python script below that will create multiple Transformation Constraints for our Flip Cards object that references the Vertex Groups of "Template" object, which will give the Flipping effect.
Watch this Transformation Constraint carefully and modify the script as you need.
If you setting up the Transformation Constraint like this, you get the Scale and Reveal kind of effect:
 |
| SCALE AND REVEAL EFFECT |
The script below will give you Flip Effect in certain axis direction. Feel free to modify some of the number below to give you other kind of effects:
BLENDER SUSHI SCRIPT: Add Transformation Constraint to Selected Objects
import bpy

'''
Add Transformation Constraint for every selected objects
'''


objs = bpy.context.selected_objects

# Need a way to sort dictionary/reference via name
# I do a quick hack in here
# http://blenderartists.org/forum/showthread.php?194818-Python-Sort-Problem

newList = []

for num, obj in enumerate(objs):
    print (num,obj)
    newList.append(obj.name)

newList.sort()
#print(newList)

newObjs = []

for item in newList:
    newObjs.append(bpy.data.objects[item])

#print(newObjs)


for num, obj in enumerate(newObjs):

    # Make each object Active one at a time
    bpy.context.scene.objects.active = obj

    # Assign Transformation Constraints
    bpy.ops.object.constraint_add(type='TRANSFORM')

    current_constraint = bpy.context.object.constraints["Transformation"]

    # Assign Target Object
    current_constraint.target = bpy.data.objects["Template"]

    # Assign Vertex Group Target
    current_constraint.subtarget = "groupy.%03d" % num


    # Setup Attributes for Flip Effects
    current_constraint.from_max_z = 1
    current_constraint.map_to_y_from = 'Z'
    current_constraint.map_to = 'ROTATION'
    current_constraint.to_max_y = 180
    current_constraint.target_space = 'LOCAL'
We want to apply the script above to every EMPTY that is in fact controlling each Face of Flip Card.
You can Box Select every EMPTY objects, but you can also use Python script that I made to select all objects named "Empty*":
### HARD CODED SCRIPT TO QUICKLY SELECT EVERY EMPTY
import bpy
import fnmatch
# Get All Meshes Objects
objects = bpy.data.objects
## LIST COMPREHENSION STYLE
myListX = fnmatch.filter( [objects [i].name for i in range(len(objects ))] , 'Empty*')
for item in myListX:
bpy.data.objects[item].select = True
### HARD CODED SCRIPT TO QUICKLY MODIFY CONSTRAINT MODIFIER
import bpy
'''
Modify Transformation Constraint for every selected object
'''
objs = bpy.context.selected_objects
for num, obj in enumerate(objs):
# Make each object Active one at a time
bpy.context.scene.objects.active = obj
current_constraint = bpy.context.object.constraints["Transformation"]
# Setup Attributes for Scale Reveal
current_constraint.from_max_z = 1
current_constraint.map_to_x_from = 'Z'
current_constraint.map_to_y_from = 'Z'
current_constraint.map_to = 'SCALE'
current_constraint.to_min_x = 0
current_constraint.to_max_x = 1
current_constraint.to_min_y = 0
current_constraint.to_max_y = 1
current_constraint.to_min_z = 0
current_constraint.to_max_z = 1
current_constraint.target_space = 'LOCAL'
TIPS:
It would be nicer if we name every component of our Flip Card setup properly for future modification. Maybe we could also Group them.
Select every Empty objects in the scene and then apply Transformation Constraint script above.

WATCH OUT:
Be careful in matching the Row and Column of our "Template" object and the Flip Cards object. If the number is not sorted properly, we will not get the perfect Ripple of Flip Cards. Keep this in mind. Maybe I have to re-write the script to make sure this is taken care.
Ok, we are almost done here with the complex setup, but you see how every step is rather simple and Python helps a lot with the hard repetitive task.
If you move the Template object up and down in Z axis, the Flip Cards object will flips, but all at the same time. How do make this more irregular? Continue to the next step.

PROBLEM 006: Orchestrating Many Objects with Displace Modifier
Problem 006 is NOT really a problem anymore because we have gone through all the complex setup. Problem 006 is the most fun.
Simply apply Displace Modifier to our "Template" object, assign a Texture (Cloud, Image, Voronoi, Blend Ramp/Gradient, etc) and move the "Template" up and down in Z axis.
Depending on the Texture and how it affect the displacement of mesh, you will get different Ripple effect of the Flip Cards.
 |
| Using Cloud Texture for Displace Modifier |
 |
| Using Blend (Ramp/Gradient) texture. |
 |
| Using Marble (Stripes) texture |
PROBLEM 007: Double Sided Material
For Double Sided Material, we can use Solidify Modifier. You get everything basically for free and easy to setup 3 Different Materials: Front Material, Rim Material, and Back Material.


The result can be seen right away:

If simple Material is what you need, your work is really pretty much done. You can use Blender Cycles to continue polishing the look.
However if you want to use proper UV and Texture, you have the last problem:
PROBLEM 008: UV and Texture for Scrambled Flip
Our Flip Cards object is only a single object. By having this, we can easily apply 3 materials using Solidify Modifier above.
We could apply a single UV Texture, but we actually need 2 UV Textures to make it work. Why? Because the other side of Texture is Scrambled.
I will give you an example with this photo of Dog (Woofy) and Cat texture on Front and Back side of the Flip Card object.
Firstly, do the UV Layout for the object. Hit TAB, tap U, select all Faces (tap A) and Spacebar "Unwrap" (this is the quickes way). That UV is fine for the normal Flip Cards, before being flipped.
I assign 2 Textures (Cat and Dog) to the Flip Cards.
- FRONT: Dog (Woofy)
- BACK: Cat


The Front looks fine:

Now we flip the cards....

But the Back is scrambled:

How do we fix and unscramble the texture?
I think, we could use multiple UV. However, for simplicity sake, we just provide Blender with pre-scrambled texture that will be unscrambled later.
What do I mean here is just to "Project" and render the pre-scrambled texture of the photo and use this for our purpose.

Now, when we flip the cards, the Texture is correct from this Front Camera Point of View.

PROBLEM 010: Multiple Texture Changing
We have Front and Back texture, but what if we want to change many textures? Not just 2 textures? The magic is in Keyframing the Texture Visibility ON and OFF:

Kind of hacky, but it works. You could probably setup Driver Control that make it easier for Animator to animate the flipping cards, which takes me to the last problem.
PROBLEM 010: Multiple Texture Changing
PROBLEM 010: Flip Cards Control Rig For Animator
How is the best way to pass this Flip Card setup for animator? This is one unsolved problem for this Flip Cards setup.
I would like to contain all the Empty and hide all kind of complex mechanical objects, and giving ability to move around the Flip Cards. So far, I am not sure how to do this. Because simply parenting the Empty which has Constrains does not actually work. Wonder if I could use Armature hierarchy.
PROBLEM 011: Python Script and GUI
One day I will create a nice GUI for this to help the setup and automate the whole steps. Or maybe you can do it yourself.
VIDEO TUTORIAL
I made a quick video tutorial that takes you through all the steps. I also added additional setup using Dynamic Paint.
I made few hickups during recording:
1. UV was not laid properly because I missed to select Faces, hence the Black appearance of Material. I did figure it out and fix it in the video.
2. I assigned Dynamic Paint to the wrong object. Supposedly for the "Template" object, and not the Flipcards object. However, I also fix this issue as you can see in the video.
3. You might notice that the Flipping Card ripple is not 100% perfect. This is because of the Sort Ordering of the Grid Face is not properly setup. I need to look into this further.
4. The back Texture is scrambled. This will happen, you need to "unscramble" it using a pre-rendered texture that is actually scrambled so that it looks correct when flipped. Got it?
Hope this is a useful technique for you! Maybe in near future we can use similar technique to trigger Crowds Wave kind of effects.
In next post, I like to cover NLA Action Animation together with this technique.
UPDATE 20130515
BLENDER SUSHI SCRIPT: Uber Flip Cards Effect
import bpy
import fnmatch

# HELPER FUNCTIONS

def hookEveryFace():
    ## HOOK EVERY FACE OF MESH


    """
    Hook every selected Faces. This works best for object
    with all faces separated.

    Copyright (c) 2013 Jimmy Gunawan at Blender Sushi Blog
    Name: hookEveryFace.py
    Version: 001
    Author: Jimmy Gunawan
    Contact: blendersushi@gmail.com
    Date Created: 2013.05.12

    How to use the script:
        1. Select object which every face will be booked
        2. Run the script

    """

    # Get current active object
    object = bpy.context.active_object
    object_name = object.name
    print(object_name)


    # Get all faces
    faces = bpy.context.active_object.data.polygons

    # This is less Pythonic but works.

    for i in range(len(faces)):

        # Deselect Everything in Edit Mode
        bpy.ops.object.mode_set(mode = 'EDIT')
        bpy.ops.mesh.select_all(action = 'DESELECT')
        bpy.ops.object.mode_set(mode = 'OBJECT')

        # Select a face
        bpy.context.active_object.data.polygons[i].select = True

        # Hook face to new object
        bpy.ops.object.mode_set(mode = 'EDIT')
        bpy.ops.object.hook_add_newob()

        # Reselect original object
        bpy.context.scene.objects.active = bpy.data.objects[object_name]


    # Deselect everything in Edit Mode
    bpy.ops.object.mode_set(mode = 'EDIT')
    bpy.ops.mesh.select_all(action = 'DESELECT')
    bpy.ops.object.mode_set(mode = 'OBJECT')

    """

    # More Pythonic, but failed to work, I do not know why

    for face in faces:

        # Deselect Everything in Edit Mode
        bpy.ops.object.mode_set(mode = 'EDIT')
        bpy.ops.mesh.select_all(action = 'DESELECT')
        bpy.ops.object.mode_set(mode = 'OBJECT')

        # Select a face
        face.select = True

        # Hook face to new object
        bpy.ops.object.mode_set(mode = 'EDIT')
        bpy.ops.object.hook_add_newob()

        # Reselect original object
        bpy.context.scene.objects.active = bpy.data.objects[object_name]

        face.select = False

    """


def quickSeparateFace():
    # Select the mesh
    # Get current active object
    object = bpy.context.active_object
    object_name = object.name

    # Go to Edit Mode

    # Select Toggle All Faces
    bpy.ops.object.mode_set(mode = 'EDIT')
    bpy.ops.mesh.select_all(action = 'SELECT')

    # Mark Sharp every Face
    bpy.ops.mesh.mark_sharp(clear=False)

    # Back to Object Mode
    bpy.ops.object.mode_set(mode = 'OBJECT')

    # Assign and Apply Edge Split Modifier
    bpy.ops.object.modifier_add(type='EDGE_SPLIT')
    bpy.ops.object.modifier_apply(apply_as='DATA', modifier="EdgeSplit")


def VGVertex():
    '''

    Assigning each and every vertex of a mesh into own Vertex Group

    '''


    # Specify Object to Create Group
    obj = bpy.context.scene.objects.active

    # Make Specified Object Active
    # bpy.context.scene.objects.active = obj

    # Accessing Vertex Groups Data
    # obj.vertex_groups

    # Get total vertex number
    total_vertices = len (obj.data.vertices)

    # Create Vertex Group based on total vertex number
    for i in range(total_vertices):
        vg = obj.vertex_groups.new(name='groupy.%03d' % i)

        # Assign each Vertex to Vertex Group
        vg.add([i], 1, "ADD") # index, weight, operation


    # http://www.blender.org/forum/viewtopic.php?t=25776&sid=a7610ca4988d2ad669308cc517d104c9


def getAllEmpty():
    # Get All Meshes Objects
    objects = bpy.data.objects

    ## LIST COMPREHENSION STYLE
    myListX = fnmatch.filter( [objects [i].name for i in range(len(objects ))] , 'Empty*')


    for item in myListX:
        bpy.data.objects[item].select = True

def constraintAllEmpty():
    '''
    Add Transformation Constraint for every selected objects
    '''


    objs = bpy.context.selected_objects

    # Need a way to sort dictionary/reference via name
    # I do a quick hack in here
    # http://blenderartists.org/forum/showthread.php?194818-Python-Sort-Problem

    newList = []

    for num, obj in enumerate(objs):
        print (num,obj)
        newList.append(obj.name)

    newList.sort()
    #print(newList)

    newObjs = []

    for item in newList:
        newObjs.append(bpy.data.objects[item])

    #print(newObjs)


    for num, obj in enumerate(newObjs):

        # Make each object Active one at a time
        bpy.context.scene.objects.active = obj

        # Assign Transformation Constraints
        bpy.ops.object.constraint_add(type='TRANSFORM')

        current_constraint = bpy.context.object.constraints["Transformation"]

        # Assign Target Object
        current_constraint.target = bpy.data.objects["Template"]

        # Assign Vertex Group Target
        current_constraint.subtarget = "groupy.%03d" % num


        # Setup Attributes for Flip Effects
        current_constraint.from_max_z = 1
        current_constraint.map_to_y_from = 'Z'
        current_constraint.map_to = 'ROTATION'
        current_constraint.to_max_y = 180
        current_constraint.target_space = 'LOCAL'


# FINAL CODE

# Ask User to select FlipCards Object, so it is active
user_grid = bpy.context.active_object

# Oops ... Hard Coded
user_template = bpy.data.objects['Template']

# Select FlipCards Object
bpy.ops.object.select_all(action='DESELECT')
bpy.context.scene.objects.active = user_grid

quickSeparateFace()
hookEveryFace()

# Select Template Object and do the VG for every vertex
bpy.ops.object.select_all(action='DESELECT')
bpy.context.scene.objects.active = user_template
VGVertex()

# Select Every Empty of FlipCards Object
bpy.ops.object.select_all(action='DESELECT')
getAllEmpty()
constraintAllEmpty()
I decided to put together all the Python scripts above into a single easy to use script. One click and all connection and setup done.
How to use:
- Make sure you have a Mesh Grid of Cards which Faces Indices are SORTED correctly.
- Also make sure that you also have the "Template" object, as specified and described above. Name it "Template" because the Script is slightly hard-coded for simplicity.
- Next, you simply select the Flip Card Object and run the script.
- Finally, just apply Displace Modifier that will control the Flip Card.
- Have fun animating Flip Cards with Texture.
Remember it is more important to understand every steps first so that you can modify the script to your liking. You can create interesting variations using the same setup just by modifying the script for Transformation Constraint.
ANOTHER VIDEO DEMO WITH UBER FLIP CARD SCRIPT:
EXAMPLE BLEND FILE AT BLENDSWAP
http://www.blendswap.com/blends/view/68139
ADDENDUM: UV Project Modifier at Blender Cookie
http://www.blendswap.com/blends/view/68139
ADDENDUM: UV Project Modifier at Blender Cookie
You might also want to check Blender Cookie video tutorial with Gottfried Hofmann that shows Blender UV Project Modifier:
Not directly related, but if you are using Blender Cycles and want a quick projection, it is recommended to watch the video and use the technique.
ADDENDUM: Sorting in Python
This might be something you may use to sort the index of mesh components (I have not tried it yet), but I was watching this Google Python class and I guess, this could be handy:
Nick Parlante's Class on Python Sorting: (at Google)
>>> myList = ['aaaa', 'bb', 'ccc', 'd']
>>> myList
['aaaa', 'bb', 'ccc', 'd']
# sort the list using 'len'
>>> myList = sorted(e, key=len)
>>> myList
['d', 'bb', 'ccc', 'aaaa']
# create custom function to sort
def last(s): return s[-1]
>>> myList = sorted(e, key=last)
>>> myList
['aaaa', 'bb', 'ccc', 'd']
Thanks to Daniel Peterson for providing me with this flip card challenge!
Post a Comment