


 |
| "Interesting Pattern" as Garman said. |
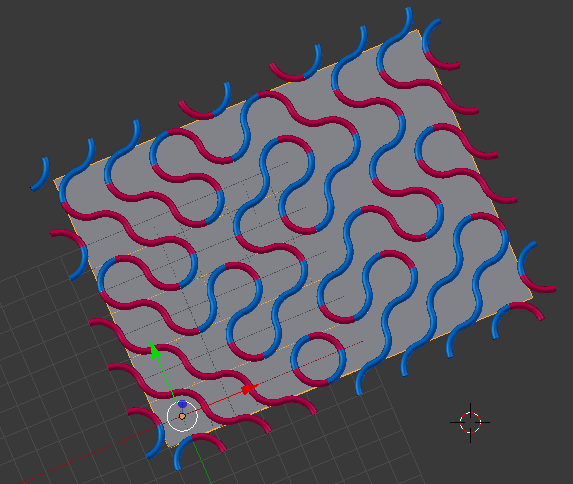
Let's have fun and create our own procedural pattern.
The problem to solve is to create funny pattern artwork above. Originally, this is something that you would like to do using procedural tool like Houdini.
How do we create this in Blender, as procedural as possible? We will take a look step by step on how you could solve the puzzle.
NOTE: You will need Blender version 2.68 up that has "Use Modifier Stack" option for Particles.
1. BREAKING THE PATTERN ELEMENTS
Like all kind of patterns, we should be able to break it into elements that can be repeated. The above funny "pipe" pattern maybe already familiar to you. There are probably similar patterns like that in Math. 3D patterns actually interesting.One example I could remember from top of my head is the Procedural Snakes in "Snakes On The Plane" by Cafe FX. There is some sequences showing Snakes going in motion in a complicated patterns, that's Math.
Anyway, the above patterns can be broken into 2 x Shapes like below:
 |
| Shape A |
 |
| Shape B |
2. PROCEDURAL CIRCLE
The above design can be created using either Poly Mesh or Curve. Any modeling technique will work.
With Curve, we can start with a circle. We just need to turn the circle into 1/4 circle, which is, actually slightly tricky because when you delete a point in Circle, Blender tends to adjust the bezier handles. You can give it a try.
See down below for Python script way to create 1/4 Curve.
I will probably do something like below to then be converted to Curve.
However, a more procedural way is to probably start with a Single Mesh Point + Screw Modifier. Which then converted into Curve, to take advantage of Blender Curve and Modifier.
Step by step:
1. Merge Cube into Single Mesh Point. Place the single Mesh point at XYZ position: 0, 1, 0.
2. Create Empty, this will be our reference point for Screw Modifier.
3. Apply Screw Modifier to the Single Mesh Point. Make sure the angle is 90 degree so we get 1/4 of Circle. You can adjust the number of steps. Assign the Empty created on Step 2 as the ObAxis, turn on Object Screw option.

We should be getting something like below.
 |
| Procedural 1/4 Circle part one. |
At this stage that 1/4 Circle is pretty procedural. If you want less or more DIVISIONS for this Circle shape, you can adjust the Step on Screw Modifier. If you like to increase or decrease the RADIUS, you can do so by moving the Single Vertex in Y axis (for this setup).
Remember this technique in the future, will come in handy.
Watch also Curve Start Bevel and End Bevel, it is interesting that you can "Carve" the Curve Start and End like that. Very Houdini like.
4. Next, we want to convert this Mesh into Curve object. Why? Because Curve in Blender has interesting property that can be used to create a Pipe with hole, which Radius can be adjusted anytime as we please.

5. Now that it is a Curve, under Curve Property, we can enable the Depth and Fill of Curve.

 |
| Procedural 1/4 Circle part two. |
Now, we have 1/4 Torus with adjustable Radius for our Pattern Design Element.
The only little GLITCH is that the end and start of "Torus" is not 100% tangent. But it is ok, something we can always make up in the end.
If you can suggest a better method to create 1/4 Torus, please let me know. If you don't care much with the Radius, you can always use Torus Mesh and cut it into 1/4 quarter.
Now, it's matter of duplicating, rotating and position this shape to get the 2 x Elements:

We can group them and we will use as Particle Instances.
3. PROCEDURAL GRID
The idea here is just to place the 2 x pattern elements above into a template grid that will then create the Patterns.Can we create procedural Grid? Sure, you can, by using a Single Face and Array Modifiers.
1. I tested it with Single Vertex + Array Modifier combination, apparently it does not work. Array Modifier seems to like Edge or Face. We will start with A Single Face.

2. Assign live 2 x Array Modifier the Face in 2 Direction to create procedural grid. The Array Count can be adjusted anytime. Activate Merge so that we do not have duplicate vertices in one spot.

 |
| Procedural Grid. |
4. PROCEDURAL PATTERN
Now that we have every ingredient, we can simply Copy Stamp the Instances into Particles.I remind you again that you need Blender 2.68 that has "Use Modifier Stack" option under Particles. This is so that we can use our Procedural Grid to generate the Template for Particle Instance while keeping everything live and procedural.
Simply create Particle System using our Procedural Grid, and then activate "Use Modifier Stack". There are few settings you need to adjust under Particle System so that everything works:
IMPORTANT:
The Emission Count (Total Particles) = (Array Count X + 1) * (Array Count Y + 1)


Everything set properly, you will get the setup and our puzzle is solved.
The power of procedural will enable you to do these:
RANDOMIZATION OF PATTERN
By adjusting the Seed of Particle, you will get random patterns.


RADIUS VARIATION
 |
| Thick Radius. |
 |
| Thin Radius. |
GRID EXPANSION
Since the Array is still live, we can simply adjust the Grid X and Y. Remember to also adjust Particle Total Count, using the formula above.
 |
| There must be a name for this kind of Pattern. |
You could generate any size of Patterns you want. Not a worry, because it is all procedural.
COLOR VARIATION
If you want to have Pipe in different color, you can do that too. Just add more Pipe in different colors to the "Group" for Particle Instances.

Everything will propagate automatically:

Feel free to experiment further with some other pattern. Blender Particles can be arranged in Grid or Hexagonal Grid. However, if you code it using Python script, you could create all kind of patterns.
Challenged and would like to do Procedural 3D Pattern? Go for it. Just add one more Array Modifier and break the pattern into element that you can duplicates in 3D. Have fun!
 |
| Convert to Mesh Edge, adding Displace Modifier + Noise to the Pattern. |
 |
| Next probably shade it. |
UPDATE 2013.07.23:
PYTHON 1/4 CURVE + REFINING THE CURVE GLITCH
As soon as I posted this, Adhi Hargo posted Python way to create 1/4 Quarter Curve!https://gist.github.com/adhihargo/6062845
Thanks Adhi, brilliant!
There is still the glitch of start and end curve not being tangent and flat like 1/4 Torus. However, if you Subdivide the Curve, enough, it should be work.


Although, I like to keep the Curve point as little and efficient as possible because eventually we probably convert it back into Mesh Edge anyway. Or you do few conversion:
Curve -> Remove Pipe -> Mesh Edge -> Remove Doubles -> Curve -> Recreate Pipe


Post a Comment