In this post, let's talk and think about how we could create a basic Procedural City using Blender and Sverchok Add-On.
This is a big task and NO WAY we can do this in one go. We should not attempt to do that anyway.
A big project requires planning and testing of many options and choose the best way to go doing it. So, I will try to discuss some techniques related to this that I could think. Overtime, I will do research and add more information related to this interesting topic.
OTHER PROGRAMS
I know Maya has some MEL or Python Scripts or Plugins to build a Procedural City. Softimage probably has similar thing.Houdini also has a big video tutorial on how to create buildings for procedural city creations.
http://lesterbanks.com/2010/02/a-few-building-city-generation-tools-for-maya/
http://lesterbanks.com/2011/09/preview-of-qtown-2-workflow/
http://cg.tutsplus.com/freebies/software-tools/kludge-city-01-7-maya-script/
Blender also has Suicidator Add-On:
http://cgchan.com/suicidator/
SOME SVERCHOK TRICKS
Before we go into this, I want to show you few trick that I learned from Sverchok Masters:1. Switching Vector XYZ DATA
Apparently by using Vectors Out => Vectors In nodes, we can easily switch the XYZ DATA of Vector List! This is really useful.For example:
We know that LINES node creates connected points and edges that goes in positive X axis?
The LINES node generates some Vector Data, but mostly what is important is the X data because it is the data that is changing.
If we want to switch the axis to Z, we can simply pipe the X data into other axis, apparently below will do the job easily!
Line.Vertices => VectorsOut.Vectors => VectorsOut.X => VectorsIn.Z => VectorsIn.Vectors => ViewerDraw.Vertices
Line.Edges => ViewerDraw.Vertices
Same thing with Y:
If we pipe the X data to X and Y, we get something like below:
Remember, it is all about DATA going IN, processed, and DATA coming OUT. I often forgot about this as well, so please remind me. It is all just numbers.
Do you think that's air you're breathing now? - THE MATRIX
2. DEFORMING MESH
Similar to the above method, we can get Vectors data from Object Mesh (in 3D scene) or from Sverchok own generated Mesh.Let's look at Plane or Grid Mesh. I started with Blender default Grid Mesh.
Because this mesh is Flat (we do not worry about the Normal yet) and I want to show you a very basic example of how we can deform the surface of this mesh using Sverchok.
Bring it into Sverchok. This setup below brings in the data and create some kind of duplicate data that you can manipulate. You do not need to worry that it will destroy original mesh, it will not.
Next, we want to take the Vertices DATA, which is basically a SERIES of VECTOR LIST of NUMBERS as we know it already.
The default Blender Grid has 10 x 10 Vertices, total of 100 Points. This is what we will manipulate to deform the surface.
Below, I am OFFSET-ing the Points by 5 unit in Z Positive Axis.
Cool, so we can OFFSET. Now, let's use RANDOM to disturb the surface of this Mesh (randomize the points in Z axis).
With Random node below, be aware of the parameter COUNT. I specify a value of 100 here, the exact number of Vertices/Points that the Mesh has.
What we know:
- By default RANDOM will just create a single random floating value between 0-1.
- If you specify the COUNT more than default 1, then RANDOM will generate LIST of NUMBERS that you can use.
- Often we need to know the Total Number of Points, so we can use LIST LENGTH for that. Don't get confused with VECTOR MATH LENGTH to measure the length of vector.
If we want to automatically GET THE LENGTH (TOTAL NUMBER OF POINTS) we do something like below:
If you do something like above, no matter what new Mesh you bring in, the RANDOM node will always get the right COUNT number to randomize the surface mesh. Remember to press UPDATE button.
 |
| Torus mesh with its points deformed in Z axis. |
A more advanced version of Displacement Setup in Sverchok should allow you to deform the surface of mesh just like Displace Modifier does it. For that we need to work with Surface Normal, etc. We probably do not need to recreate Displace Modifier using Sverchok! However, since Sverchok does not respect the Post-Modifier DATA yet, we might need to recreate some of the Modifiers inside Sverchok.
NOTE:
Keep in mind that if you are using the Vectors Out => Vectors In nodes workflow, you will be transforming the actual Vector DATA. Which means, when you bake out the Object from Sverchok and to go back up to Blender Object Level, the new Mesh will have it's Transformation got applied (just like when you CTRL+A and apply to freeze transform). If you use Matrix Deform workflow, you can still keep the transformation data. The Matrix is not zeroed out.
BACK TO OBJECT STACKING FIRST...
Main Ingredients:
- List First Last
- Matrix In
- Objects In
If you are building a TOWER or BUILDING, you will often have Roof and Base. The Middle Part can be rotated or made up of few different elements. That is something to think about later when we get into the details.
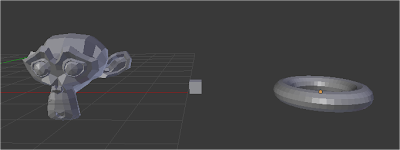
Let say we have these guys that we want to stack together
- HEAD/TOP: Suzanne Head
- TAIL/BASE: Torus
- MIDDLE PART: Cubes
Do you know how to STACK them into something like below using Sverchok alone?
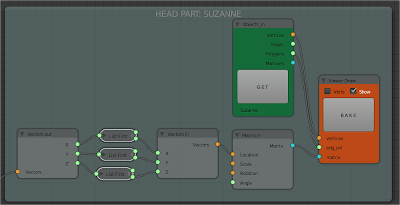
You have the knowledge already, you simply bring the Object In and apply the Position(s) Matrix based on the Points. Below is the whole Node-Tree snapshots.
 |
| The Big Map |
The cool thing about the setup like this is being able to adjust it on the fly as needed.
 |
| Short Tower |
 |
| Tall Tower |
With example setup above, you can create PROCEDURAL BUILDING or TOWER. You just need a nice model of ROOFTOP, MIDDLE BUILDING PART (SIDE FACADE), and the BOTTOM PART.
THINKING PROCEDURAL CITY
Now, we finally get to the FUN PART. The title is "Thinking Procedural City" because this might not be the full setup to do the procedural city. Not yet, but it will come eventually.A city structure is like grass in field or tree in forest, except the city we know is more rigid.
We need to think about:
- BUILDING PLACEMENT AND SPREAD
- BUILDING HEIGHTS
- BUILDING VARIATIONS
- SPACE BETWEEN BUILDINGS (streets, parks, etc)
- MAPS
For now, let's just imagine that our City is just made up of SQUARE GRID. Soon enough, we can use VORONOI to make the city more random in shapes and mappings. I promise.
Square Grid is easiest, I could think of. Let's either use: Blender Grid Object or Sverchok Plane Object as the base. Either way is fine.
At first, I made a setup where I would base the Buildings of the Polygon Face of the Base Mesh. That will be handy to do the Extrusions.
However, let's do this using Points/Vertices of the Base Mesh.
STEP 001 - Base Grid
I use 8 x 8 square grid, ended up with 64 Vertices in total. Each Vertices will "grow" a building. We will present the building as "edge" for now. Just like Sticks.
STEP 002 - Top Grid
For the Top Grid, create the same grid, except that we want to push (offset) the grid up in Z Positive axis. We start breaking the Grid into its components: Points and thinking of them as Points and Positions.
The points at the bottom represent the BASE of buildings. The points at the top represent the TOP parts. This is probably a very TALL city with lots of SKY CRAPPERS buildings.
STEP 003 - Randomize the Points Positions for the TOPparts
We want some random height for the building, we already know how to do that just simply by adding Random Values in Z to our setup.
STEP 004 - Connect the BOTTOM and TOP points
This part is optional, but I think it is nice being able to VISUALIZE the building as STICKS.
Firstly, we want to joint the TOP and BOTTOM positions as single VERTICES DATA:
Next, we just provide EDGE DATA. We have done this in the past. It feels more complex because we are using GRIDS, instead of just 2 LINES and connecting LADDERS. However, it is exactly the same!
We need the DATA PAIR for edges, so let's supply that data. Remember for edge data needs to be Pair of Integer, not Float.
The whole Node-Tree Snapshots as below:
RESULT SO FAR:
At this stage, I like to tidy up my Sverchok Node-Tree so that I can easy adjust the result. I give Yellow Color for node parameter that can be changed.
Adjusting the placement of STICKS in GRID is easy now, we have control over:
- Position X
- Position Y
- Height Z
- Height Random
- Spacing in X
- Spacing in Y
You can bake it, convert to Curve and do the bevel to render it out. But we will not stop there.
STEP 005: Solidifying the shapes.
I reduce my overall building height and the random heights. This should be easy just by adjusting the parameters.
Let say we use Cube object that will be instanced into the position at the bottom. And then we will Matrix transform each Cube to match the Length of each STICKS/EDGES.
I like using Blender Cube as a starter. You can use different shapes like Prism later.
Create Cube, bring it in into Sverchok using Object In. Let's Duplicate Instance the Cube on every points on the BASE. We know how to do that using Matrix In.
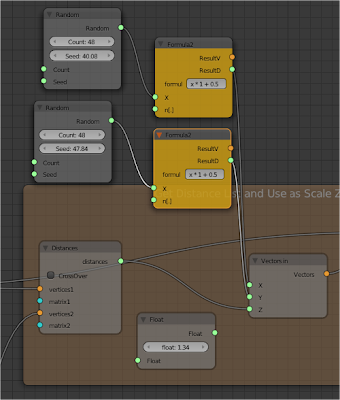
But how about the Height of Building? We can adjust the Scale Z of each building by measuring the DISTANCE between positions Points Base and Top.
Now, you may notice that our Cube is not exactly positioned on its base. You can do two things, just go to Edit Mode and adjust the Cube. Or you can adjust it in Sverchok using Matrix deform. Up to you.
STEP 006: Little Details, Rooftops
Our buildings started to look like a boring city, but it is a city, a very blocky city. We can randomize the size and shape of buildings, but I leave that to you.
Each building will have similar rooftops too. How boring! But it is okey for now.
NOTE: Keep in mind that at the moment, we cannot easily "EXTRUDE" a face. For Roof Top I simply use a Cube and duplicates to the TOP positions.
STEP 007: Bake Out
Now, if we bake the result, we will actually get each individual mesh as separate objects.
In near future, let see how we could add details procedurally for each buildings.
I don't know how yet, maybe you know? Should we work on each building? Or can we combine the block stackings to create a more detailed buildings and then the actual city?
How about the EFFICIENCY? Maybe too many buildings and Sverchok started to slow down? Mabye we could use Blender Referencing for each block?
Plenty of questions! That is why this is not something that can be done in one go.
TO BE CONTINUED....


Post a Comment