 |
| The inception of Particle Info node. |
I wrote a bit of Object Info node and Strand Info node not long ago. I think I should also write a quick post about Particle Info node.
There are already few great video tutorials out there touching on this topic of Particle Info node and Cycles, but anyway, I will just write this post just as a note for myself and hopefully can also be useful as quick reference fo you.
Particle Info node as first mentioned at Blender Developer Blog:
http://code.blender.org/index.php/2012/05/particle-info-node/
WHAT IS REALLY PARTICLE INFO NODE
Maya has this Particle Info node. Houdini also has this similar node. But, I personally think that Particle Info node in Blender is the most clear and simple in term of usage and application.
Similar to Object Info node and Strand Info node, Particle Info node is exposing specific data values and make it available for Look Development (Shading, Texturing, Lighting), and for our case, it is made for Cycles real time Material and Rendering.
Blender philosophy seems to be more toward procedurality, where are you are able to pass and manipulate data from one node to another node more easily.
Particle Info nodes is exposing and passing these data: index, age, lifetime, location, size, velocity, angular velocity, that we can use to Map or as Factor for other data.
THE BASIC SETUP
You need some familiarity of Blender Particles basic (emitter, instancing) and Blender Cycles node-based Material in order to understand this.
I am just going to show the basic, exploring this Particle Info node while writing notes for every useful finding.
My Particle setup for this is super basic, just the "Monkey Rain" setup with a single Suzanne monkey as a instance copies:
 |
| That Suzanne monkey object selected is the INSTANCE object. The rest of monkey falling down is just a copy of that single monkey object. |
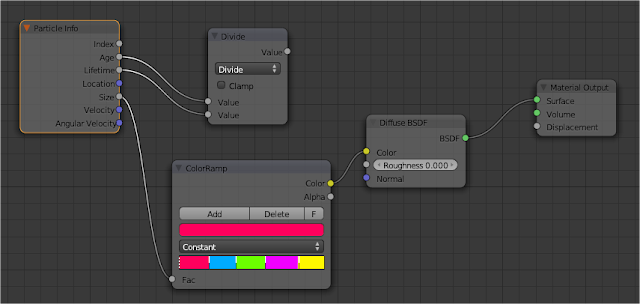
PARTICLE INFO: Age and Lifetime + Color Ramp
Every single Particle has Age and Lifetime value. Age is calculated from the time a particle is born, while Lifetime is the how long Particle is set to live.
By default, when you create Particle System, the value is as below:
Lifetime = 50, meaning every particle will live up to 50 frames and then die. You can randomize the lifetime (Random) if you like a bit of variation.
Age will start from value of 0 when the Particle is born on a particular frame.
How can we use this value to affect Cycles Material? It is very straight forward, we just pass the data.
For many of our purpose, we will be using Color Ramp node.
This Color Ramp node is a handy little node that shows Color gradation, and when used with data output from Particle Info node as Factor, we can visualize the changes.
In order for Color Ramp to show value from beginning Color to end Color properly, we should always make sure that the Factor (Fac) value is normalized (0-1). So for our purpose, we use Math node, set to Divide) to divide Age with Lifetime.
So, with everything in default value, we have result as above. Particle Color Diffuse goes from Black to White from the time it is born until it die and disappear.
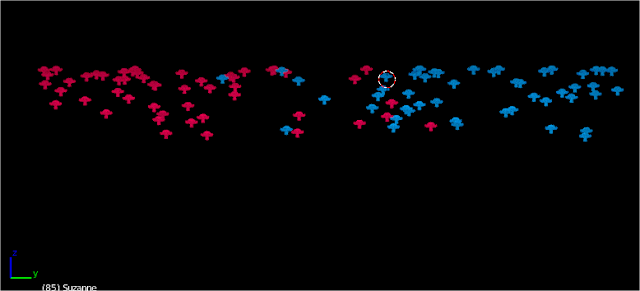
If we change the Color Ramp node value, we can see more clearly what is really happening.
PARTICLE INFO: Age and Lifetime + Mix Shader
With similar setup above, we can then do the same thing to Mix Shader. Let say, we like the Particle to fade from original material (for example Diffuse Shader) and become transparent (Transparent Shader) overtime. That can be done as easily as Color Ramp.
PARTICLE INFO RANDOM
For random color, looks like we can simply use Object Info node as a Factor for Color Ramp and this works for our Particle Instances which is nice.
PARTICLE INFO: Size + Color Ramp
Next thing we can pipe to Color Ramp is the Particle Size via Particle Info node. You probably understand this by now.
I first randomize the Size of Particle from the Blender Particle System Property:
PARTICLE INFO: Location + Color Ramp
Particle Location is an interesting one because it is a Vector XYZ value, which means it carries 3 different values depending on Particle Location.When I pipe the value to Color Ramp anyway, it will show the gradation as expected.
With Location value, it is probably clearer if we use Grid Texture and see how the color is distributed for each Particle in 3D space:
With the same method we did for Object Info node, then we can pipe in the Location value output from Particle Info node to UV Image Texture, which gives us the LED grid that we are already familiar with.
If our Instance Object is simplified to a Cube, then we get something like below:
PARTICLE INFO: Location = Color
If Particle is static, the color will be Black (0,0,0 velocity value), but if they are moving or have velocity other than zero, you get color.
For example, apply Turbulance Force to the Particle System so that each Particle has some kind of Velocity value (also a type of Vector value, to depict direction velocity of Particle).
Alright, so this is all the basic that I can think of. Will look for more advance setup next time. I bet plenty of questions start to arise by knowing all this basics.
This should prepare us for future development Blender Particle Node system.


Post a Comment