


We are not yet going to create and define our own Functions yet, but just to stroll around using the available Functions and Methods, and getting to see the 3D scene using Python.
When I first started getting into Programming in Pyhon in Blender, I jumped into a lot of things without quite a solid understanding the concept.
http://blendersushi.blogspot.com.au/2012/03/programming-one-can-script.html
While back then I am still thinking "Learning to Program", these days, I try to "Learn to Programing to create Something Useful".
Kind of like people tend to say:
"I need to make a lot of money." == useless aim
"I need to make a lot of money to help other people, make world better place." == with reason
"I want to learn Blender." == fun and fine, but also pretty useless if you don't have reason
"I want to learn Blender to create animation to entertain many people." == with reason
With a little better grasp of concept of programming, Python programming and Blender in Python, I can now go backward and explain things more clearly. At least up to certain level.
LAYOUT FOR SCRIPTING

We will be using the default Blender Scripting layout that is provided by Blender. CTRL+Left/Right arrow to quickly switch layout.
For this one, we can just work using Python Console, with single liner code one at a time. We can always plonk that single liner codes into the Text Editor later for you to keep.
FIRST STEP: SCANNING AND OBSERVING YOUR 3D SCENE
THIS is the most useful important step. You want to gather information about your 3D scene. You want to be able to specifically target an object or many objects. And you want to perform procedure on that object, whatever the procedure is.
I do not think there is any Python Blender tutorial or Python Maya tutorials out there that tells you that "scanning your 3D scene" is the first step. But I shall tell you that very early.
We really want to observe and scan the 3D scene, just like when you are scanning and finding for files in directory or when you are using 3D Viewport and Blender Outliner to get into an object.
Just as if we were BLIND but we can ask for voice feedback about our surroundings:
- where you are at?
- what is in front of me?
- where to go?
- what is I am holding?
- what is on the table?
- what food we have?
- where is the door?
- is it snowing outside?
We can also imagine the act of programming is like playing Text Based Adventure Game (like the classic Zork). We cannot see any visual, but we are able to ask and get text feedback.
The good thing in Blender, of course, we do have visual feedback. And that will help us understand what happened if we run certain commands.
More than often a lot of processing happening in the background (with the speed of light of computer) and we only see the result once the process is completed or finished successfully. This is what makes programming is both magical, yet seems complicated.
Ok, I am sure you got some kind of idea what we like to do with Python at the beginning.
Inside Blender, using Python and Blender Python Module (BPY), we are able to LIST all objects or specific object and PUT them into a VARIABLE, so then next we are able to MODIFY their VALUES and PARAMETERS as we please. That is exactly how and what we are going to do using Python in this post.
Python and BPY Module already allows this quite easily once you understand the concept. There are quite a few BPY (Blender Python) commands/operators/functions/methods that we will be using here.
Again, they are really SIMPLE.
LISTING ALL OBJECTS IN 3D SCENE
- bpy.data.objects
I believe the "collection" there means that it is a "dictionary" type of data in Python.
DICTIONARY data type in Python is very cool because it is like a LIST, which ITEM(it's values) can be called using KEY (it's keyword).

You can see in BLUE there the Return Value, which is rather cryptic. If we use Python LIST command, we can see something that is more useful:

Since the bpy.data.objects is returning you Dictionary format, we can use common method such as keys() and items().

As we can see they are listing the 3 default objects in Blender: Camera, Cube, and Lamp. But Blender actually tells you the FULL PATH, instead of just the Object name. And with that information, we can tell Blender to QUERY and EDIT the values of certain things.
If you type bpy.data.objects['Cube']. <Ctrl+Space> in Python Console you get....

.... a super long list of all the methods that you can use to QUERY and EDIT things in relation to an object.
You can try all of them one by one if you like to test what they actually do. Or maybe read the documentations.
It is better find the right command/function/method for what you need for your purpose.
dir() and type() in Python Console

This is also a useful thing to do when you are doing Blender programming because it is being a Python, you can do dir() inside the Python Console to get information regarding an object or something. This is something to do with "Object Oriented Programming (OOP)" in Python.
type() will then tell you what type of the particular item is.
Below, I typed in bpy.data.meshes[ and then <Ctrl+Space>, it will also list the meshes in the scene. I put an object called 'Suzanne' into variable "monkey" and then I can dir() on the "monkey" to get the list of modules, functions, variables, etc stored inside that object.
You can then use it like below:
list(monkey.vertices)
list(monkey.polygons)
Super handy.

LISTING SPECIFIC OBJECT BY NAME
Interestingly, for beginner Python coder, we can do something like this... let say, we have bunch of objects with name: "Cube.001", "Cube.002", "CubeSomething", we can write something like below to quickly get a LIST of all objects named "Cube*". We can use List Comprehension.
import bpy
mesh = bpy.data.objects
myList = [item for item in mesh if "Cube" in item.name]
print(myList)
Something like below will give you back the INDEX of item within the Collection:
# Check index
bpy.data.objects.find("Cube")
The return value will be index number of object named "Cube".
DICTIONARY: item(), key(), value()

When we collect items in the scene using BPY, the data is nicely stored in library structure, with "keys" and "values". Both "key" and "value" pair is called "items".
From the default scene, Blender scene has 'Camera', 'Cube', and 'Lamp' and we can directly point to data path using the KEYS:

Lots of flexibility in getting and listing data.
SHORTEN DATA PATH AS VARIABLE/ALIAS
First thing first, we can actually store "data path" of an object into any Variable name/alias that you like. Variable is like a container or a representation of an object and for this case it can help to "shorten" things.
Instead of typing:
bpy.data.objects['Cube'].{some methods}
You can type:
myVariable.{some methods}
First put the bpy.data.objects['Cube'] inside a shorter Variable that will point into that data path (you don't really store the 3D object into a variable, just the data path).

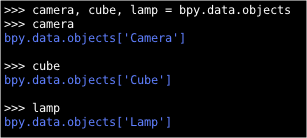
You can also do things like this in Python: (assigning multiple variables all at the same time)
It's like if you have a friend from Thailand or India with super long name "Chulalongkorn Pichaironnarongsongkram Ramathibodi", you can simply alias the name as "Chu" or "Rama".
And the cool thing about Object in Python is that you can simply attach a "Method" to tell it what to do next and it will be happy to do so.
You certainly cannot tell your friend:
- Chu.goAndBuyMeAHouse
- Chu.takeMeToTravelAroundTheWorld
- Chu.cleanTheHouse
- Chu.takePetdogForAWalk
With that ALIAS Variable for object, it is a lot easier to COMMAND, to QUERY or to EDIT any ATTRIBUTE in your 3D scene using just Python commands that BPY already offers for you.
In our context, we probably now have 3 Variables: camera, cube, lamp.
RENAMING OBJECT
- {object}.name

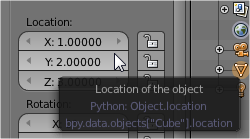
QUERY AND MODIFY OBJECT LOCATION
- {object}.location

MODIFY the location by specifying new value: (3 values in this case)

QUERY AND MODIFY OBJECT COLOR

NOTE: The Object Color is not really your Material Color, as you may or may not already know. You can tell Blender to render Object Color, but in general you want to pass it to Material Color.
SELECTING OBJECT AND MAKE IT ACTIVE
- {object}.select
- bpy.context.scene.objects.active

The object will be Selected on 3D scene, but not necessarily Active. Active is usually the last object selected if you have many other objects selected. The color will be more like bright orange/yellow, instead of orange.

Read more about "Active" in relation to Python here:
If object is selected, we can do certain Operator command like Translate, Rotate, Scale (Resize).
bpy.ops.transform.translate()
bpy.ops.transform.rotate()
bpy.ops.transform.resize()
As we know it, if objects are Selected and with last object Active we can tell Blender to do certain thing like COPYING many settings from Active object to the rest of Selected objects or LINKING data from Active object for the rest of objects.
We won't go into that details on that topic using Python now, basically if you select bunch of Cube objects, and select Monkey the last (as Active), you can then CTRL+L and link the Data of Monkey, so that all the Cube becomes Monkey. That is how I understand it anyway.
Python will also usually perform BPY Operation only on the Active object. Just keep this in mind.
Please keep in mind that when you get LIST of objects using list() and store it inside a variable, you will get back a list or array type of variable. So, if you need to get into particular object, use its INDEX.
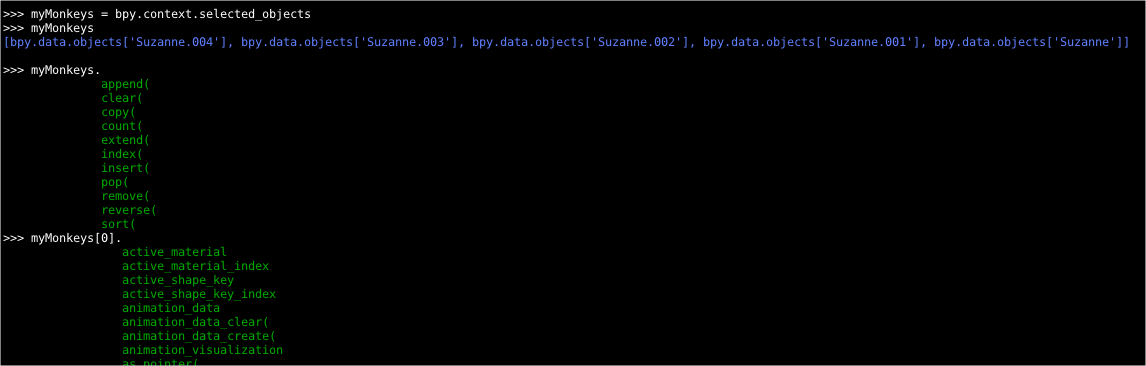
Above example, I have 5 monkeys in the scene. I store it inside variable called "myMonkeys". It is actually a list type (or array), and in order to get into each item in the list, I specify it with myMonkeys[INDEX].
Let say I wanted to create a new Material Slot for each Monkey:
THE RIGHT WAY:
import bpy


myMonkeys = bpy.context.selected_objects


for monkey in myMonkeys:


    bpy.context.scene.objects.active = monkey

    bpy.ops.object.material_slot_add()
THE WRONG WAY:
import bpy


myMonkeys = bpy.context.selected_objects


for monkey in myMonkeys:


    bpy.ops.object.material_slot_add()
The wrong way will give 5 new Material Slot for the Active Monkey, instead of 1 new Material Slot for each Monkey.
Let say, I already created 3 materials, named: "red", "green", "blue".
http://wiki.blender.org/index.php/Dev:2.5/Py/Scripts/Cookbook/Code_snippets/Materials_and_textures
import bpy


red = bpy.data.materials.new('red')

green = bpy.data.materials.new('green')

blue = bpy.data.materials.new('blue')


red.diffuse_color = (1,0,0)

green.diffuse_color = (0,1,0)

blue.diffuse_color = (0,0,1)
If we then want to change the 1st INDEX MATERIAL SLOT as "green" for all the 5 monkeys (selected), we use script like below:
import bpy


myMonkeys = bpy.context.selected_objects


for monkey in myMonkeys:

    bpy.context.scene.objects.active = monkey

    bpy.context.object.active_material_index = 0

    bpy.context.object.active_material = bpy.data.materials["green"]
OBJECT AND OBJECT DATA
We should make clear distinction between Object and Data and how Blender Python is seeing it. So far we are actually dealing with the actual Data.
You can delete all Objects in the scene, but it may still contain that piece of Data. Multiple Objects can point into a Data block.
I think I will add more information here at later stage for you to be really clear.
LIST SELECTED OBJECTS
- list(bpy.context.selected_objects)
More often, instead of listing all objects in 3D scene, we want to just do something with objects that are already selected manually.
We can use the bpy.context.selected_objects:

Now, we can then change attributes of multiple objects (being selected) by doing FOR IN loop like below:
import bpy

myObjects = list(bpy.context.selected_objects)

for object in myObjects:
    object.scale = 1,2,3
The length function is useful to tell you how many number of objects are currently selected.
len(bpy.context.selected_objects)
print ( len(bpy.context.selected_objects) )
This TOTAL number of something is useful when you are doing LOOP. Let say, you have certain number of Objects selected and you want to create exact number of Materials based on that total number.
import bpy

for item in range(len(bpy.context.selected_objects)):
    bpy.ops.material.new()


# This will create bunch of new Materials as many as your selected objects
LIST OR FILTER SPECIFIC OBJECT
- bpy.data.*
You learned above how you can list ALL objects in the 3D scene and also how to list selected objects. You can also be more specifically ask Blender to collect and list certain Object Type: Meshes, Type, Light (Lamps), Camera, Materials, etc.

LISTING ALL MATERIAL IN 3D SCENE
- list(bpy.data.materials)

SECOND STEP: CREATING OBJECTS USING PYTHON
- bpy.ops.*
For example, I create bunch of random objects and the History looks like below:
bpy.ops.mesh.primitive_monkey_add(view_align=False, enter_editmode=False, location=(-2.4157, -3.02076, 0.278938), rotation=(0, 0, 0), layers=(True, False, False, False, False, False, False, False, False, False, False, False, False, False, False, False, False, False, False, False))
bpy.ops.object.camera_add(view_align=True, enter_editmode=False, location=(-2.4157, -3.02076, 0.278938), rotation=(1.0527, 0.0128194, 0.650496), layers=(True, False, False, False, False, False, False, False, False, False, False, False, False, False, False, False, False, False, False, False))
bpy.ops.object.empty_add(type='PLAIN_AXES', view_align=False, location=(-2.4157, -3.02076, 0.278938), rotation=(0, 0, 0), layers=(True, False, False, False, False, False, False, False, False, False, False, False, False, False, False, False, False, False, False, False))
bpy.ops.object.text_add(view_align=False, enter_editmode=False, location=(-2.4157, -3.02076, 0.278938), rotation=(0, 0, 0), layers=(True, False, False, False, False, False, False, False, False, False, False, False, False, False, False, False, False, False, False, False))
Don't be surprised, the reason it is looking long and weird like that is because of Blender Layers, it is usually placing the object at the current visible layer and there are 20 visible layers, which Blender needs to know whether the object will be visible on those layer (True) or not (False).
You can simply create new objects by running it like below:
bpy.ops.mesh.primitive_monkey_add()
bpy.ops.object.camera_add()
bpy.ops.object.empty_add()
bpy.ops.object.text_add()
Running the bpy.ops (operator) commands without any parameters/arguments inside the parenthesis, will create "monkey", "camera", "empty", and "text", with default value.
Remember you should always put that () parenthesis at the end of Operator command to actually run the commands.
And when you need to be more specific with parameters, simply specify key and values arguments inside that () parenthesis.
NEXT STEP: GETTING SPECIFIC INFORMATION ABOUT OBJECTS
We should now know how to List, Query, Select, Modify some Object in 3D scene using Python.Next thing is to be able to get inside an Object and get as much details about that particular Object using Python. This is a bigger area and maybe I talk more in the next post. But, I will talk a little bit about MESHES anyway.
MESHES: Getting Vertex Information of a Mesh
http://blenderscripting.blogspot.com.au/2011/05/blender-25-python-printing-vertex.html
That blog post above explains and gives example scripts to get component data information from mesh. It is not very clear how he manages to get the vertices coordinate.
So, I tried exploring it myself. Let say we have the Default Cube and we put it under variable 'cube' and there is ".vertices" method.
import bpy

cube = bpy.data.meshes['Cube']

cube.vertices

# get total length of vertices

len(cube.vertices)
From that script above, we can get to "vertices". But I just don't know how he get to ".co". It is really hard to find inside Blender Python Documentation.
http://www.blender.org/documentation/blender_python_api_2_62_2
UPDATE 2013.03.20:
Apparently if you directly point out the vertices index, it will display the 'co'. This is how you would often dig for information about object using Blender Python.

You can also dir(mesh.vertices[0]), but you better do mesh.vertices[0].<CTRL+SPACE>. We will do this quite often.
We could also print out all the vertices local coordinate using loop as below:
for vertex in cube.vertices: print(vertex.co)
ADDITIONAL NOTE 2013.06.09
I found this useful Blender thread that uses vertex.co:
http://blenderartists.org/forum/showthread.php?280330-XYZ-location-of-Vertices
I will steal that example Python code from blackno666 from for us to study:
import bpy
import mathutils

obj = bpy.context.object.data

new_z_pos = 2.0

for vertex in obj.vertices:
    if vertex.select:
        orig_x = vertex.co[0]
        orig_y = vertex.co[1]
        orig_z = vertex.co[2]

        vertex.co = mathutils.Vector((orig_x, orig_y, new_z_pos))
The code above is very simple and clear. Its function is to change the position of Z of currently selected vertices into the specified location (zero in Z position).
- Firstly, it gathers info about 3D scene using bpy.context.object.data --> this seems to take only the Active Object or the last currently selected object
- It also prepares a variable for the new Z position
- Then, using FOR-IN LOOP to iterate through each selected vertices (vertex.select) and then modifying the location with new positions using mathutils.Vector.
Anyhow regarding Vertex Coordinate, I am still not sure the easiest way to get each Vertex Position in World. I will update this one as soon as I understand how.
In the mean time, reading these....
https://sites.google.com/site/satishgoda/blender/blog/blender25xscriptinggettingtheworldcoordinates
http://niittymaa.com/blog/freebies/blender-script-follow-vertex-position/
http://blenderscripting.blogspot.com.au/2011/05/blender-25-python-printing-vertex.html#comment-form
http://www.blender.org/forum/viewtopic.php?t=24153&sid=7037b626251533473bc7831108c853f8
http://www.blender.org/forum/viewtopic.php?t=24103&sid=81216a311192048c0abb66a1160c3b86
http://www.blender.org/forum/viewtopic.php?t=25950&sid=fb84d4792604c1f5d8a4f124b4f19220
http://blenderartists.org/forum/showthread.php?39998-Worl-Position-on-a-vertex
Finally, I understand how to get Vertex Positions of Mesh in World (instead of Local).
Apparently we will need to Multiply the Local Coordinate with World Matrix of the Mesh and also you need to create another dummy mesh in order for Blender to tell you exactly the Applied Transformation Location of the Mesh in World.
The order of World Matrix multiplication with Vector is also important:
- DID NOT WORK: worldCoordinate = localCoordinate * worldMatrix
- WORK: worldCoordinate = worldMatrix * localCoordinate
It took me a while to understand it. I will make sure you can understand this. Below script is kind of the basis of my understanding.
import bpy
import mathutils

obj = bpy.data.meshes['Cube']

localPositions = []

for i in range(len(obj.vertices)):
    #print (obj.vertices[i].co)
    localPositions.append(obj.vertices[i].co)

wmtx = bpy.context.active_object.matrix_world

# the order is important, world matrix at the front
worldCoord = wmtx * localPositions[0] ### this one does the job

print(localPositions[0])
print(wmtx)
print(worldCoord)
The script above is almost working. The Rotation and Scale Matrix are now in World Position. But the Translate/Position is still local. We need one more thing.
Continue to the next script below.....
Finally, below script is an example script on how you would collect the position of every vertex in World and then create Poly Cube at those locations.
BLENDER SUSHI SCRIPT: To create object at Vertex Positions of selected mesh object.
import bpy

# Set active scene and object
activeScene = bpy.context.scene
currentObjs = bpy.context.selected_objects

for item in currentObjs:

    print(item.name)
    if item.type == 'MESH':
        # Make meshdata
        # this is important!
        # we create a fake object for Blender (Apply Mesh Location)
        meshdata = item.to_mesh( scene=activeScene, apply_modifiers=True, settings='PREVIEW' )

        vert_list = [vertex.co for vertex in meshdata.vertices]
        for vert in vert_list:
            vert = item.matrix_world * vert # this is important!
            print(vert)

            # Create Boxes At Vertex Location
            bpy.ops.mesh.primitive_cube_add(location=vert)
            selectedObject = bpy.context.selected_objects
            selectedObject[0].scale = 0.25,0.25,0.25


        # Remove meshdata data
        bpy.data.meshes.remove(meshdata)

Surely, you can do the same manually using Particles or using DupliVerts, but then again, this is the Blender Python way.
NEXT STEP: Selecting Other Components and Information about Mesh
(more information will be added in the future)
http://blenderartists.org/forum/showthread.php?207542-Selecting-a-face-through-the-API
ALAS: Blender Python Scripting is Not Fully Documented
I have a feeling that you can do a lot using Blender Python Module (BPY), but the BPY itself is quite raw codes, meaning that not all the codes are made for easy of use. But there is always someone out there create a simpler code to get into something.
Also, the documentation seems to be never complete as Blender is continue being developed every day. I am sure more BPY documentation will be added overtime. At the moment, lots of things are discovered by digging and searching it on the forum.
NEXT STEP: WRITING OUT INFORMATION?
Something even crazier to read later is if you WRITE out the information you collect as TXT. I think below post is one example, although it is just rather short and random.
http://www.blender.org/forum/viewtopic.php?p=101278&sid=5ad21e8fbdf32a572c6afab33c6d51e0
http://blenderscripting.blogspot.com.au/2013/01/reading-writing-csv.html
OTHER PEOPLE PYTHON SCRIPTS
Both Python and Blender Python are NOT new, there are already TONS of Blender script out there that does interesting and useful things.Although whatever external Python scripts we want to use needs to match the Python inside Blender. As for today, Blender is using Python 3.3.0.

Keep in mind that Blender Python API has a big change at least twice between 2010-2012, so, there are many scripts that used to work, and no longer works.
If you have an idea for a program, you must start by searching whether others have made something similar in the past. They are there for us to study and perhaps to modify or update.
Sometimes it can be useful to "recreate" the wheel or "deconstructing" other people's scripts to understand how it works. Even though it will take some times, it will be worth it.
Remember to ask the original creator and give credits.
This is really how you can improve your Python scripting skill.
SCRIPT: Randomize Face Color by COTEJRP (OLD)
http://www.blenderaddons.com/home.php
There is an old Python script that allows user to create and assign random Face Color to a mesh:
http://blenderartists.org/forum/showthread.php?229082-Random-Face-Color-Script
I think that script is quite nice, but it is no longer work for latest Blender, it should be updated to recent Blender Python version.
In theory, we should be able to do that using our current knowledge.
HINT: Instead of "faces", it should be "polygons". There is also some extra things need to be modified.
SCRIPT: BLENDER COOKBOOK SCRIPT
Take a look at Blender Cookbook Script on Multiple Materials, even this script is OUTDATED.
http://wiki.blender.org/index.php/Dev:2.5/Py/Scripts/Cookbook/Code_snippets/Materials_and_textures
Again, instead of "faces", it should be "polygons".
Below is updated, still has error on 'center'.
#----------------------------------------------------------

# File multi_material.py

#----------------------------------------------------------

import bpy

def run(origin):

    # Create three materials

    red = bpy.data.materials.new('Red')

    red.diffuse_color = (1,0,0)

    blue = bpy.data.materials.new('Blue')

    blue.diffuse_color = (0,0,1)

    yellow = bpy.data.materials.new('Yellow')

    yellow.diffuse_color = (1,1,0)

    # Create mesh and assign materials

    bpy.ops.mesh.primitive_uv_sphere_add(

        segments = 16,

        ring_count = 8,

        location=origin)

    ob = bpy.context.object

    ob.name = 'MultiMatSphere'

    me = ob.data

    me.materials.append(red)

    me.materials.append(blue)

    me.materials.append(yellow)

    # Assign materials to faces

    for f in me.polygons:

        f.material_index = f.index % 3

    # Set left half of sphere smooth, right half flat shading

    for f in me.polygons:

        f.use_smooth = (f.center[0] < 0)

if __name__ == "__main__":

    run((0,0,0))
SCRIPT: Batch Rename
http://blenderartists.org/forum/showthread.php?272086-Addon-Item-Panel-amp-Batch-Naming
Post a Comment