


 |
| Blender VIDEO PAINTING mode. |
Blender has a powerful UV Editor and 3D Painting built in tool sets that can be quite easily overlooked.
I feel like to write something about it. Keep in mind that I am fairly new to Blender way of doing UV and painting, basically learning and discovering thing along the way. I will add and refine this "study note".
PS: While writing this, I want to write in the style for total beginner of 3D. I will describe every step in details, hopefully easy to follow.
UV EDITING TOOLSET IN BLENDER
 |
| Please, UV and Texture the right way...! |
THE PLUS
- UV Pelting is a breeze
- Quick Checker and Colored Grid to check the UV is handy
- Live Unwrap is brilliant
- Projection and Stencil 3D Painting
- Blender has UV stretch map viewer
- Blender 3D Painting is fast.
THE MINUS
- There is a slightly quirky workflow, but once you got over it, all good and smooth sailing
- Blender needs Swatches Panel for Materials
- Blender does not have 3D Paint Layering ala Mudbox (yet). There is an Add-On that does this already, but I heard it is not so easy to use.
What is UV Editing?
For more detailed explanation, simply Google Search "what is UV Editing" or "what is UV map".
In my own words: basically UV editing = way we would convert a 3D geometry into 2D space coordinate called UV, sometimes called layout out UV, which result in UV Map.
UV Map is required for us to be able to assign a Texture Image to 3D object. Most game engine still prefer object with UV.
Learn from Simplicity of "Roadkill" UV Editor
"Simple is better than complex.", the second line of "The Zen of Python" by Tim Peters said. Simplicity can make difficult task a lot easier.Roadkill is an open source UV Editor that does UV in a simple workflow.
http://www.pullin-shapes.co.uk/page8.htm
 |
"TUFF GIRL" 2D Character Designed by Kouotsu / 3D Character Modeled by Daniel Kreuter |
RoadKill hotkeys are very simple:
- E = select Edge(s)
- C = Cut the selected Edges to create "seam lines"
- W = Weld back the edges
The pelting unwrapping is all automatic. Just like Blender if you enable the LIVE UNWRAP.
Why did I mention RoadKill, you might ask? Now, of course in comparison to Blender full complete toolset, RoadKill is no match. However, there is something here we can learn: SIMPLICITY FOR UV EDITING. I am all about efficiency and workflow.
With that idea in mind, let's now check Blender's UV EDITING and make the workflow as SIMPLE as RoadKill and even better!
BLENDER UV EDITING 101
Let's use default cube:
One important thing:
Blender Polygon Primitives do not come with UV Map. You can check this under Properties panel:
0. Check for current UV Map

1. Setup the layout for UV Editing
Next place to go when dealing with UV Map and Editing is the UV/Image Editor panel. Usually, I will use Blender preset layout. That is a good start because we want to be able to see the UV/Image Editor and the 3D View at the same time:

We got that layout like above. Do not hide the Blender TOOLSHELF yet. At this moment, the layout is not really helping you, but we need that Toolshelf to activate "LIVE UNWRAP" option.
In order to see UV, we need to be in Edit Mode. So, while selecting the object, hit TAB to go to Edit Mode. Next thing I do is to tap U on the keyboard and select Unwrap.
Remember that Blender is very HOT with hotkeys.

2. UV Unwrap Reset
Doing that will give you UV Map of every face, overlapping. This is the "reset" default UV Map.

3. Assign a generated Checkered texture to check the UV
At this stage, I would click on "New" button and create a new UV Grid Image.

It will give you Checkered texture which you can change to Colored Grid texture or Blank. Keep in mind that these generated Checkered image texture is "temporary" unless you actually save it. It is like a BUFFER image, only when you save it as texture, then it will save.
You can assign your own Image as texture preview. We are not going to do 3D or 2D Paint texturing yet, but that will come later. Feel free to start painting on it if you already know and impatient.

4. Set Viewport to display texture.
Now we like to see it on the 3D view as well, so we turn on "Texture" on the Viewport Shading option.

Ok, now, I will get the Property side pane (N) and turn on "Shadeless" so we see the texture without any lighting. This is useful for looking at your UV + Texture. Also useful when you are doing texturing later.
Sometimes, you want Viewport Shading needs to be: "Solid". Not "Texture".

We are nearly ready to do the actual UV editing. We can save BLEND file with this layout if want a view that is more like RoadKill from the very start.
Obiously, you can start doing the UV Layout right away, however, there are usually these OPTIONS that you want to have:
A. OPTIONAL: Live Unwrap (Off by default)


B. OPTIONAL: Sync Select both component in UV Editor and 3D View (Off by default)

By default, Blender does not sync the selection of components between UV/Image Editor panel and the 3D View. But now you know this is possible. What we usually care to select is usually the Edge while we are in 3D, and the Vertices while we are in UV layout.
NOW, we are ready to do UV Layout! Using the "simplicity" like RoadKill.
Hide all the side panels (hotkeys N and T) on both UV/Image Editor and 3D View.
 |
| Let's UV! |
When doing UV, we make guess on where we want to cut the SEAMS. Part where we can afford to have seams. Like in clothing. There will always be seams.
Now, our object is a 3D basic Cube. You want to flatten the 3D Cube just like Paper craft cutting.
Selecting edges, we need to toggle the Edge Select: (remember RMB click is for selecting in Blender)
Alt + RMB = select edge loop
CTRL + LMB = select edges in between two edges (shortest edges will be selected)
C = Cursor Paint Select (this function is locked to current view, you cannot orbit around while in this mode), sometimes this is more useful as SHIFT+C = paint deselect, ESC once you are done
B = Box Select

6. CUTTING EDGE (Mark Seam) >>> C in ROADKILL, CTRL+E in BLENDER
Once you select some edges, we then CUT it, or in Blender terminology = Mark Seam.
CTRL +E, select Mark Seam. We create SEAM where we can afford to have Seam for texturing. A good practice is to start cutting UNDERNEATH area. Or sometimes SIDE. Places that is hard to see.
Start cutting from the END of "branches". Start with fingers, then goes inside.

If you have "Live Unwrap" turned ON, Blender will do the auto unwrap for you and re-layout the UV everytime you Mark Seam. This is handy and the workflow I like to use most of the time. Sometimes, you do want the Live Unwrap to be OFF and you want to do the cutting without being distracted with Auto Cut.
To manually unwrap, just tap U hotkey and select Unwrap. Since you mark some seams on the edge, unwrap will give you a different result now.
Time to time, you want to use manual hotkey U - Unwrap, just to relayout the UV.

More Edge Seams Cutting.... (more Mark Seam)

We can do MARK SEAM on the 2D UV/Image Editor panel or the 3D view. As long you are in Edge Select mode.

All well and good, we get the "cross" like flat 2D UV that is the best to represent the 3D cube for texturing.
7. WELD / STITCH EDGE BACK
Sewing back edges or welding seams is done by using a hotkey V. The result will be displayed like below for you to confirm which object goes to where.
You could also REMOVE SEAM, it does a very similar thing.

That is all pretty much there is to it for the tool coverage.
For quickly selecting "Islands" or "Shell" of separate UV parts, you first select a component then use hotkey L (select linked).
There is also UV select tool, just by toggling to one of the icon (VERTEX, EDGE, FACE, UV).

Let's practice with other primitive objects:
SPHERE UV
For things like Spherical, we better off starting with Spherical projection. Pelting might work too, but depends...


Below is Maya's auto-UV for its Polygon Sphere.

ICOSPHERE UV

CYLINDER UV

TORUS UV: Follow Active Quads
Now, sometimes we actually want "Stretched" UV that is following quads evenly. So instead of the usual UV Unwrap "pelting" style:

We want something that is more or less like this:


Sometimes you need to use RESET UV to get the proper evenly stretched quads.
Straighten UV edges?
Wonder if Blender has something like this:
http://download.autodesk.com/us/3dsmax/2012help/index.html?url=files/GUID-9E98AEAC-F06F-4FAD-9091-DCD30AC9BB2-510.htm,topicNumber=d28e112454
Suzanne is an interesting one because it is like a human face. It has ears part that we can cut.
Below is a quick and easy way, however you see the resolution for the face is not good enough, but still alright. You can try different SEAM cutting.
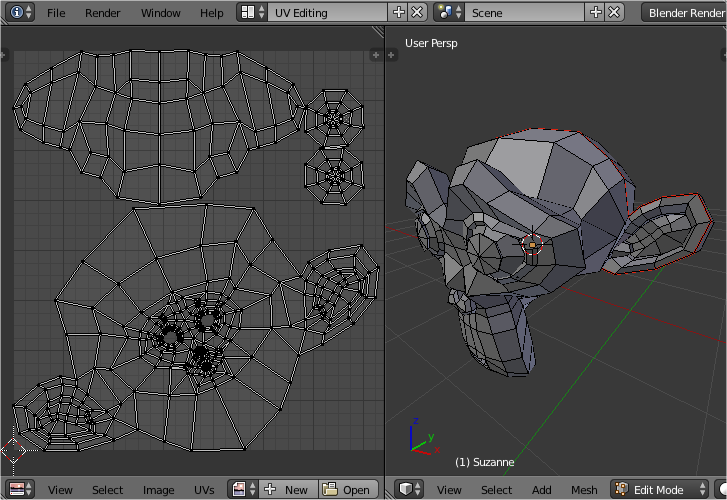

There are many ways to unwrap Suzanne the Monkey. There must be one that is the most ideal. However, just give it a try yourself.
Blender actually come with some more features for UV Layout:
I. Displaying Stretch Map (Angle or Area mode)
Blue = good/perfect/no stretch
Green = a bit stretched
Red = very stretched

II. Relaxing UV
Interactive relax the UV is called Minimize Stretch. The effect is interactive and adjustable by mouse scroll wheel, the simulation of relax is displayed.

III. Pinning UV
With Pelting method, you often want to PIN areas, just like a real cloth, you pin the corner, and you stretch that area just so that the resulting "flat" UV is more manageable, or to your liking.
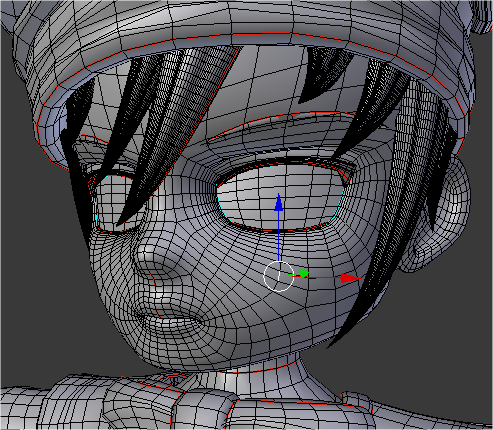
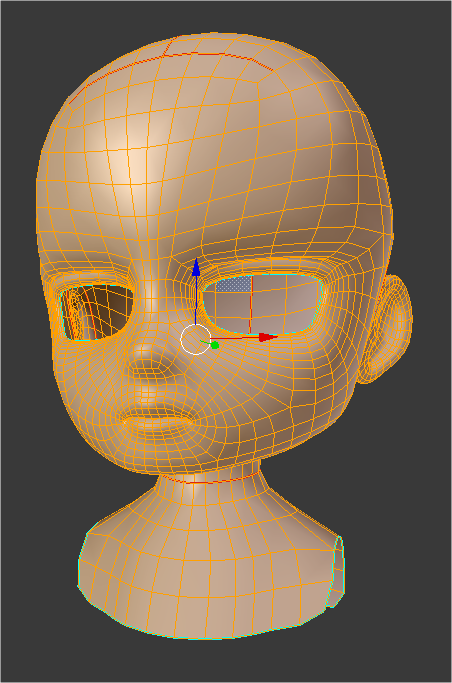
TIPS: Use Blender Isolate View Mode for faster & cleaner UV Editing
If you use RoadKill, you might find "slowness" when you are editing a complex Mesh with many objects combined into one object.In Blender, it is going to be a lot faster and moreover Blender has a neat way to isolate selected object parts while in Edit Mode, or Object Mode likewise.
Let say we have model that is made of many different parts, but they are all combined. The 3D model I am using for example here is "Tuff Girl" from BLENDSWAP, modeled by Daniel Kreuter. This model does not have proper UV, just the anime eyes and texture.
a. Select a component (edge, vertex, face)
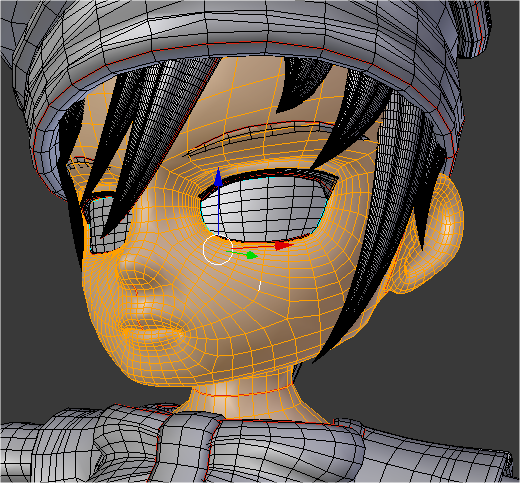
c. CTRL+I = invert selected (components)
d. H = hide selected
Now, with all other parts got HIDDEN, you can focus and work on this part of the Mesh only.
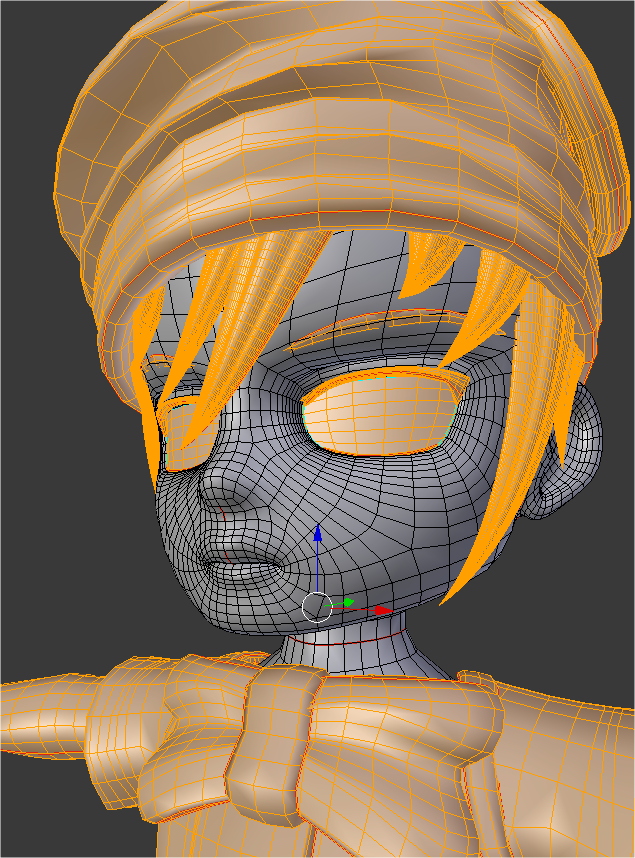
Blender is clever enough to unwrap this using all the UV space.

f. ALT+H = bring back everything.
Now, once we have done all the SEAM CUT, we can do the final Unwrap and Blender will again automatically pelt and unwrap the UV for whole objects.
BLENDER 3D PAINTING 101
I will just give a quick rundown here, but all pretty intuitive.
NOTES:
- If 3D object looks like xray, maybe you have Limit selection to visible turned on
- If you cannot do any Painting, that is probably because you have not assigned / connect the texture to Blender Image Buffer, you go to edit mode, then in UV/Image Editor, you need to assign an image, before you can start painting.
- If you use TILE UV Generated texture be careful, it may seems that you cannot do any painting, but it is actually overridden.
- Buffer image preview for UV and 3D Paint WILL NOT render, unless you save the image or assign the image texture into a Material.
- UV Texture + Generated Texture >> for UV Mapping.
- Image Texture >> Brush >> for 3D Painting
- Material + Texture >> applied for Rendering
Work in 2D Paint Mode:


Or Work in 3D Paint Mode:


SOFT VS HARD BRUSH

STENCIL / TEXTURE PROJECTION
You can use Alpha for texturing and you also can use 3D Texture Projection to do 3D Painting. It is an option inside the Toolshelf.

RMB drag = move the stencil image
CTRL + RMB = rotate the stencil image
SHIFT + RMB drag IN or OUT = scale the stencil image
RAKE (paint in angle following the brush stroke direction)
Set Brush Mapping to "View Plane", enable Rake under Angle. You might also want to set the Stroke options. This is useful to paint Snake Skin, bird feathers or those kind of tasks where angle of texture matters.

ADDING IMAGE TEXTURE AS BRUSH
This is one of those interesting quirk, for adding Image as a texture, where we need to go into Texture Tab inside Properties panel.

This is something that you will get used to. Basically, in Blender, if we have bunch of images we want to load, we need to load it one by one into the Brush Texture.
It is logical. We need to assign Image Texture specifically for Brush.
Image Texture => Brush
The image can be your own image or the Blender procedural image.
I think this is one workflow that needs to be improved. There must be a better way.
In fact, just for information, these textures data are slightly different:
1. Image Texture used inside UV/Image Editor (buffer)
2. Image Texture used for Material
3. Image Texture used for Brush
4. Image Texture used for Particle
5. Image Texture used for World (related to Scene Environment).
"M" Mode Painting
I don't know what this feature is really called, but if we tap hotkey M, we will be in this mode where we are painting based on the selected FACES only.
CLONE PAINT
Ctrl + LMB click to place the 3D Cursor to where you want to clone from. Then you can start paint cloning.
UPDATE 2014.04.10
DRAG AND DROP IMAGE, THEN START PAINTING (this is the FASTEST WAY)Apparently, you can drag and drop an image from outside Blender directly into a 3D object.
http://www.blendernation.com/2010/05/10/improved-drag-and-drop-in-blender2-5/
http://cgcookie.com/blender/2010/05/10/tip-external-drag-and-drop/
 |
| Drag and Drop and PAINT AWAY! However, this will not render, unless you assign the Texture into the Material properly. Like I said, the Image Texture for UV is different to Texture for rendering. |
If you like to load many images into the buffer, you could use Blender Add-On "Import Images as Planes".
Accidentally, I figure out that we can actually use Image Sequence or Video as Brush. This is very unusual, but somewhat works! By doing this, using ARROWS LEFT and RIGHT, we can quickly switch between different brush. We can even paint randomly using videos.
PAINTING WITH MOVIE (!)
If you have a random video with Alpha Channel, maybe a random images, you could practically paint randomly using "stamps" from videos.
Below is an example:
1. I created a VIDEO with ALPHA of Suzanne, saving it as Quicktime (with Alpha).
2. I reloaded the VIDEO as IMAGE TEXTURE for BRUSH. With "Use Alpha" turned on and "Calculate" option is also open.
3. Now, while painting, I have the Playback running and I can "stamp" and paint using Video.


COMMON GENERAL 3D PAINT HOTKEYS:
F = Adjust Radius / Brush Size
Shift + F = Adjust Opacity
S = Eyedrop Sample
Alt + F = focus wherever mouse cursor is
 |
| Painting with Numbers has never been the same since Blender :) |
IN CONCLUSION
For the actual techniques on UV Layout and Texturing, I will need to write another blog post. But this is a quick overview of the tools. Should be useful for 3D artists wanting to use Blender just for UV texturing and painting. There is a lot more that I might miss.
BOOK: Blender Gotchas
A quick plug, there is this new eBook by Andrew Buttery that talks about Blender gotchas that you might find (because anyone often has assumptions of how things supposed to work). Andrew describes the common problems and many solutions for each gotchas you found in Blender.I bought the book earlier today, have a quick read, and I still manage to learn a few things.
https://blendertraining.com/products/
The book is very useful for 3D artists switching to Blender or like to add Blender into the toolset. It is a type of book that every 3D artist would also write notes for themselves as they are learning a new tool.
However, I think a long time Blender users may still find some topics an eye opener or a good refreshment.
RANTS: Choose the RIGHT tool - the case of Maya
Now, I have a real case scenario I would share with you.I am a 10+ years user of (Alias/Wavefront/Autodesk) Maya.
I am slowly (but happily) converting into Blender around 2+ years ago. I still use Maya for some jobs (because it is industry standard and because Maya node based in useful). I also use Houdini. But these days, I use Blender for everything else, self projects, teaching 3D and future projects.
After years of experience, I realized that Blender is a kind of tool that I have always wish for. I am kind of CG artists that actually care about the tools I am using.
Each tool actually deserves a proper look and respect. Like wise man said: "Empty your bowl if you want to learn something new". It's good to be open with available tools.
Of course, I have my skepticism too. However I am learning to listen :)
Bad Developer, Good Tool....
From Maya 2009 - 2014, what Autodesk has been doing is refining the UI, make the realtime shader looks nice on the viewport, buying NEX modeling tool, it is really a needed cosmetic, but add things slowly. Commercial tools that requires $$$$ every year that does not do the common things properly.
What kind of company only gives out Updates and Bonus Tools, ONLY if you sign up and pay for yearly subscription? That is one greedy company.
Yahoo is as well = evil. They bought the awesome "KitCam" camera app, turn some features into Flickr app that can filter and upload photos, and abandoned the app (no updates). They killed the KitCam app.
Anyways... that is another story. Very unrelated, but worth a mention.
Maya is actually a really powerful tool, just developed half-asses. Maya 2014 crashes the most. Maya 2015 only added ability to see UV Stretch Map. After so .... many ... years.
However, I tried to stay neutral and will always see the goodness in Maya or other 3D packages that eventually ... Blender can adapt:
BACK TO TOPIC:
 |
| Maya Primitives Poly comes with Auto UV. Blender probably needs this as well. |
- Maya Polygon Primitives come with Auto-UV (!)
- Maya has 3D Paint Effect = procedural painting tool
- Maya MEL scripting is easy and rich, and any Maya script can be easily docked into Shelf. Blender Python (BPY) should be made easier like that.
So, I think Blender is the only hope left in "3D Industry" that is more and more toward becoming independent productions.
Thanks to Ton and Blender Developers. Hope Blender continue and steady, until version 3.0 and beyond.
Blender IS the ultimate standard of 3D and Computer Graphics, so if there is any other (commercial) 3D package that actually does 3D in a much more complicated and uneasy way, then you chose the wrong tool.
Below is the standard Cube UV Mapping process in Blender. Maybe even easier in the future, who knows.
// MAYA MEL SCRIPT TO SUMMON BLENDER
Thanks to Ton and Blender Developers. Hope Blender continue and steady, until version 3.0 and beyond.
Blender IS the ultimate standard of 3D and Computer Graphics, so if there is any other (commercial) 3D package that actually does 3D in a much more complicated and uneasy way, then you chose the wrong tool.
Below is the standard Cube UV Mapping process in Blender. Maybe even easier in the future, who knows.
UPDATE 2014.04.13
A QUICK SCRIPTING HACK TO TELL MAYA TO SUMMON BLENDERTASK
To be able to send OBJ from Maya to Blender ala RoadKill UV Editor.
// MAYA MEL SCRIPT TO SUMMON BLENDER
system("blender.exe --python blendobj.py -- C:/OBJ/geo_out_temp.obj");
"blendobj.py"
import bpy, sys
bpy.ops.import_scene.obj( filepath = sys.argv[-1])
NOTE:
Once the script is complete I will post it in my blog. The idea is simple, just export-import and streamline the OBJ.
But there are few things to clean up and I also want some kind of "quick render" using Cycles thing happening.
This is only for USERS that are using other 3D package and using Blender as MacGyver swiss knife!
Post a Comment