Halloween Costume ideas 2015
Articles by "armature"
@dorothiar #arttips #interview 101 2 Column Template 2012 mentee 2013 2013 mentee 2014 2014 mentee 2014 Portfolio Winner 2014 SCBWI Portfolio Mentorship Winner 2015 mentee 3 Column Template 360 3d 3d print 3d printing 3delight 8bit Abbey McCulloch abstract acryla gouache acrylic action addon adobe Adobe Flash CS3 Adobe Illustrator Advanced Tutorials advection Advertising advice Agata Wierzbicka agents airplane Al Wiseman ALA Alan E. Cober Alan Lee Alex Ross Alexandra Compain-Tissier Alexandra Lekias Alexandra Levasseur Alexandre Korobov Alexis Winter algorithm alien ALT Amelie Hegardt Amit Shimoni amusement an Ana Aranda analog Andrea Hrjnak Andrea Hrnjak andrea offermann andreaoffermann andreazuill Andy Musser Angela DiTerlizzi Angelika Peißker animal logic animals animation animation nodes anime anisculpt Anja Kroencke Anna Higgie Anna Jensen Anna McKay Annabel Briens AnneBerry Anneke Krull Annu Kilpeläinen anstudy anthology António Soares ar arduino area armature arrange array array modifier arrow art art director art directors Art is fun! art reps art tools Artaksiniya arthictecture arthur rackham artists artwork ase Ashlyn Anstee Asian aspiring asset atom attribute attribute transfer audio Audrey Kawasaki augmented reality aurasma Aurelius Battaglia author illustrator automatic automation Autumn Whitehurst avatar Avrom Yanovsky AW14/15 award awards Babeth Lafon Babies baboon Baby Love Background background color bacteria bake baking ball Bamboo banner Banner images banner making Barbara Dziadosz barcode basic bbox beads beats Bec Winnel beginner Bel Johnstone Ben Denison Bernie Fuchs Berto Martinez Beth Krush better photos bge Bijou Karman Bike biscuit bishop black and white black and white art Blair Breitenstein blam blender blender game engine blender3d blending Blinkie Blinky blob blocks Blog Tips blogger Blogging Friends blogs Blonde blur effect in pixlr and photoshop blur images and pictures bmesh bmesh viewer bolognaragazziaward bombing bone bone modeling bones book book launch books boomerang bottle bounding box bowl bpy brian eno brian ormiston Brian Sanders brian won brick bridge Bridget Davies bright Brooke Boynton Hughes build modifier building burns business Buttons bvh cage Caitlin Shearer caldecott calibration camera camera settings camera tips Candle capcom card career Carole Wilmet cartoony Cassandra Rhodin cast Catherine Campbell Cecilia Carlstedt cell center pivot centipede cg cg photography chair challenge Chanel changin color in pixlr changing color chaos character Character Bible character development charcoal charles Charlie Dot Charlie Hebdo Children children's book illustration chocolate Christina Drejenstam christina forshay Christina K christinaforshay Christmas Cindy Derby circle circle dance city cityengine clock clones cloning cloth Cloud based clover CMYK Coco Chanel Cody and the Fountain of Happiness coffee collect collection Collections collision color color balance color cast color correction color mode color study colorful Commercial Use complexity component compositing composition computational thinking computer concept art Condensed Posts conference connect connect the dot connection Connie Lim Conrad Roset constrain constrast contagion content Contest contracts control converter copy copyright Corinna Luyken count Courtney Brims crack Craft craftsmanship Craig & Karl creative creativity creature cricket Cristina Garcia Martin critic criticism critique Crop Crop Tool cross section crowd csv cubism curve curve modifier custom Custom Blog Design Custom Blog Design Tutorial Custom Blog Designers Custom Illustration custom properties Custom Signature custom xml cut cutting plane cycle cycles dae Damien Florébert Cuypers Dan Hillier dance Daniel Egnéus Daniel Segrove Danny Roberts Daren Newman Dasha Tolstikova data data path David Blossom david diaz David Shrigley David Stone Martin Dean Hardscrabble Debbie debbie ohi debbieohi deform deformer degrees deleting background in pixler demo demoscene desaturation of images design design by numbers design process Design Tips dictionaries dictionary Different Text Writing in Pixlr digital digital paint Digital Scrapbook Freebies Digital Scrapbooking disk distance distractions distribute diversion DIY DIY Contest Dolf Veenvliet Doll Doll Bones dolls domino domino effect doodle Doodles door doraemon Doris Jackson Dorothia Rohner dots dpi draw drawing drill driven driver drivers dual versions dummy duplicate duplicates duplication dupliframe dvd dynamic dynamic paint dynamic text E Simms Campbell Easy easy pixlr Easy Tutorials Ed Graham Ed Vebell editing editing photos editors education effect effects ego Eleanor Dalton electric Elia Fernández eliza wheeler Elizabeth Mayville elizawheeler Emily Forgot Emma Zanelli emoticon happy-face Emotional storytelling empathetic characters empty entoforms envy epicycloid EPS Illustration Epson scanner erasers Erin Armstrong Erin Petson erinoshea ernest shepard Esra Roise euler evaluate line Eveline Tarunadjaja evenly spacing vertex event everywhere door exhibition Expandable Posts experiments explode exploded view export expression extrude eye eye color in pixlr eye trick eyeball face rig facial expressions facial setup factory Faiyaz Jafri Families fashion illustration fashion week fcurve feature Featured Fee Harding Feedback fence Fernanda Guedes fibonacci Fifi Lapin file File Types Finalists Finding Nemo fire fix photos Flash Tutorials flicker flip flip flop floor flop flow flower Flowers fnmatch focal point follow up font Fontaine Anderson Fonts food footage For Sale force form formula fractal fracture frame Frames Francois Berthoud Frank Bellamy Frank Furlong Franklin McMahon freckles Fred Steffen FrederiqueBertrand Free for Commercial Use Free for Personal Use Free Stock Photography Free transform tool Freebies Frenchillustration Fritz Siebel frosted mylar fruit ninja Fumi Mini Nakamura Fun function futurism FW2017 fx Gabriel Moreno Gabriella Ibarra game game animation gameart gamma gangnam style Garance Doré Gary Fernandéz gel medium generate generative generator geometric geometry Gerald Lazare Géraldine Georges GIF Gildo Medina Girl Giuseppe Castellano Giveaway glorar goals golden ratio google google docs Google Tools Grant Young graph graphite graphite transfer grease pencil grid group group node growth Gucci Guest Guil Godier gustave dore hair handbook Harper's Bazaar harpercollins Harvey Schmidt Haute Couture head Headers heat map Helena Hauss hexagon hexagonal grid Hiroshi Mizuno Hiroshi Tanabe Holiday Holly Black homology honeycomb hook horror houdini how to how to blur a face or an object in pixlr How to change eye color how to delete an object how to desaturate an image how to edit a image in pixlr how to erase an object how to fix red eye problem how to fix red eyes in pixlt How to fix the parts in pixlr in photoshop How to make a banner in pixlr How to overlap the nevus how to remove a object How to remove an object in pixlr how to remove red eyes How to Remove the Background of an Image in Pixlr How to remove the parts that you don't want in pixlr and photoshop how to replace color How to write a Patterned Text in Pixlr how-to Hsiao-Ron Cheng hsv hue humor Hyshil I love illustration magazine idea ideas Igor+André illusion illustrating illustration illustration board Illustration Books Illustration Intensive Illustration Now! Fashion illustration process Illustrations Illustrative Berlin illustrator Illustrator Intensive Illustrator Tutorials iloveillustration magazine image ediditing lessons Image Ready image sequences image theft imaginative import import text import vertex color improving photos inbetween index visualizer Info Ingrid Bockting ink inktober input Inspiration inspirational quotes install instance instance switching intensive interaction Intermediate Tutorials internet interoperability interpolation intersect intersect edges intersecting intersection interview introduction invoke subprogram io ipad Irana Doucer Isabella Hemmersbach islam islamic iteration Izzie Klingels Jack Hearne Jack Tremblay James Dignan James Gurney japanese Jason Brooks Jean Kim Jeanne Detallante Jen and Chris Creed Photography jen betton Jen Rofé Jenny Mörtsell Jeremy Combot Jeslyn Kate Jesse Auersalo Jessica Jessica Lanan jessicalanan jewellery jewelry jiggle Jim Schaeffing Joe Bowler Joe Cleary Joe Isom Joe Krush Johanna Goodman john maeda John Vernon Lord joint Jordan Sondler JPEG JPG jpop juana martinez-neal juanamartinezneal Judge Judit Garcia Talavera Judith van den Hoek Judy Byron Schachner Jules Julien Julian Beever Julie Verhoeven Jump Break Tool JW Anderson K-Fai Steele Kaethe Butcher Kareem Iliya karel zeman Kate van Harreveld Kathrin Kuhn Kathryn Ault Noble Kathryn Noble Katie Kath kdtree Kei Meguro Kelly Beeman Kelly Light Kelly Smith kelly sonnack Kelly Thompson keyframe keyframing kidlit kidlitartists kimberlygee Kirkus Review Kisoo Chai Kodak Konstantin Kakanias Korean illustration Kotaro Chiba Kozue Himi Kremos Ksenia Finogeeva KT Smail kuler Kustaa Saksi Lanan Laptop larry gritz lasso tool latte lattice Laura Callaghan Laura Laine Lauren Rille layer layering Layla Holzer layout leaf learning learning blender LED Leendert meets Ingrid lego length Leonard Starr lessons levels LFW A/W 14 liangzhu liero lightbox lighting lightning Lina Bodén Lina Ekstrand Linda Dorn line line connect line drawing lines Links Linky Love Linn Olofsdotter Lionel Gilbert Lisa Anchin Lisa Billvik Lisa Krannichfeld lisaanchin lisbeth zwerger Liselotte Watkins list list comprehension List First Last listing locator lofting logo Logo Design Lola Dupré London Fashion Week loop looping loops looptools Lorraine Fox lossless lossy lost weekend lostweekend lotte reininger Louis Glanzman louis vuitton Luciana Rondolini luciograph LULU* lv Lynnie Zulu Mac macgyver macouno maeda Magda Antoniuk magic Magnus Voll Mathiassen mailing mailings maker Makiko Sugawa making banners Malika Favre MAMP mandala manga map map range maplelam mapping Marcel George Maren Esdar Margot Macé Margot van Huijkelom Maribeth Olson Marie El-Ahmar Marilyn Conover Marina Esmeraldo Marine Marbleindex mario Marlies Niemeijer Marsha Riti Martha Rago Martin Krusche Martine Johanna mask masking material materials math matrix matrix apply matryoshka Matt Baker matte medium Matthew Woodson maya maze mdd Meagan Morrison measure megaman Megan Hess Meizhen Xu Mel Crawford memory mentee mentees mentors mentorship program Mercer Mayer Meridth McKean Gimbel mesh mesh cutter meshlab Meta Tags metal gear rising Meyoko Mia Overgaard Micca mice Michael Sanderson Michela Picchi middle grade midi miku Milan milipede minidom Minima Mio Matsumoto mirror cut Misc Miss Blackbirdy miss maple's seeds Miss Take Mitchell Hooks mixamo mixing Mobile Apps mocap mod model modeling modifier modular modulation modulus mold molecule molly idle Molly Ruttan Molly Ruttan Illustration money monitors monkey mono-zero monster monster university morph morpher mosaic mosquito motion motion capture motion capture mouse motion trail moto360 mountain muji Muriel Wood Murray Tinkelman mushroom Music and Podcasts My dead pony Nadia Flower Naiad Einsel Naja Conrad-Hansen Natalie Brockett Natalie Foss nathan vegdahl nautilus Nav Bar navigation needle-felting negotiating Neil Boyle neon nescbwi14 nested New Blogger Questions New Blogger Template Tutorials new user pixlr new year new york New York Fashion week Newbery nicholas nicholas bishop Nicholas Hong Niki Pilkington Niso Ramponi nla No Software node node-based nodebox noise non linear animation Non-Web Font normal Noumeda Carbone npr number NURBS NYFW object object color change object info octopus offset Ola Volo Olaf Hayek old formats opaque projector open movie open shading language open source openshadinglanguage opensoundcontrol optical organization origami original art show Ornaments osc Oscar Schlienger osipa osl outline outliner output Pages paint paint weight painting painting on illustration board painting on wood painting with movie painting with numbers Pair pandas panorama Paper paper lantern parabola parametric parent parenting particle particle info node particles pat david Pat Zietlow Miller pattern Patterned Text Paul Faassen Paul X. Johnson Paula Sanz Caballero PC pdb pebbles pencil Pencil Sketch pencils Penguin perfume perlin Peter Helck Photo CD.8B photo editing software Photo Reference Photobucket photographing art Photographs photography photomerge photoshop Photoshop Brushes Photoshop CS3 Photoshop elements photoshop pixlr desaturaion Photoshop tips Photoshop Tutorials Picture Book Builders picture books Pierre Louis Mascia Piet Paris Pietari Posti pingpong pinnochio pipes pixar pixel pixel art pixel generator pixlr Pixlr advanced Pixlr blog pixlr desaturate keep a colorful part pixlr editting pixlr express Pixlr forum Pixlr free transform Pixlr Lesson Pixlr lessons Pixlr mobile Pixlr resizing images pixlr shortcuts Pixlr tools pixlr tutorial pixlr tutorial with pictures Pixlr Tutorials pixlr white black pixlr.com plant plot plotting ply PNG PNG Illustration podcast point point color pointilism polka dots polyCut polygon Pomme Chan pop-overs portfolio Portfolio award portfolio showcase portfolio-advice portrait position Post Dividers postcard poster Posting pot powdered graphite powerhousemuseum Prada presentation print printmaking Prize procedular procedural process processing programming projection Promotion property prototype PSD psy publishing pulse puppet puppetry pydriver pydrivers pyhandler pyhandlers pyramide python quad quick select set quick tips qumarion Rabbit Moon Rachel Ryle radians radius ramp random random motion randomization randomize range float raspi Ray Houlihan reading reading XML READY-TO-WEAR realflow Rebecca Clarke rebecca dautremer Rebecka Skog rebuild recursive recursivedrawing red eye remove reducing glare reference referencing release remesh modifier remix removal remove remove red eyes remove unwanted objects Removing backgroung render rendering renderman repeat repeater repeating replace replacement replacing color representation rerouter resample resampling research Resizing image resolutions retopology retro review revolve rgb rib Ricardo Fumanal Richard Scarry rig rigging rigify Rikke Jorgensen ring ripple roadkill Robert Heindel Robert J. Lee Robert McCloskey Robert Shore Roberta Zeta Robin Rosenthal robot robotic rocks Rodolfo Montalvo Roller Coaster rotation Rousseau rsl Rubin Pfeffer ruler tool Russ Mills russian rut S/S14 S/S15 S/S16 Sabine Pieper sadako Saftey Pins Sainte Maria Sale Sam Weber Sanda Suy Sandy Kossin santoso Sara Andreasson Sara Singh Sarah Jacoby saturation artist tools scan scanners scanning scatter scbwi SCBWI 2015 mentee SCBWI conference scbwi germany SCBWI mentorship scbwi-la scratch scratchboards screensaver screw screw modifier script scrub sculpting seamless Seamless Patterns Search Engines select by material select by name select by type SEO sequence series set keyframe set keyframes shader shading shadow Shannon Stirnweis shape grammars shape key shapekeys shapes shards shatter Sheilah Beckett shell ship shipping shipwright Shoes SHOWstudio shuffle Sid Barron Sidebar Titles Signature Silja Goetz silkworm Simon and Schuster Simon Varela simple simplicity simulation sine Site Engine Optimization Sjoukje Bierma sketch Sketches sketching skin skin modifier skinning slice slicing slides sloth slow parent smoke smoothstep SN snake Sneek Peek snippet Snow Snow White Snowflakes soccerball social media Social Media Buttons Social Networking society of illustrators Society6 soft body softbody Sonia Menti sound sound wave space spaceship sparta special spider spiderman spiderweb spin spiral Spiros Halaris Spiros Halaris x Urban Decay spline Spot Healing Tool spreadsheet SS16 stack stacking stair stamp Stan Galli star starfish stencyl step Steven G. Dobson still Stina Persson stone stones storytelling strand strand info strands street art string stripes structure studies studio style stylistic summary Summary Posts Summer sun supplies surface Susan Farrington suzanne Suzanne Kaufman sverchok swatch switch sydney system table table of contents take out background Tal Drori tangent tangled Taschen teaching teapot Template Templates tentacle Tess Jacobson Tex Avery text text editor Text Formats Text Styles in Pixlr texture texturing The Cartorialist The Grudge Keeper The Purple Book thinker1 Thomas B. Sawyer thread TIFF tile tilecam tiling time time code Tina Berning Tina Kugler tips tips for artists Toby Neilan Tom Baxter Tom Bjarnason tombow tomie depaola tool tools topology tower Tracy Turnbull Train transfer drawing transferring sketch transform transformation transit travel triangle wave Tricia Springstubb trigger tris tristan lock tube tubes Tutorials twitter type tool typeface typography unbake unity3d universal unquad utah uv valentine Valentino Valerie Servais vanilla variable variation variety vase vector vectorized Velwyn Yossy venus Veronica Ballart Lilja vertex vertex color vertex group vertex paint vertex weight VFX Victoria Boysen video Videos viewer Vintage virtual virtual studio visualization vivid vividfestival VOGUE volumetric voronoi Vote voxel voxelated voxelation walking teapot Walter Einsel wand tool water soluble graphite watercolor wav wave we need diverse books web webbing Week Themes weight welcome Wendy magazine Wendy Plovmand what casues red eyes What is Pixlr Wherever You Go Wide Awake Bear wiggle Will Davies Winner Winnie Fitch Winnie Truong Winter wire wired wireframe wolfram Woman wood woodwork wool wooly wordpress work workflow World writing writing XML www.pixlr.com XML YA yayoi kusama Yelena Bryksenkova yoda Yoko Furusho Yuliya zaha hadid zen zsphere


NOTE: 
This 101 on Rigging will grow overtime. With my 101 blog articles, I often update it and adding more information as I found more.

Ok, finally I am pretty confident to start writing post about Blender rigging and hopefully this can be useful for everyone.

I shall touch the basic of rigging in Blender first, and hopefully improve my writing to more advanced rigging in few posts to come.

I am actually basing my Blender rigging post from Nathan Vegdahl's DVD on rigging, with some extra notes based on my own understanding and experience with this area.

RIGGING IS AN ART

My rigging background is from Maya and I have become too familiar with Maya rigging workflow. I use Maya for over 8+ years now, my main are of focus is on character animation and rigging too.

BY NO MEANS, I am an expert in rigging, but I am about intermediate level. I am a teacher and mentor, so I know the general foundations pretty well.

While my Blender knowledge is 1+ year old. I am new to Blender rigging. So I am a student again.

I wish there are more Blender riggers out there can mentor or share their techniques. Or actual Blender projects that can push me better with Blender rigging. But I guess if I keep looking I will find a way.

So, I am not totally blind with rigging, but at the same time I am new to Blender rigging. Luckily Blender Rigging has some similarity to Maya. And more.

Anyhow, one needs to be brave to take first step and start learning.

BLENDER RIGGING

When switching to Blender, there is a slightly different approach. Conceptually, rigging in any 3D package is pretty similar.

But I don't like how people often oversimplifying things. Rigger cannot just switch from one package to another, there is always a bit of learning curve, but they may be able to learn it faster if they have experienced in that area.

Yes, rigging can be automated, like MIXAMO Rig or all kinds of automatic rigging script out there. However, they are good for generic character. There is nothing more beautiful than a nicely rigged character that works well for particular animation.

Using particular 3D tool, whether it is Maya, Softimage, Houdini, 3dsmax, Cinema4D, Lightwave, or Blender, a really good rigger needs to be flexible and switch his/her ways of thinking to suit the rigging tool set in hand.

It is not certainly not just different in UI. There is always advantages and disadvantages of one tool over another tool.

Quoted from Nathan Vegdahl: "Rigging is a mean to and end". So, every rig should have a purpose. When rig is complete, that is when animation can begin. RIGGING is just part of process to get to the final.

BLENDER WIKI ON RIGGING AND ARMATURE

http://wiki.blender.org/index.php/Doc:2.6/Manual/Rigging/Armatures

BLENDER DVD ON RIGGING

Nathan Vegdahl's "Humane Rigging DVD" is probably the only Blender Rigging DVD out there. I could be wrong, but this is certainly one of the BEST rigging DVD out there.

There are also some Blender rigging video tutorials from CMIVFX (the Mammoth Rig) but unfortunately they use older Blender version. They did try to kind of explain the difference, but still it is not easy to study rigging tutorial using old Blender when you are actually using new Blender interface.

STEP BY STEP RIGGING CONCEPT (this is the same on every 3D software)

  1. Analyzing and preparing the 3D model to be rigged. Do clean up, make sure it has good topology. Make sure it is face the FRONT axis of the world.
  2. Consult your animator and clearly understand on what this rig is going to be used for (what animation).
  3. Break down the rig into smaller functions: Face Rig, Eye Rig, Leg Rig, Arm Lig, Torso/Spine Rig,  
  4. Draw and place joints (or bones) in place.
  5. Create controls and apply constraints
  6. Paint weighting
  7. Corrective Shapes
  8. Body Rig and Facial Rig
  9. Advance additional layers: Muscles, Dynamics

BLENDER EMPTY, ARMATURE EDIT MODE AND POSE MODE

Blender has its own unique way in handling rigging.

Like Nathan stated on his rigging DVD, there are 2 very important Objects related to rigging:
The Empty and The Armature.

Empty (or sometimes called NULL) is an object that only has Transformation information (position, rotation, scale). It cannot be rendered, but it appears on 3D viewport as a shape.

Armature is similar to Empty, but it has more to it. For every Armature object, it consists of bones hierarchy (aka bone chain), Armature has 2 mode to work with: EDIT MODE and POSE MODE.

To switch to Armature Edit Mode, you select the Armature object and hit TAB.
To switch to Armature Pose Mode, you select the Armature object and hit SHIFT+TAB.


Animator animates in Pose Mode. Armature is a single object that actually contains a lot of other objects and information, but able to maintain a Single Actions animation data.

BONES IN ARMATURE

Bone in Blender is simply powerful.


Bone in Pose Mode is Transform-able (Position, Rotate, Scale).
Bone can be saved as Pose Library.
Bone can be extruded.

As single bone can be squashed, stretched, and broken into segments (like for tail)

BLENDER CONSTRAINTS AND DRIVERS

There are also 2 features that relates closely to rigging: Constraints and Drivers.

This is quite common in all 3D package, but Blender has its own set of Constraints. In Blender, there are some constraints that are available for all common object (including Empty)

There are also more constraints that are only available inside Armature and can be applied when you are in Pose Mode:

Well, both seems to be showing all the constraints, but things like Inverse Kinematics is something that specific to Armatures and Bones.

BLENDER SPLINE IK SETUP

Spline IK in Blender is very interesting.


The Bone Constraint Spline IK itself is pretty simple, easy to setup. We need CURVE object that will drive the Bone. But how do we drive the CURVE? How do we CONTROL it? The answer is HOOK. Apparently we can also exchange HOOK with BONE!!


Grease Pencil => Curve => resample Curve (simplify) => Polygon Edge Mesh => Skin Modifier => turn this into a BONE CHAIN


HOOK Modifier - Blender Diplom

https://www.youtube.com/watch?v=Z7WXOM3iQYM

PARENTING CONCEPT

Ctrl+P to parent.
Alt+P to unparent.

In Blender, Bone is can be FREE, PARENTED, CONNECTED.

Maya users switching to Blender rigging will be a bit shocked to find this (yes, that's me). We understand the idea of having broken-hiearchy-joints, but the modularity of Rig and the Mesh in Blender is shockingly simple in implementation.

SILHOUETTE SHAPE ON CAMERA DEFORMATION

For a more advanced technique, you will something called Pose Space Deformation fixes.

I think Shape Tweak for Silhouette can be done using AniSculpt tool from Pepe:
http://www.pepeland.com/

PRESERVING VOLUME WHEN USING ARMATURE DEFORMER


ROTATING JOINTS FROM INDIVIDUAL PIVOT

Animator from Maya will understand this "gotcha!". By default, Blender Rotation is not actually based on Joint Individual Rotation. But you can do that if you like to, especially when animating something like tail.

In Maya, there is a lot of restriction on how we can transform Joints.

In Blender, we are FREE to Transform Joints as we please, to move them in space, to scale in any axis, to rotate in any pivot, it will all work, in a Animation Pose kind of way anyway. Probably the Rigger will tend to say => well, we probably need to rig cleverly.

However, in Blender, actually animator don't need to worry about that. Sometimes having JOINTS just moving and deforming character into POSE in 3D is more important.

In Blender, you might notice that ROTATION was not set to EULER by default, but QUATERNION. I was shocked too at first. This is so unusual. However, when animating for ROTATION, animator don't care about XYZ, but more about the SPACING and TIMING to get the POSE. They should not deal with GIMBAL LOCK stuff.


DRAWING AND PLACING BONES (Edit Mode)

Unlike Maya where you draw Joints and need 2 Joints to create Bones, in Blender you always start with a Single Bone. You cannot have just a single entity called Joint. I think similar concept is used in Softimage.


Blender default Bone axis is down in Z axis. Unlike Maya, which typically down in X axis. This means the bone Twist Axis is Z axis by default.

To turn on the Axis visibility of Armatures (all the bones) you do that on the Property panel:


JOINT ORIENTATION (Edit Mode)

Twist of Bone can be adjusted at anytime in Edit Mode. It will not affect the weighting or mesh.

QUATERNION VS EULER (Pose Mode)

Blender has 2 types of rotation for every object, which default on Quaternion.

Euler rotation is prone to Gimbal Lock.
With Quaternion, we don't need to worry about rotation, just pose your character.

MAYA: JOE ALTER L-BRUSH AND BRAVE RABBIT SHAPES

I often got the Pose Space Deformation mixed with Blendshape Corrective Shapes. PSD is probably a more advanced topic.

Something like this would be nice, L-Brush from Joe Alter.
http://www.lbrush.com/

NOTE: I switch back between Maya and Blender and trying to find a similar or equivalent tools in Blender. I think this is a good way to think of it. In Blender, we are all sharing skills and trying to brainstorm for the best and simplest of tool possible.

There is also this one from Brave Rabbit:
https://vimeo.com/80840525

CONTROL AND CONSTRAINT (Pose Mode)

Rig controls in Blender are BONES itself. They are created in Edit Mode, but you do the constraints in Pose Mode.

If you want to do parenting of object geometry, you do it in Pose Mode.

Shape of CONTROLS in Blender can be changed easily. Any MESH can become the SHAPE of controls.

BIND AND SKIN WEIGHT

Parenting Mesh to Armature will give you option whether you want to have Auto Weight. Blender Bone Auto-Weighting is really good. It's like Heat-Map and just works beautifully most of the time.

Select the armature and go to Weight Paint Mode

SPECIAL: ACTION CONSTRAINT

https://vimeo.com/8754153

HOTKEYS FOR RIGGING

USEFUL HOTKEYS WHEN DRAWING JOINTS/ARMATURES

E key = extrude bone
F key = connect between 2 Joint Point (you must elect 2 points only)

ALT +F
Reverse Joints

CTRL+SHIFT+C
To quickly add Constraints

BONE: Edit Mode
This is where you will want to work to edit, extrude bone, etc.


You don't need to Freeze Transform the Shape (unlike Maya)


BONE: Custom Shape
Need to be done in Pose Mode

Alt + P Clear Parent
When creating a quick control, you can quickly extrude bones and then Clear Parent


FOR CURVE
v = change vector handle type

USEFUL HOTKEYS WHEN POSING IN POSE MODE
A = Select All Bones (blue color)
Alt+R = reset rotationg
Alt+G = reset position
Alt+S = reset scaling

Don't forget there is also ARMATURE MENU apart from HOTKEYS:


WORK IN PROGRESS: Sverchok for Bone and Rigging and Procedural Character anc Creature Creation

Don't be scared. Everything will be simpler in time! Remember EDGE => SKIN MODIFIER => BONE.

You can create all kind of complex bone, procedurally and parametric. With a good setup, of course.

Just an unfinished work in progress. Sorry for Grease Pencil scribbles.

USEFUL HOTKEYS FOR WEIGHT PAINTING

RMB Click = select armature joint that you want to paint weight around the mesh points
F key = change brush size

USEFUL RIGGING RELATED LINKS

How to Rig An Arrow
https://vimeo.com/94007193

Rig - Animator Blog
http://www.riganimator.com/tips/animtip/

Suchan Raj Blog
http://suchanspot.blogspot.com.au/

Procedural Centipede in Blender.

I am a little bit side-tracked, but I still want to think Pixar and procedural monster. I will focus on one character: Dean Hardscrabble.


UPDATE 2013.10.15:
Watch also this video:
http://youtu.be/kuAsOyzawNY

This lady here, according to Pixar Wikia, is based on creepy crawling insect, the Centipede:
"Dean Hardscrabble’s character was modeled after a type of centipede called Scolopendra Gigantea, also known as the Amazonian giant centipede."
http://pixar.wikia.com/Dean_Hardscrabble


MODELING CENTIPEDE PROCEDURALLY

I wonder which one is actually more "tricky" to create, maybe each one gives different challenges:
  • Procedural Insects
  • Procedural Monster
  • Procedural Human (Biped)
  • Procedural Anime Character
  • Procedural Human Heads
In this post, I may not have 100% solution, but I will take you through the process of thinking. We will look at example inside and outside Blender.

Creatures like Centipede or similar kind (like Millipede, Maggots) is a type of creature that is truly perfect for Procedural Modeling and Animation. Many other insects like ants, spiders, butterflies, dragonflies, Trilobite, etc, are all very interesting to study and model procedurally because they can be reduced to "primitives and parts".

GREAT EXAMPLE: Procedural Spiders by Esther Zuidgeest - Houdini
http://www.youtube.com/watch?v=2b11iiBjS9Y

3D printed Octopod Robot:
http://www.youtube.com/watch?v=HfiHOpv6HtI

Let's look at Pixar's Dean Hardscrabble again. She is modeled quite "realistically" based on Centipede especially her lower part of body/torso and legs. While her face and wings, are more like Dragon. It is a very interesting in term of design. I do not 100% agree with the wings, but flying crawling creature is pretty "scary" monster, I guess.

http://www.youtube.com/watch?v=ySapzrgfImc

This character may seems simple, but she is certainly not "simple" when we really look at every details. This is what makes a Pixar: a simple character but complex shadings.

I guess we can focus on the Dean's CENTIPEDE's SPINE and LEGS parts for now...

CENTIPEDE SPINE AND LEGS

If we are to model such creature with many repeating legs in Blender, how would we do it?

There are many techniques that I could think of. Not just Skin Modifier, but many others as well.

Below are some of the list of Blender features that might be useful to model a Centipede SPINE AND LEGS:
  • Skin Modifier
  • Grease Pencil
  • Curve Object
  • Curve Modifier
  • Array Modifier
  • Joint Sketching
  • Blender Particle Intancing
  • Python + NumPy and MathPlotLib stuffs
  • Dupliverts or Dupliframes or Dupliface
I actually found a lot of other interesting informations (that is not totally related to Centipede modeling) while observing this idea of modeling and creating a Centipede using Blender. 

SKIN MODIFIER: VERTICE RADIUS AND PYTHON  = SPINE PART
Yesterday, I have a bit of exploration of Skin Modifier but from Python context.

I am always curious with how we can access the "weight" of each point (vertex) of Skin Modifier via Python. You know, kind of like when we apply Skin Modifier to an edge, go to Edit Mode, and do Ctrl+A for some vertices to Scale the Radius size of each segment.

I did Google Search everywhere, and the only clue is this blog post:

It mentions about Skin Vertice and Radius.


I also asked the same question at Blender Stack Exchange, and thanks to answer by Dealga aka Zelffi (Blender Scripting guy), this became very clear:

What more interesting is that there is not actually 1 Value for Radius Weight Value for each vertex, but a set of 2 Values:

import bpy

# Get selected mesh with Skin Modifier applied
skin = bpy.context.active_object.data.skin_vertices[0].data

# Iterate every point/vertex and get/set the Radius

for i, v in enumerate(skin):
    print ("vertex", i, v.radius[0], v.radius[1])

    # Change the Radius Value for all vertices
    v.radius[0] = v.radius[1] = 2.0

Give the code above a try to understand what I mean. The above code will do 2 main things:
1. Printing out the values of Vertex Radius (2 values)
2. Setting the radius of every vertex to certain value (if you like).

By default, apparently the Radius is set to (0.25, 0.25). Remember, there are 2 values for each vertex.

Now, do you know that we can constraint Blender Skin Modifier in one axis X or Y, apart from its ability to scale in both axis proportionally? All this time and I only found out about this feature today!

Flat Skin Modifier
This means, we can create a FLAT MESH, instead of Boxy or Sausage like MESH (when subdivided). A BIG revelation!

This means, we can model Australian Boomerangs with a minimum of 2 Edges + Skin Modifier:

Australian Boomerang
Modern plastic boomerang toy.

We can also create all sorts of wooden Paper Airplanes:


3D printing Paper Airplanes? Why not. Unfortunately, I don't have 3D printer at the moment.

Anyways, it is really quite interesting that we can actually create "flat mesh" based on Skin Modifier.

MANUAL: Go to Edit Mode (TAB), select vertice(s), do the usual CTRL+A then constraint in X or Y axis, using Shift+X or Shift+Y to adjust the Radius.

INFO: This is a bit Similar to Blender Curve Object
The Skin Modifier ability to have 2 x Radius is equivalent to Blender Curve Object, in its ability to set Feather Radius that will affect the Extrude property.

Curve Object also has special Tilt attribute for each point and this is not built in inside Skin Modifier. 

Procedural Drill using Curve Object ONLY by adjusting the Tilt.
import bpy

# Make Tilting Curve Spiral based on Curve

# you need to select NURBS object first
curve = bpy.context.active_object.data

# get points

points = curve.splines[0].points

for i, point in enumerate(points):
    # tilt X degree of every points of curve
    point.tilt = i * 2 # 2 degree tilt

However, I am guessing that we can always use Armature Skinning and Twisting. We probably can try that at some point in the future.

BACK TO CENTIPEDE PROCEDURAL MODELING...

I like the Skin Modifier solution, because it is very robust. Of course, Skin Modifier is only the base model, but it can be easily repeated and adjustable along the way before we commit to any parts of the Centipede.

One QUIRKY thing about Skin Modifier, in relation to the original Edge is that we don't always get Vertex Indices that is in order. Unless you create the Edge properly.

This is quite strange for me at first. I found this quirk when I try to create CONE Tentacle like object using Skin Modifier and Python. 

You can check Vertex Index in  two ways:
1. Using Python in Edit Mode

2. Using Blender App Debug mode
Activate debug mode:
bpy.app.debug = True

Go to Edit Mode and select Vertices with Indices option checked.


My tips when modeling Edges for Skin Modifier is like this:
1. Start with Cube or other mesh.
2. Go to Edit Mode, merge At Center. So you have a single Vertex now.
3. Instead of Extruding, use CTRL + Click, Click, Click method instead.

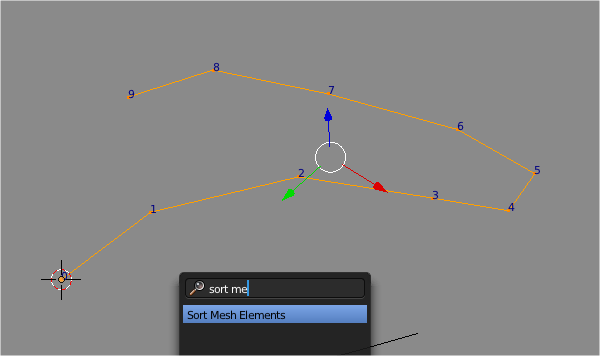
Why? The reason is the Vertex Index Order will be different. The one with CTRL+Click, Click, Click method will guarantee to have a nice sorted index from 0 (beginning) to end number.


Of course you can always sort the mesh using Sort Mesh Elements operator, but it is always better to do it right the first time. So remember to use CTRL+Click, Click, Click method when you are creating edges for Skin Modifier. I know, it is tempting to just extrude.

UPDATE 2013.07.10 Correction: Ctrl+Click,Click,Click and Extrude Vertex give no different.

Regarding the CTRL+Click,Click,Click method OR Extrude Vertex, both will actually give same result. Let say you start with a single vertex. When you extrude you get 2 vertices with index 0 and 1. If you continue to extrude right away, you will get Vertex Order Index List like below:
0,1 (original edge)
0,2,1
0,2,3,1
0,2,3,4,1
0,2,3,4,5,1
0,2,3,4,5,6,1

You got the idea. The sorting is not right.

In order so that you have a nice ordering, you start with a single vertex in edit mode, extrude it once so you have an edge to start with. Then go out of Edit Mode to Object Mode. Jump back to Edit mode, now you can extrude from vertex index 1, and the index list is now properly sorted:
0,1
0,1,2
0,1,2,3
0,1,2,3,4
0,1,2,3,4,5

The advantage of having an edge with sorted vertex index is the ability to re-arrange mesh as you like.

Number Pattern to rearrange edge into any kind of curve you like. 

Number Pattern to re-arrange pre-existing Edge.
Maybe one day, we can go deeper into low level Point Vertex and using Algorithm to arrange points using complex Math.

Having this information will ensure that later on when we use Python to modify the RADIUS of each Skin Vertice, everything will be as we expect it. Such as if we create a Tentacle kind of object, we want the radius to go from MIN to MAX value, and with vertex order correctly sorted, we can easily adjust the radius using Python.

Sorting matters can be complicated, if you want to read some, I think this blog post is related:

I think, in the future, when I have better grasp of Python, we can really Procedurally code the creation of Centipede.

BLENDER ARMATURE: Skeleton Sketching  = SPINE PART

In my research on creating Procedural Centipede, I also encounter this super interesting Blender feature that easily overlooked: Skeleton Sketching.


This feature is also quite interesting and potentially useful in relation to modeling or rigging: Tentacle, Snake, Tail, or Centipede.

Remember my old talk about Curve Resampling or finding a way to place objects evenly in a Curve Path? Well, I think this Skeleton Sketching might actually be useful to do that.

We will keep this Skeleton Sketching for future usage.

DUPLIFACE/DUPLIVERT/DUPLIFRAME: Spine or Leg Part
These features of Blender is always kind of interesting and handy for a lot of reasons. Even for Centipede. You definitely want to study this feature on your own:

Pablo Lizardo creating Array of Rooftop Tiles:
http://www.youtube.com/watch?v=yso0RC9hqoI&feature=youtu.be

BLENDER GREASE PENCIL: Drawing Curve = SPINE PART
Grease Pencil is also potentially nice to draw Centipede Backbone/Spine. Always keep Grease Pencil handy for all situation. When we convert Grease Pencil to Curve, it will have nicely sorted index too. 

MODIFIER: Array Modifier and Curve Modifier  = LEG PART

The final key here is to use Array Modifier, Curve Modifier, and a Curve in order to duplicate legs of centipede along the Spine path.


The result:


Ok, now, we have pretty must the foundation of how to model Centipede Procedurally using Blender.

DETAILING AND FURTHER REFINEMENT

We are not finished, this is in fact, just only covering the base.

You can continue to refine the model by Sculpting, but I think with the Skin Modifier for the body, for example, we can probably first create Segmented lines using Python script.

For example, something like below:

ADJUST RADIUS FOR EVERY N VERTICES

import bpy

# Get selected mesh with Skin Modifier applied
skin = bpy.context.active_object.data.skin_vertices[0].data

# Iterate every point/vertex and get/set the Radius

for i, v in enumerate(skin):
    print ("vertex", i, v.radius[0], v.radius[1])

    # Change the Radius Value for all vertices
    
    v.radius[0] = v.radius[1] = 0.5
    
    # Change the Radius Value for every N vertices
    if(i % 2):
        v.radius[0] = v.radius[1] = 1


With Displace Modifier and Noise Texture.

JOINING THE LEGS INTO EACH SEGMENTS OF SPINE

If we later want to JOIN every leg segment back into the body, we can also use Python scripting.

This makes me think: maybe the whole thing can be scripted too? I bet it can. Normally for "procedural" stuff, where everything is repeated and can be solved by step by step procedure, things can be scripted.

Let say we do it another way. we firset created an Array of Edges that makes a pair of legs, then we connect the center point of every pair of legs using Python, that might possibly works as well.


RIGGING AND ANIMATING CENTIPEDE

Continue on, if we are to rig the Centipede for animation, we probably want to use Drivers to control the movement of the legs.

GAKKEN MECHAMO CENTIPEDE ROBOT

Human Meta Rig to Skin Modifier

The other day, I received an email asking a question below:

SAL:
“Although Blender now generates the armature from skin, is there still a way to generate rigged mesh from armature? I have great many animated armatures I need to re-model, this would help so much.”

Aha, cool question! I actually had the same exact questions a while back ago, when I was touching a little bit on Skin Modifier.

I believe SAL's real question is on converting pre-existing Armature into Skin. The answer is:
"Yes, certainly there is way to generate rigged mesh from armature" and maybe easiest by mean of Python script. Back then, I would feel a little bit stuck because I could not script and probably have to wait until someone else write script that does the job.

Today, even though I am still a beginner CG programmer and a long way to go, but I can "hack thing a bit" and it is always fun to dig the BPY (Blender Python).

I bet that someone else out there already created similar script that is probably better than this script I am writing. However, it is still necessary exercise to go through.

Let see how far can we go in converting Skin from Bone.

BLENDER ARMATURE & RIGIFY

(Before I jump into Blender Armature object via Python, I have to talk a little bit about Blender Armature and the Rigify Add-On....)

Ok, so I am a highly curious person about Blender Armature object. I will really investigate it like a newbie.


Blender Armature is like an Empty that it does not render, but it has a lot of special features in it. Just like Blender Curve and Blender Text object, they are special.

For every Armature object, it consists of Bones hierarchy (aka Bone Chain). Armature has 2 modes to work with: EDIT MODE and POSE MODE.

To switch to Armature Edit Mode, you select the Armature object and hit TAB.
To switch to Armature Pose Mode, you select the Armature object and hit SHIFT+TAB.


Animator animates a rigged character in Pose Mode. Armature is a single object that actually contains a lot of other objects and information, but able to maintain a Single Actions animation data.

(That is pretty much some basic Armature information that we need to know. Next, I talk a bit about Rigify...)

Apart from  my interest with that Bone Object called Armature in Blender, I have also big interested with Art of Rigging inside Blender back then when I first use Blender 2.5x, and now even more so.

I definitely need to study Nathan Vegdahl DVD "Humane Rig" again. I never actually finished the whole rigging process. 

There are too many questions in my mind at the time. Not that I get less questions today, I actually have even more questions than before. But some important questions are answered along the way.

Last Friday, when I was at University computer room, I investigate Blender Rigify Add-On a little bit and use it from user's point of view from scratch to prepare the armature, run the Rigify script and skin "Make Human" mesh and also a random bi-ped creature created using Skin Modifier.

I like Rigify system, it is quite solid, a lot of magic happens in the background. Such as how Rigify uses Layers to separate the actual Skin Bones, Mechanics and the actual Controls.

One day I will spend some time to deconstruct the system that is implemented in Rigify.

For now, I will just use the meta-rig armatures for a test.

BLENDER ARMATURE VIA PYTHON

Like other special Blender Objects, the best way to investigate an object is to start from Properties.

With Armature, we need to go to Edit Mode and investigate each Bone in the hierarchy to truly understand what is happening.


Bone in Blender cannot exist by itself. It always needs 2 "joints" that is connected to each other to form a bone. Each Bone in Blender always has Head and Tail. The relationship between one bone with another bone via Parenting is important. As well as to watch for the "Local Rotation Axis" for each bone that is determined by the Roll value. 

Now that we have a bit clearer picture about Armature object and Bone object (element of Armature), we can then start looking and digging it using Python Console.


  • I rename my Armatures as 'MyArmature' for now.
  • To check the Bones element inside Armature, we simply go down in the object level
  • Using the Python Console, we can see there are 3 bones, named "Bone", "Bone.001", "Bone.003".
I found it interesting how Python looks up Dictionary data.

Listing Methods/Functions that the Bone object has. Notice that we need to specifically point into certain Bone whether by name or index in order to dig deeper and get information.
Blender API help on Bone:

NOTE: By no means I understand Blender Armature and Bone as whole, but here I am trying to walk you through the process on getting information using Python and use them. Often time we don't need to understand everything (sometimes impossible), unless you need to go into more complexity.

GET BONE INFORMATION

Ok, now what information do we really need to accomplish our problem in turning Armature into Skin AKA Create Skin from Bone?

Let's think.... we know that Skin Modifier only needs Polygon Mesh Edge component. What is the bare minimum of an Edge? 2 Points that are connected together.

Since we know Bone always has Head & Tail, while Edge always has 2 points that are connected, we can sort of solve our problem of "converting bone into skin".

So, we need:
1. Locations (2 XYZ positions) of Head and Tail for every bone (local position is fine)
2. Based on those Locations info, we can create Points and connect them into Edge
3. The rest, we will figure out later.


CREATE EDGE USING PYTHON SCRIPT

I am looking at these to understand how to create an Edge.

Slight modification to the script and then I got this below script that will create a mesh object which contains 2 points and an Edge. Exactly what we need at bare minimum.

import bpy 

# HELPER FUNCTION THAT CREATE EDGE BASED ON SUPPLIED POSITIONS
def createEdge(coord1 = (-1.0, 1.0, 0.0), coord2 = (-1.0, -1.0, 0.0)):
    
    Verts = [coord1, coord2]
    Edges = [[0,1]]
    
    profile_mesh = bpy.data.meshes.new("Edge_Profile_Data")
    profile_mesh.from_pydata(Verts, Edges, [])
    profile_mesh.update()
    
    profile_object = bpy.data.objects.new("Edge_Profile", profile_mesh)
    profile_object.data = profile_mesh
    
    scene = bpy.context.scene
    scene.objects.link(profile_object)
    profile_object.select = True

EDGES FROM BONES FOR SKIN MODIFIER

With the helper script above, we can easily turn every Bone into Edge by looping every Bone in the Armature and then run the script.

NOTE: In the script below, I am actually referencing the Object Name, instead of Armature name. Maybe you want to modify the script so that it works on Armature.

import bpy

# ACTUAL FUNCTION THAT TURN BONES INTO EDGES
def boneToEdges(armature_name='metarig'):
    
    myRig = bpy.data.objects[armature_name]
    
    # which armature to work on
    #myRig = bpy.data.objects['Armature']
    #myRig = bpy.data.objects['metarig']
    
    # this actually return STRING NAME of bone
    boneNames = myRig.data.bones.keys()
    
    # the actual data to each 
    myBones = myRig.data.bones
    
    for i, bone in enumerate(myBones):
        #print(bone.name, bone.vector)
        # every bone has HEAD and TAIL
    
        #loc = bone.vector
        head_loc = bone.head_local
        tail_loc = bone.tail_local
        
        createEdge(coord1 = head_loc, coord2 = tail_loc)
        
boneToEdges("MyArmature") # Change the name to your Armature Object Name.

Running the script above and I get multiple Edges objects like below:

We are not actually finish because my scripts is a bit of half done. It only creates Edges from every Bones. We need to Join (CTRL+J) all the edges into a single mesh and the Remove Doubles (merge overlapping points). Once we have a single mesh, we can then apply Skin Modifier.


You can quick select the Edges created using the script using the QUICK SELECT script below and then CTRL+J to join them into a single mesh, and then you can Remove Doubles..

import bpy

# Get all objects named "NAME*" and put it in a list
mesh = bpy.data.objects
sel = [item for item in mesh if "Edge_Profile" in item.name]

for item in sel:
    item.select = True

USING THE SCRIPT ON RIGIFY (HUMAN-METARIG)

Let's try this on Rigify Bones. If we use the script on the Rig object (with controls), we get something like below:


If we use the Human Meta-Rig object, we get slightly cleaner Edges that potentially can be used for Skin Modifier.


With slight clean up and connecting and Remove Doubles, we get a Skin Modifier ready edges, that we can easily turn into a mesh:


BVH Motion Capture Data to Skin Modifier

If we import BVH data into Blender, we know we get Armature that is already animated, right? So we can use the script above to "Skin the Bone". 

Below is from JPOP Group "Perfume" Motion Capture Dance data which was made available for download and really popular last year:

The Skin is dancing in no time.

Once we create Edges that is "Skin Modifier ready", we can easily modify the Skin and quickly Auto-Weight it to the original Skeleton.

I actually quite like the fact that Blender has separate Edit Mode and Pose Mode. We can match the Bone in Edit Mode (the default pose), regardless the animation in Pose Mode.

VIDEO DEMO "Bone to Skin"


SOME LIST OF GOOD VIDEOS ON WORKING WITH BVH
http://www.youtube.com/watch?v=AzYotTZVhcM
https://vimeo.com/12340788
http://www.youtube.com/watch?v=oe1ySIpWZgo


DOWNLOAD FREE BVH
https://sites.google.com/a/cgspeed.com/cgspeed/motion-capture/cmu-bvh-conversion


HORSE BVH?
I am trying to get Quadruped BVH data, that would be interesting. Anyways, for Biped BVH data, there are quite a lot on the Internet. I wish I have my own Kinect to do mocap data, that will be fun.

OTHER LINKS

http://www.blender.org/forum/viewtopic.php?t=26496&sid=bbfac66a1deced62a45d9b4bbd0bda8f
http://blenderartists.org/forum/showthread.php?181392-Armature-Bones-and-Poses-with-Python

This is just going to be a really wordy post, just a summary note on my research on "Audio Driven Animation".

Researching on Audio Driven Animation, eventually brought me back to:

Andrew Lowell's Houdini Audio Driven Animation Book:
http://www.andrew-lowell-productions.com/andrew-lowell-productions/resources.html

For Blender, there is apparently this MIDI Driver Add-On (not yet available for Blender 2.5x?)
http://blenderartists.org/forum/showthread.php?195434-MIDI-Driver-music-driven-animation-creator
http://blendit.xaa.pl/index.php?p=middrv&l=eng#faq

And also stumbled into this one (will take a look)
http://kwnetzwelt.net/wordpress/archives/1022

MIDI VS WAV
So, MIDI is definitely a more precise way to control animation compared to just WAV Audio Samples.

And for MIDI to be useful to control and automate animation, apparently is not that simple. Firstly the F-Curves generated by MIDI need to be manipulated somewhat so it became more useful to use for animation. And it is also depending on the animation. Whether it is going to be a simple loop or with variety of animations.

It is quite interesting area but also pretty ... deep.

ACTION MODIFIER
So far, the furthest setup I can do is by connecting Baked Sound F-Curves into Action Modifier for Pose Armature. Action Modifier is quite interesting in itself (I just found out about it by studying Nathan's HUMANE RIGGING DVD), probably that is one key that I have been looking for.


In fact, with Action Modifier, I could go back to triggering animation using Dynamic Paint. Although I am still thinking for the most efficient way to do so. Maybe just a couple Constraints and Drivers will do it, without Dynamic Paint.

Actions driven by Dynamic Paint.
I am also looking into BGE (Blender Game Engine) way to trigger or automate actions. But then again, that is another huge area.

MKRdezign

Contact Form

Name

Email *

Message *

Powered by Blogger.
Javascript DisablePlease Enable Javascript To See All Widget