Here is a quick AN exercise: "How to make Epicycloid?".
I decided to write this real quick after receiving email from Eli S earlier this morning. Thanks for your email asking about this, I guess nothing wrong to try to review old thing. Maybe I was missing a step in my explanation in my old writing.
Not long ago I must have done this using Sverchok. Either way, they both can do cool stuffs that overlap with each other. Just slightly different way of thinking.
Animation Nodes (AN) add-in in Blender is really fantastic to build a quick prototype to study motion. Like Steve Jobs would say: "It's INSANELY GREAT." I would say AN is INSANELY AWESOME!
AN Script Node for Epicycloid
You can create this Epicycloid shape using a few Math and Number nodes or perhaps Expression node in AN, however, I decided to use AN Script Node. Why? Because I want to show clearly INPUT and OUTPUT things the simple way.
This is really simple to build, actually.
1) Research the Formulae for Epicycloid
You must love Math, like I do :) Not the complexity per se, I mean, the complex stuff will be dealed by smarter geniuses people. We, computer artist, very often can skip that part and simply use the formula. For epicycloid shape, I found this on Wiki, super useful: https://en.wikipedia.org/wiki/Epicycloid
2) Write it down I quickly jump into Blender and rewrite the formula inside Blender Text Editor. I do not write this in single typing. Basically I started just by typing this:
x = r * ( k + 1 ) * cos(a) - r * cos ( (k + 1) * a) y = r * ( k + 1 ) * sin(a) - r * sin ( (k + 1) * a)
THEN, it become something like below:
Few things changes, depending on what variable names I give, what are going to be the INPUTS and how it fit the requirement of AN script node. You add input and output variables as needed.
3) Noding it AN Script node does all the magic. You could actually make your own custom (real) node for AN that simply creates Epicycloid shape.
For our purpose, we use Script node, which is like a quick prototype node. It's really fast to make and super handy for a lot of things.
Keep in mind that this Script node is linked to your script earlier.
4) Build the Node Tree The rest is piece of cake. You simply use the actual Script Node and test it in 3D View.
I am applying the Epicycloid formulate to create this epicycloid motion to the default Cube.
The shape will be created as we play with the ANGLE variable. I use the Time Info node, and plugging in the output to the angle. Watch out here that I convert the Degrees to Radian in order to make this working properly.
5) Viewing the Motion Now, in order to view the motion, you need to see it in Playback. As this is really just a motion in shape of Epicycloid.
What nice is that Blender has a way to display a keyframed motion, and this is build in on object transform, under "Motion Paths" subpanel.
What I did below, is I am using AN Set Keyframes to bake the motion, then I simply draw view the curve motion.
Drawing Epicycloid Curve using AN
I was going to stop writing here. But then I am thinking... You must be curious on how you can draw this using AN?
If you read my previous blog writing, you should be able to build the setup.
The aim is to generate Vector List using Loop. It's easy. This way we can pipe the Vectors => Points for Curve aka Spline.
We can smooth the spline, bevel it etc, and then voila, a 3D cycloid mesh.
And... moreover, why did we do all this steps? Because in node based system, you can always go back, change variables, improve it and you get different result.
That's all folks, Merry Christmas 2015, since it's already pass, hope you all have an insanely awesome new year 2016!
You can skip all my rambles to the actual topic by direcly go to (*) below.
Few days ago, I was watching this 2 hours video regarding "Python and CG Pipeline. There is one part about ANIMATION that I am interested in: A mention of MDD Cache for animation transfer between softwares.
You can watch the video here: (original video is in Russian by Russian TD, then translated by another Technical Director) https://vimeo.com/88080700
Basically this Technical Director (TD) was giving an example scenario where Python might be useful to pass on DATA between softwares, like in this case from Maya to Houdini (it can be IN and OUT from and into Blender too of course).
FBX format is apparently (still) not perfect for exporting and importing. Houdini FBX Import from Maya does not guarantee a fully compatible correctly read data. This is a common situation in any production, the format conversion is often not perfect out of the box. Using Python, the TD wrote this "translator" that export out MESH data as BGEO format (Houdini native, more robust than the basic OBJ) and the ANIMATION data as MDD Cache.
I remember that Blender has a pretty good MDD tool built in, and it is part of Blender's Modifier. Cool, let's talk how this later relate to the AN business.
ROUGH PIPELINE SUMMARY
I will try to explain a bit of summary about "CG Pipeline":
In CG Production, there will always be a stage where everything is "baked" prepared for (Final) Rendering. Asset and Rig are baked, Camera animation is baked, Shader is baked, Character animation is baked, VFX is baked, and so on.
BAKED DATA can be "final", but does not always mean final, meaning that artist can always go back and make edit, just in case there is an issue.
However having this BAKING STEP implementation allows for CHECKPOINT and VERSIONING before re-assembly. Definitely allows for flexibility for a lot of situations.
BAKING can sometimes expensive, especially for VFX simulations.
Ideally, the whole production is made inside "just one" software/tool that does every stage of production smoothly. For example, Blender is one tool with a complete and robust tools. Including compositing.
In typical film or game productions, many artists may use different tools: - MODELING: ZBrush, Mudbox, Sculptris, Blender - RIGGING: Maya, Houdini, Softimage - ANIMATION: Maya, Houdini, Softimage - VFX: Houdini, Maya, Softimage - RENDERING: Arnold, Renderman, VRay, Octane - COMPOSITING: Nuke, After Effects - VIDEO EDITING: Premiere
Blender, I believe, WILL eventually fit every stages to help artists. If not already.
What really important is usually the way we "BAKE" animation or "TRANSFER" data between tools, along the pipeline, to ensure smooth process.
Remember this: For any "procedural" workflow, at some point we need to bake.
WATCH OUT: Although baking of animation is nice, sometimes this is also not always possible. Sometimes Anim Curves need to be retained and re-applied to the RIG ASSET.
I believe current convention in CG industry is to use Alembic for baking mesh data. Sometimes we actually need to bake the Animation Curves into generic data that can be passed on between softwares. All this needs to be taken into consideration.
In the past, I have experienced in using Maya and Houdini as ASSEMBLY tools. Blender actually has this potential to be the assembly tools because of its open source and always available to use in any system.
But well, it's all back to the Studio Production Pipeline.
MDD CACHE FOR BAKING ANIMATION
MDD Cache, although old and may does not seem much, has a lot of potential and advantages. It is really simple to use too.
ALEMBIC is probably the next thing to look at, once Blender implemented it (!)
Anyways, MDD Cache allows DEFORMING MESH ANIMATION to be baked fully. By doing this, we are no longer dealing with hundred of animation curves (f-curvds) which is good!
NOTE: One note, althouth mesh caching is great for film animation, maybe not for Game Animation that requires joint, but there is always a way to "reverse engineer" MESH ANIMATION to JOINT ANIMATION.
ANIMATION NODES TO CONTROL MDD ANIMATION (*)
Ok, FINALLY .... we got to cover the actual topic on using Animation Nodes toolset for MDD Animation.
Above, I am trying to give us a background scenario of typical MDD usage to bake animation in pipeline. Beyond that, MDD can be used to create complex animation. For examples, maybe we want to: - Generate multiple VARIATIONS of animations - Create OFFSET ANIMATIONS for same rig - Have easier control over thousands of rigs (simple crowd system)
What I really want to cover here is one way we can think procedurally using nodes to offset animations :-)
Simple right? Well, apparently not that simple.
Although we already have "F-Curve Animation Offset" AN Template, that can help offset animation curves, but I believe it works only for a single object transformation, and that its function is simply to offset animation to INSTANCES (duplicate) of same object.
What if we have a rig with many controls? Do we need to deal with bunch of controls and f-curves and then re-apply it back into rig? Although this is probably possible, I think it's really too complicated for now.
That is why I am looking at MDD Cache for now.
Caching/baking animation really simplifies a lot of animation complexity. By baking, we don't have to deal with hundreds if not thousands of Animation Controls and Animation Curves and Attributes.
BLENDER ACTION BLOCKS AND NLA (Non Linear Animation) Blender has this function built in to turn animation curves into block of animations, and we can sort of arrange and edit animation like NLE Editor.
It might be handy for certain scenario but I honestly have very little experience with Blender NLE, animation block layering, etc. I think it can do what we are trying to do (offseting animation) using block of Animation Actions, but we will take it a little further and tackle the problem procedurally using animation nodes.
I am definitely more familiar with MANUAL ANIMATION and PROCEDURAL ANIMATION, and SEMI-PROCEDURAL ANIMATION is really my desire to achieve using Blender and Animation Nodes. It needs to be simple enough concept that animators can learn in technical level.
LET'S BEGIN...
We will use a simple rig to explain this concept. By understanding this example, you will learn further about LOOP and data GENERATOR of AN.
1 Rig and Multiple Controls You can use your own rig. Or download from Blend Swap. But basically you need a deforming mesh that you can export animation as MDD.
2 Export out MDD Activate MDD exporter from the User Preferences. Maybe it should always be ON by default, because Blender's MDD reader is always part of Blender Modifier feature. Anyway, "Save User Settings" if you like.
Then, you select the mesh that is deforming and then export the animation as MDD.
3 Use the MDD Cache Once you have the MDD, all you need is the "original mesh" duplicate or imported into the 3D scene, and apply Mesh Cache Modifier, read the MDD cache from disk, and to apply it to the mesh. Then you get the animation back.
The mesh needs to be identical to the mesh used for rigging and animation in term of vertex order. We will be using AN to "drive" the "Evaluation Frame", so I set it to "Custom".
WEIRD BUG: Sometimes after you save the Blend file, and re-opening, the path into the MDD might change, for example:
Wrong: (when opened back, was working...) //MDD_TEST/simple_single_surface_rig_001.mdd
Make sure you put the //../ dot dot.
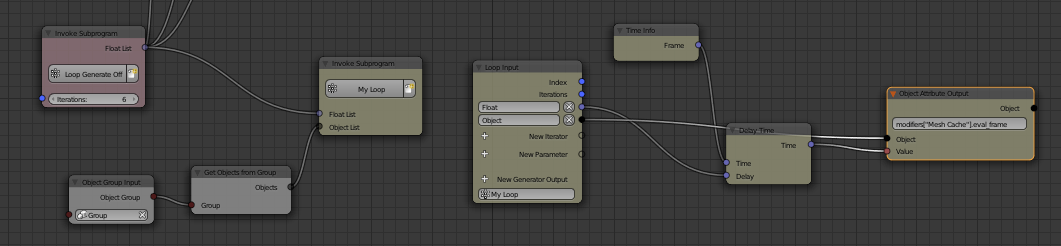
4 Offseting MDD Cache using AN Node This part is pretty straight forward and simple. You just need "Object Attribute Output" node that can directly drive any attribute of an object.
The DATA PATH here is: modifiers["Mesh Cache"].eval_frame.
At this stage, note that we can actually have MULTIPLE caches, different kind of objects ANIMATION. Later on below, when things get serious, you will see how we can orchestrate many objects using AN node LOOP.
5 Using Loop Node Now, this is the FUN part.
If we were to manually connect nodes for multiple object with MDD Cache, and create offset, we might have something like below:
Above is not wrong, in many software packages (such as Maya), this is actually what is happening under the hood. It's pretty crap, however easy to connect nodes to create offset using script, user will still end up with web crap of noodles and nodes. What if we have hundreds of objects? It will be a pain to connect.
You could write Python that randomize the "Object Attribute Output" node's attribute ("Delay" attribute, in this case), but still that is not efficient.
AN actually has a nice looping system that is pretty robust, yet pretty simple to understand.
How do reduce the connections above into a nice system? First, I look at which ATTRIBUTE that will have MULTIPLE values applied FOR EACH. In the way, AN Loop is similar to Houdini's "For Each" node conceptually.
Above we can see: - DELAY: will have different values per object. How many? As many as user wanted. - OBJECT: will have different input, whether the user supplied objects via "Group" node, or
So, I was first experimenting with generating the random values, this will be LIST of random values we can plug into DELAY attribute. It's a floating values.
LOOP in AN will do either of below: - To "do something" for each LIST of input - Generating LIST with certain number of iteration
6 Loop that generates LIST of OFFSET values
Above, you see, those network in light maroon color, is responsible to generate LIST of values for our OFFSET DELAY attribute.
7 Loop that take LIST of OFFSET and apply to MANY OBJECTS with MDD
I am plugging in the OUTPUT into another LOOP. The setup will then magically takes the generated offset value, and loop iterate it for X many objects we supply via "Group".
Don't you think it's such a revelations?
At this stage, you should already see things happening. You could Blender duplicates the mesh + mdd mesh cache modifier, and each one of this object will be controlled by our setup, each being offset slightly in random fashion.
This is a rather complex setup. Well, still a "simple" basic procedural magic example. But creating this any other way probably will not be as elegant.
HEY, CAN'T ONE JUST USE PYTHON?
SURELY, you can always make Python script that generate random values and apply it ONCE OFF to randomize the offset, and then create driver expressions that drive each "Evaluation Frame" of MDD objects so that we are getting the same effect.
However, this is one ideal situation when we set everything nicely, we have full control over the whole things. And more over, you could expand from this and make all kind of tweak and variations.
I WANT MORE... The setup can be more elegant and reusable if we maybe create an AN GROUP CONTAINER for our node. AN prodives this way of organization to reduce clutter of node noodles.
You might want to check AN Subprograms "Group". It's like a way to nodify node network and reduce it into a CUSTOM NODE container that takes INPUT(S) and spit out OUTPUT(S).
If you check some of the AN Templates, you will see this "Group" custom node is used quite often. At first, this might feel like an extra unnecessary step, but when our network grows over 100 nodes or perhaps we often use a certain node setup, this will become very helpful.
Parametric Series continued, this time, I want to talk about Rebuild Curve, Extrude, and Lathe.
(SEMI) REBUILD CURVE / RESAMPLE LINES
Interpolation SV Node
Range Float SV Node
Lines Connection SV Node
Dense Grease Pencil Output
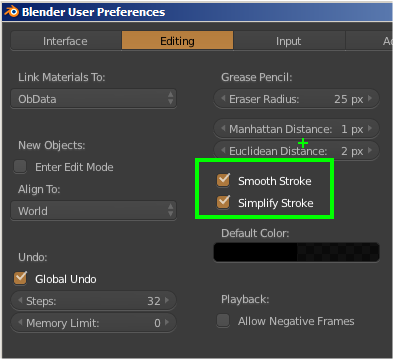
I have mentioned in the past how Grease Pencil conversion to Curve often results in a dense path (too many points). There is an option in the Preferences to Smooth Stroke and Simplify the Stroke and we also have Simplify Curve Add-On, however sometimes we really want to have Curve with a more evenly spaced Points along the lines.
In recent Sverchok update, we now have the Interpolation node that can help us to resample or rebuild curve, and since Sverchok can also bring in Curve object, together this feature really comes in handy!
The COUNT in Float Series node will define the Resampling Points along the Curve. In order for us to be be able to output something useful, we want to also use Lines Connection node.
If we want to evenly spacing a Lamp Pole, or Trees, we can now do that very easily. Perhaps parametric Table and Chair? Below is such example.
NOTE: if you want to have the ability to OFFSET IN / OUT the Line Profile, you want to convert it the mesh back to Curve and the process it like below. You see how the Blender normal workflow can work together with Sverchok procedural/parametric workflow.
Sverchok Grease Table.
Everyone can make a table now. If only we all have 3D Printer!
SIMPLE EXTRUDE IN SVERCHOK
Remember in the previous post when I said that we "cannot" do Face Extrude? Well, I was wrong, there is always a way to do it. Thanks to +zeffii to show me the way. The answer is SELECTIVE SOLIDIFY.
Solidify
List Mask
List Item
Supposed we start with a Plane or Grid of some sort. Simple 8x8 grid.
We know that if we "Solidify" an object, we get thickness and it is a bit like Face Extrude, but happens for the whole face.
How do we selectively "select" something? Well, we don't have that feature yet, but we have way to mask things out, such as below using List Mask:
The result is not perfect. Maybe List Mask is not what we want. Is there another way to do this? How about LIST ITEM? Yes, this is the one we want.
Now, later on I found out that similar to the result of Solidify and List Mask, this Solidify and List Item are also giving result that's not perfect like below:
However, we have a different and more means to control over the FACE EXTRUDE besides the Adaptive Polygons
SVERCHOK LATHE
Sometimes it's also called Revolved or Screw, we have now this LATHE NODE in Sverchok!
Often overlooked feature like Screw Modifier, this Lathe node is more powerful that one might think at a glance. It is very straight forward to use, it does not need much explanation. Just supply an Edge or Curve of some sort and use it as INPUT for Lathe Node.
You definitely want to experiment and get to know what INPUT PARAMETER you can adjust below. It works similar to Screw Modifier.
You also want to remember to "Apply Matrix" if you are moving the Edge/Curve Profile in World Matrix, so that the point position is confirmed, to get the result below:
Use "Merge" option if you want to "Remove Double". The "Degrees" and "Steps" are obvious to give control over the 360 Lathe rotation.
There are 3 more interesting parameters to play with, you need to feed them with Vector, simply use Vectors In node with these guys: "Cent", "Axis" and "DVec"
"Cent" I believe is the CENTER of Lathe rotation. I actually like to use this with Empty and get the Matrix. By doing that, we have interactive control in the 3D View and Sverchok updates accordingly.
"Axis" is the AXIS you want the Lathe to go around. Feed this with Vector like [1,0,0] or [0,1,0] or [0,0,1]
"Dvec" is probably the Distance it would OFFSET around. "Dvec" option allowing us to create SPIRAL STAIR kind of effect. It will generate a twisty mesh and goes around as many times as you like.
We now have more ways to build endless KORIN TOWER (like in Dragon Ball anime):
BAKING IT OUT WITH BMESH VIEWER
To bake out Sverchok mesh, at this moment, I think the best way is to just use BMesh. We could probably use Grid Matrix to randomly spit out variations of Mesh. that will be cleaner, but often time it takes additional steps to setup.
Using BMesh and Blender's own OBJ Animation Export, we can output OBJ out to be used as Instance Reference objects.
NOTE: I recommend you to use BMesh at the very last moment if you want to bake out the meshes.
1. Use BMesh Viewer at the very last of Sverchok node train chain.
2. Select the BMesh from Outliner or by clicking on Select on BMesh Viewer node.
3. The BMesh will change every frame and generate a different mesh per random Seed.
4. Export OBJ Animation while the BMesh is selected. Specify Animation and Selection Only.
5. Save it into a folder.
Exporting OBJ is totally fine, but Importing those multiples OBJ back into Blender is actually .... tricky. I am afraid Blender could import multiple OBJ at once! Unless I am missing something.
I did mention about this way back ago, and we can use script to do that. All we need to do is to run the Python script that is pointing to the path folder where we have all the OBJs:
NOTE: In Maya we can also Drag and Drop OBJ's into Maya window :) I guess we can ask Blender Developers to allow OBJ drag and drop. Nothing is impossible.
WIGGLE NOISE DISPLACED TEXT
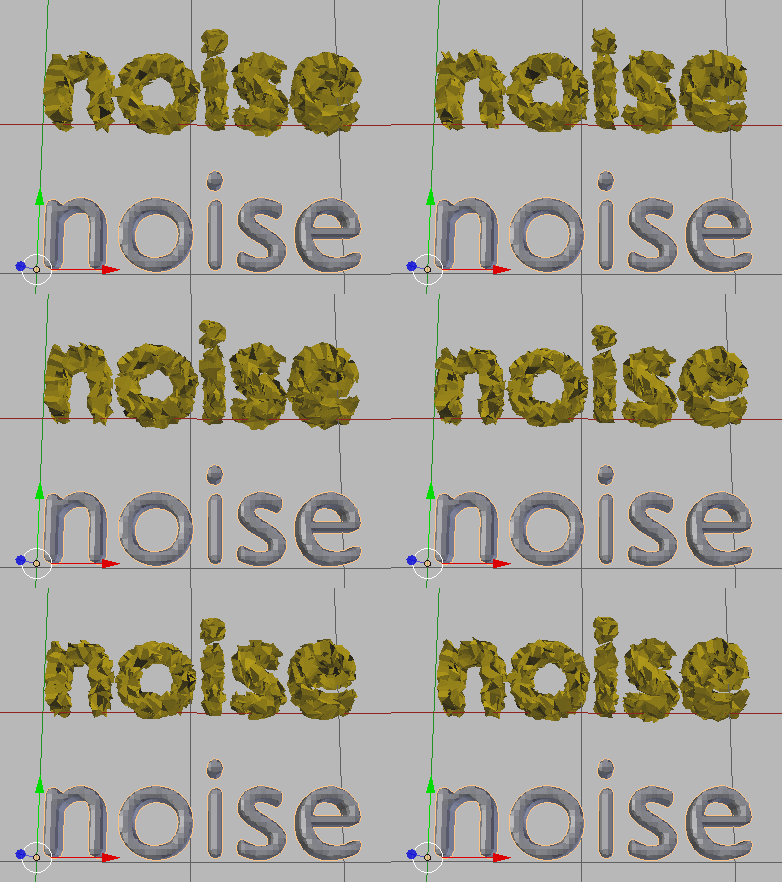
I experimented a lot with Blender Modifier. I found it quite amusing when Text Object allows some Modifiers stacking. Which is very cool. On top of that, Sverchok Developers also gives this capability. So, while the Text Object is still LIVE (we can change the text), we can go inside and mesh around with it.
Below is another example using Noise node. Noise node is limited in parameter at the moment, but we can sort of hack it in a way we can control the scaling.
TRY: Drive Sverchok parameter using sound WAV.
MESH SNAP TO GRID
I found this setup by accident. What if we turn all the XYZ Position of Vertices into INTEGER value, meaning it will snap (rounded) to the nearest full number.
We can came up with an interesting abstract looking object.