


PYTHON / Driving Arrays Like A Boss
Unknown
7:36 PM
animation
,
array
,
attribute transfer
,
blender3d
,
drivers
,
dynamic paint
,
pydriver
,
shapekeys
In Computer Graphics, having the ability to control, trigger, and drive VALUE over another VALUE is something that is always intriguing for me. This is all related to something named DRIVERS in Blender.
DRIVERS should really attract your curiosity. In this post, I will explain in details on why DRIVERS is cool, and hopefully after you read this you gain some useful knowledge.
http://blendersushi.blogspot.com.au/2012/02/animation-driven-by-x.html
I will write about DRIVERS again, but this time will be a little bit more detailed and advanced because we will utilize a bit of Python. Even if you are a beginner and never write a code, read along and try the exercise, you will learn something. Before knowing it, you can start connecting, referencing, and using expressions to drive objects.
It was only recently that I started to dig Python, PyDriver, and PyHandler in Blender. Everything started to make more sense once a bit of programming understood.
I feel that we can now starting to get deeper into complexity, while keeping it under control. A complex setup still needs to be simple on the surface, otherwise there is no point.
ANIMATION: VALUE DRIVEN BY TIME/FRAME
Like many of you, my first introduction to Computer Graphics (CG) was as a computer animator. I got driven to learn more about CG animation because it does both thing that I really passionate about: ANIMATION and COMPUTER.
I still remember when I first set a keyframe on an object at a frame and then set another keyframe at different frame, and then when I scrub the timeline, the computer does the in between.
That was amazing, right? We and many computer animators often took that for granted.
Not after few years later in my computer graphic journey that I started to get curious about "How does it really work?", I wanted to understand the technicality of things.
So, what is keyframing in CG?
Keyframing is simply setting up (or a mapping) VALUE to be driven by another VALUE (in this case the other value is TIME).
We can think of TIME as the BEAT/PULSE/TICKER for our VALUE.
VALUE DRIVEN BY X
Sometimes though, we do not want to rely on TIME. We like one VALUE to be driven by something else. By arbitrary value, custom property, by another value that is a return value of a function, or any value that is a result of complex calculation.
Read about Custom Property here:
http://wiki.blender.org/index.php/Doc:2.6/Manual/Extensions/Python/Properties#Dynamic_custom_properties
Anyways, in the end the value will be just INPUT and OUTPUT. It is still VALUE driven by another VALUE. This kind of concept is used by many 3D packages:

Let's start by doing an exercise on one to one relationship.
We can just drive TRANSFORMATION VALUES (either location/translate, rotation, or scale) for simplicity.
Firstly, add a single driver to any of this value of an object. RMB+Click on property, choose Create Single Driver. When we create a SINGLE DRIVER, Blender automatically assign a Generator Modifier Polynomial f-curve. This line looks like 45 degree angle steep line.
That Expanded Polynomial Generator Modifier just means we have a linear relationship 1:1 between DRIVER and DRIVEN value. Making the line goes the opposite way will give 1:-1 the inverse value. You can read about this later.
However, this Drivers relationship will do nothing at the moment, NOT UNTIL we specifically tell Blender what INPUT to evaluate.
NOTE: Drivers setup is located inside "Graph Editor" Panel. It is almost hidden.
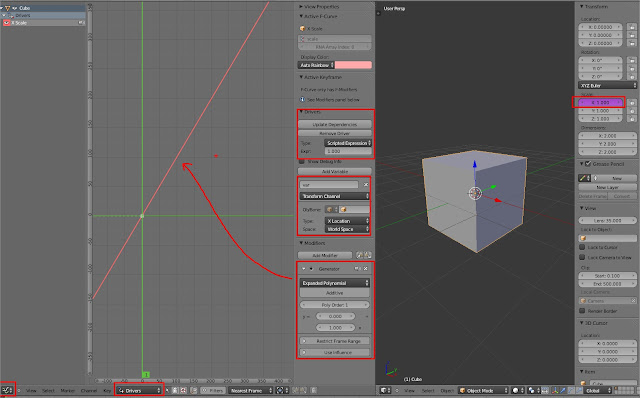
The DRIVER INPUT is dependent on:
1. Driver Type
2. Driver Variable Type
First we must set Driver Type, you have 5 options:

Doing above HASH+EXPRESSION inside a Property will pass that EXPRESSION and put it into the Scripted Expression field box.
If you type Scripted Expression directly in the field box, do not use Hash though.
NOTE: Expression function such as "frame", it will nicely updated in realtime, but some other expressions do not always get updated in real time, especially those values that are accessed via the bpy.data. You need to force Blender to update it. Same case if you happen to write your own PyDriver function, you need to hack it so that Blender will auto update the dependency. Read below.
You can use the hash + expression to directly pointing to ANY values via the Blender Python, or the bpy.data.[...]
Simple expression that can drive value is usually just a matter of finding the correct DATA PATH of a particular object in the scene. You need to know a little bit of Blender Python OOP, but not that hard.

I usually try to dig the data directly from Python Console.

Sometimes when I am not completely unsure about the Data Type, I hover on a Property, RMB click and then select Copy Data Path. That is a good hint.
For example, if I have Monkey and default Cube in 3D scene, we can create a quick setup there Monkey's Scale is driven by default Cube's Location. One of such expression is like below:

The expression I use as INPUT for Driver is as below:
bpy.data.objects['Cube'].location.x
Yes, it is a bit long, but we should already know that this is how Blender can directly access the value of any data of particular object because of its library structure.
Remember, almost any value type of data can be passed into another value.
ONE ISSUE: Using Scripted Expression, it does not update automatically in real time!
You may notice that the connection is made but when you move the Cube in Translate X, the Monkey Scale does not update automatically. You need to either: click on Update Dependencies button OR you set keyframe animation on the Cube and scrub the timeline.
There is actually QUICK HACK so that Blender will evaluate the changes: Simply by creating a VARIABLE that monitors and pointing to the object giving the INPUT value.
Even if you did not specify any property, as long the "var" is pointing into the correct DRIVER object, Blender will then forced to update the changes in real time.
Keep this in mind next time you create ONE TO ONE relationship that uses Scripted Expression.

VARIATIONS OF DRIVERS
Apart from assigning and connecting drivers, we can further Modify and Process the Value, before it is being passed on as input to the Driven Object.
VARIATION: Negative Relationship
You could INVERSE the relationship 1:-1 (negative relationship) by flipping the f-curve Generator.

VARIATION: Min and Max Relationship with Custom Curve
Now, in case we want ONE TO ONE, but with FLEXIBLE CONTROL over the F-Curve we can create our own animation Curve, instead of relying on the Generator Modifier F-Curve.
ACCESSING DRIVER F-CURVE MODIFIER VIA PYTHON
# To Create New F-Curve Modifier
# ('NULL', 'GENERATOR', 'FNGENERATOR', 'ENVELOPE', 'CYCLES',
# 'NOISE', 'LIMITS', 'STEPPED')
bpy.context.object.animation_data.drivers[0].modifiers.new('GENERATOR')
# To Delete Existing F-Curve Modifier
# ('NULL', 'GENERATOR', 'FNGENERATOR', 'ENVELOPE', 'CYCLES',
# 'NOISE', 'LIMITS', 'STEPPED')
bpy.context.object.animation_data.drivers[0].modifiers.remove(modifier)
# INCOMPLETE --- still figuring out how this remove works...
# This took me hours of searching around and almost no documentation....
import bpy
fcurvetype = bpy.context.object.animation_data.drivers[0].modifiers[0]
bpy.context.object.animation_data.drivers[0].modifiers.remove(fcurvetype)
To do this, we first delete the default Generator Modifier F-curve and replace it by drawing our own animation curve, simply by CTRL+LMB click on the graph.
For example:
Monkey Scale X to be driven by Cube Location Z.
- First, delete the default f-curve modifier.
- Then for example, set our own curve 2 states:
VARIATION: Ups and Downs Relationship
Use sin() or SINE Modifier.
TIPS ON XYZ:
Usually, for things like Scale that often has 3 value pair: ScaleX, ScaleY, and ScaleZ, we can either Copy and Paste the same Drivers from one to the other, which means it will be creating duplicates of Drivers.
Or we can tell Blender so that ScaleY and ScaleZ are always follow ScaleX value using "referencing". If we assign:
bpy.context.object.scale.x
bpy.context.object == is like "self", not 100% exactly "self", but so far I found that is the quickest way to think of this bpy.
However, I think the most correct is to use the Driver Variable Type, instead of Expression. Just because with Expresion, sometimes we need to hack the "Dependency Updates", etc, etc.
Also, the way Blender displays and accessing DATA PATH is also a little bit complicated if you are not used to Object Oriented Programming.
In Maya and Houdini, we can get, set, connect, disconnect, values from data path, by just specifying the Nodes Name and Attribute/Parameter Name. The advantage of node-based architecture and hundreds of simple commands to modify them. Writing expression in Maya and Houdini is indeed easier for general users.
MAYA EXAMPLE OF EXPRESSION
Example expression in Maya to connect Transform node named Suzanne with Cube:
Suzanne.scaleX = Cube.translateY;
In Blender, we need to dig a bit and the path name is long. Pointing to an object named 'Cube', for example, the data path looks like this:
bpy.data.objects['Cube']
# Data Path to Translate
>>> bpy.data.objects['Cube'].location.x
0.0
>>> bpy.data.objects['Cube'].location
Vector((0.0, 0.0, 0.0))
# Data Path to Rotate
>>> bpy.data.objects['Cube'].rotation_euler
Euler((0.0, 0.0, 0.0), 'XYZ')
>>> bpy.data.objects['Cube'].rotation_euler.x
0.0
# Data Path to Scale
>>> bpy.data.objects['Cube'].scale
Vector((1.0, 1.0, 1.0))
>>> bpy.data.objects['Cube'].scale.x
1.0
ADVANTAGE OF BLENDER
Blender processing of expressions is A LOT faster than Maya's Expression. In term of speed, Blender expression calculation is about as speedy as Houdini. While Maya's expression is slowest. Blender also always cache the calculation automatically like Houdini, which is nice.
Blender Python uses Object Oriented Programming (OOP) paradigm to access data, apart from being A LOT FASTER TO PROCESS, is also more flexible, allowing users to quickly customize and make custom functions.
In fact, in Maya, in order to get the Object Oriented Paradigm for scripting, they actually need PyMEL. PyMEL is a more Pythonic wrapper of Maya programming. And PyMEL is slower. Using MEL script in expression is also slow. So that is Maya. With Maya, Autodesk is your boss.
https://code.google.com/p/pymel/
While with Blender, you are the boss, Blender Python is already Pythonic. Everything is Python. Wait till Blender has PyNode and we can continue this kind of topic.
So, anyway the concept of DRIVER, EXPRESSION, is really similar across Blender, Maya, Houdini. Very similar. In fact, you can easily write Python code that will contain the Data Path into simpler variable name.
Once you understand the key concept of Blender DRIVERS, this one feature is really useful for animation, rigging, and lots of complex and exciting effects. This is another reason I write this long detailed post on Drivers to share with you.
One thing I have to mention though, unlike Maya, Blender Drivers does NOT provide:
- Set Driven Key window
- Attribute Connection window
- Create Expression window
- Simple Python script to get, set, connect, disconnect property.
Those "easy to use functions GUI" above in Maya are allowing users to easily create connections. Especially "Set Driven Key" window, which is very similar to Blender Drivers to create custom Curve creation for Drivers relationship.
It would be nice if Blender have those kind of features. However, everything is actually there in Blender. I mean, possible to do your own customization of connection using Python scripting.
I think SOMEONE can certainly make "interface" like above in Maya, inside Blender, to connect things faster and easier, OR make a simple Python script that actually does the job.
I will attempt to show you a little bit of this "automation", although not yet with GUI style.
Let's learn the basic first.
1. Tell Blender what value we like to create a Single Driver.
# drivers for all three location XYZ
myDriver = bpy.context.object.driver_add('location')
# single driver for location X
myDriver = bpy.context.object.driver_add('location',0)
# single driver for scale Z
myDriver = bpy.context.object.driver_add('scale', 2)
# single driver for rotation X
myDriver = bpy.context.object.driver_add('rotation_euler',0)
# add driver to custom property named "myProp"
myDriver = bpy.context.object.driver_add('["myProp"]')
# add driver to shapekeys 'Key 1'
ob = bpy.context.object #currently active selected object
myDriver = ob.data.shape_keys.key_blocks['Key 1'].driver_add('value')
# add driver to modifier 'Mesh Cache'
ob = bpy.context.object
myModifier = ob.modifiers['Mesh Cache']
myDriver = myModifier.driver_add('eval_frame')
You got the idea. You simply need to specify the PROPERTY that you like to be driven.
Above, I am using variable "myDriver" as container of this Driver, we just created. This will be useful as we go along and modify the Driver. You can use any valid variable name.
How do I know the name of PROPERTY? Simply by hovering on any PROPERTY in Blender, RMB click and select Copy Data Path.
Sometimes you need to be more specific, for example to create driver for specific Material "Diffuse Intensity" property, you use code like below. You need to dig the bpy via bpy.context or using bpy.data until you found that data you need to add DRIVER into.
myDriver = bpy.context.object.data.materials['Material'].driver_add('diffuse_intensity')
2. Specify Driver Type
# by default should be 'SCRIPTED', but in case you want to change
# the driver type, you have other option
# ('AVERAGE', 'SUM', 'SCRIPTED', 'MIN', 'MAX')
myDriver.driver.type = 'AVERAGE'
3. Enable DEBUG mode.
Enabling the feature below will display the actual Value being returned and used by DRIVEN object.
# enable Debug Info
myDriver.driver.show_debug_info = True
4. Specify VARIABLE and VARIABLE TYPE
Here is the fun part. Following the above variable convention, we can add LOCAL VARIABLE to our Drivers setup.
# DRIVER VARIABLE
# create new variable
newVar = myDriver.driver.variables.new()
# variable name
newVar.name = "varA"
# variable type
# PLEASE PICK ONE
#newVar.type = 'TRANSFORMS'
#newVar.type = 'ROTATION_DIFF'
#newVar.type = 'LOC_DIFF'
#newVar.type = 'SINGLE_PROP'
newVar.type = 'TRANSFORMS'
newVar.targets[0].id = bpy.data.objects['myTargetObject']
newVar.targets[0].data_path = 'location.z'
newVar.targets[0].transform_type = 'LOC_Z'
newVar.targets[0].transform_space = 'WORLD_SPACE'
NOTE:
At some point in time, you might want to check the actual Drivers data via bpy.context, below is how you may check it:
list(bpy.context.object.animation_data.drivers)
bpy.context.object.animation_data.drivers[0].driver.expression = 'frame'
Driver is kind of data that is almost hidden and hard to dig, unless shown.
REFERENCE:
http://www.blenderartist.org/forum/showthread.php?287330-Adding-driver-to-pose-bone-constraint-through-Python
Alrightly, now you should know how to quickly create Drivers for an object. You simply need to put all the above script into one nice re-usable code.
I will give some script examples:
EXAMPLE
Connect Monkey Scale X to Cube Location Y.
Make sure you have Cube and Monkey in the scene. Select Monkey and run the script below.
import bpy
# single driver for scale X
myDriver = bpy.context.object.driver_add('scale',0)
# driver type
myDriver.driver.type = 'SCRIPTED'
# enable Debug Info
myDriver.driver.show_debug_info = True
# specify the script
myDriver.driver.expression = "bpy.data.objects['Cube'].location.y"
# add DRIVER VARIABLE to FORCE UPDATE
# create new variable
newVar = myDriver.driver.variables.new()
# variable name
newVar.name = "var"
# variable type
newVar.type = 'SINGLE_PROP'
newVar.targets[0].id = bpy.data.objects['Cube']
ALTERNATIVE (although limited, probably this is a better way, since we are using the built-in method to track thing)
Make sure you have Cube and Monkey in the scene. Select Monkey and run the script below.
import bpy
# single driver for scale X
myDriver = bpy.context.object.driver_add('scale',0)
# driver type
myDriver.driver.type = 'AVERAGE'
# enable Debug Info
myDriver.driver.show_debug_info = True
# specify the script
myDriver.driver.expression = "var"
# add DRIVER VARIABLE to FORCE UPDATE
# create new variable
newVar = myDriver.driver.variables.new()
# variable name
newVar.name = "var"
# variable type
newVar.type = 'TRANSFORMS'
newVar.targets[0].id = bpy.data.objects['Cube']
newVar.targets[0].transform_type = 'LOC_Y'
newVar.targets[0].transform_space = 'WORLD_SPACE'
ONE TO MANY RELATIONSHIP:

We already knew how to setup ONE TO ONE relationship manually.
If we want to do ONE TO MANY, we can simply copy and paste the driver into other Property values. Let say, we already create Driver for Scale X, and we want to copy to Scale Y and Z, we simply Copy and Paste Driver. However, this could be tedious.
This is when you want to use Python to script things, in case if you want to connect 1 object to drive 100 objects.
EXAMPLE SCRIPT:
Make sure you have a Cube and many monkeys. Select the monkeys and run the script below:
import bpy
selected_objects = bpy.context.selected_objects
for object in selected_objects:
# make each object active one by one and do everything below
bpy.context.scene.objects.active = object
# single driver for scale X
myDriver = bpy.context.object.driver_add('scale',0)
# driver type
myDriver.driver.type = 'AVERAGE'
# enable Debug Info
myDriver.driver.show_debug_info = True
# specify the script
myDriver.driver.expression = "var"
# add DRIVER VARIABLE to FORCE UPDATE
# create new variable
newVar = myDriver.driver.variables.new()
# variable name
newVar.name = "var"
# variable type
newVar.type = 'TRANSFORMS'
newVar.targets[0].id = bpy.data.objects['Cube']
newVar.targets[0].transform_type = 'LOC_Y'
newVar.targets[0].transform_space = 'WORLD_SPACE'
I hard coded the 'Cube' above for simplicity.
You can of course modify the script below and then create a nice beautiful Python function with kwargs* stuff so that user can:
1. Select a bunch of Driven objects.
2. Select lastly (active) the single Driver control.
3. Run script.
I might as well provide such function here:
### Reminder for myself: Write beautiful ONE TO MANY function here ###
1. Create directional Eye Rig (translation to control rotation of eyes)
2. Create Advance Facial Rig to drive Shapekeys using "joystick" style.
3. Many other things you can think of, for example:
- If you have 100 doors and you want to create a setup where the door should open one after another... that is possible with drivers. Automated or semi-automated Domino kind of effects can be setup using Drivers.
- If you have a lot of Tentacles kind of joints, you probably want to use Drivers too.
Do a bit of reading of book by Jason Osipa "Stop Staring" for Maya if you are keen. The concept is simple, basically instead of having hundred of Property/Parameters/Channel/Shapekeys to control, we are using few and much less controllers to drive those values. For example:
There are some video tutorials out there that teach you how to create Advance Facial Rig in Blender. I suggest you to search on that. I will list them in here when I found a good one:
https://vimeo.com/15022068
Anyways, all of these can be automated using Python. But good idea for you to do it manually first. I have a feeling that someone out there has already created such automatic script to create "Osipa Style" Facial Rig setup. If not, maybe I have to do it.

Having multiple Drivers to affect and to drive an object is really interesting and useful.
EXAMPLE:
DRIVERS: 2 x Cube ('CubeA', 'CubeB')
DRIVEN: 1 x Monkey ('Suzanne')
import bpy
# single driver for location X
myDriver = bpy.context.object.driver_add('scale',0)
# driver type
myDriver.driver.type = 'SCRIPTED'
# enable Debug Info
myDriver.driver.show_debug_info = True
# specify the script
myDriver.driver.expression = "var"
# add DRIVER VARIABLE to FORCE UPDATE
# create new variable
newVar = myDriver.driver.variables.new()
# variable name
newVar.name = "var"
# variable type
newVar.type = 'LOC_DIFF'
newVar.targets[0].id = bpy.data.objects['CubeA']
newVar.targets[0].transform_space = 'WORLD_SPACE'
newVar.targets[1].id = bpy.data.objects['CubeB']
newVar.targets[1].transform_space = 'WORLD_SPACE'
# this will clear all kind of animation data from an object
# including custom property
bpy.context.object.animation_data_clear()
# remove animation data from specific materials
bpy.context.object.data.materials[0].animation_data
Sometimes you want to specifically remove driver from particular DATA PATH. So you probably want to LIST DRIVERS' DATA PATH for currently selected object:
import bpy
ob = bpy.context.object
drivers = ob.animation_data.drivers
for driver in drivers:
print(driver.data_path)
# Once listed, we can specifically remove the driver like so:
bpy.context.object.driver_remove('location')
bpy.context.object.driver_remove('scale')
bpy.context.object.driver_remove('rotation_euler')
# To remove Drivers from custom property
bpy.context.object.driver_remove('["myProp"]')
Or just do it all at once:
import bpy
ob = bpy.context.object
drivers = ob.animation_data.drivers
for driver in drivers:
print(driver.data_path)
ob.driver_remove(driver.data_path)
NOTE: If I understand it correctly,: "Drivers" in Blender does not have particular name that we can point into, it is simply just an index pointing to FCurve data.

This will be the most complex setup, which usually require a little bit of planning.
The simplest MANY TO MANY relationship is when 1 Driver has connection to each 1 Driven objects. So we have 100 Driver and we have 100 Driven objects. I think some kind of naming system can help a lot in hooking up relationships.
DRIVER: driver.000, driver.001, driver.002, and so on.
DRIVEN: driven.000, driven.001, driven.002, and so on.
We can then use Python to pair them. Can you write Python code that does this? Should not be too hard, just another FOR loop task.
However, do we always want 100 Controls to drive 100 Objects? Hmm.. probably we do not want that. What would be the point?
Just like if we wanted to control Particles, Debris, Crowds or simulation, we need a SINGLE easy to control MASTER/BOSS to drive an array of objects.
In this case, my proposition is to use DYNAMIC PAINT below.
Similarly, in Blender, we have "Dynamic Paint". In theory, it works similar to Houdini, but more practical. Dynamic Paint transfer "Vertex Weight" and it will also Paint Map if we like. Vertex Weight of Dynamic Paint can then be used by some other Blender Modifier and with Dynamic Paint. This works in real time and it controls ARRAY of VALUES, perfect for what we need.
I have attempted to do this kind of crazy setup in the past. It works, but I actually MANUALLY set everything and it takes me quite a while to step-by-step assign the drivers. I remember to setup 64 array, it took me more than hours.
I said to myself back then "This is not the way to go, I need to learn Python to set all these automatically!"
http://blendersushi.blogspot.com.au/2012/03/vfx-multilayers-triggering-of-effects.html
http://blendersushi.blogspot.com.au/2012/03/demo-dynamic-paint-multi-trigger-in.html
Fast forward to today, I think this is now possible and can be automated using Python. The concept is really super simple and I actually have shown this concept a couple of time in the past.
VERTEX GROUP WAY
One alternative clever hack is by using some array of VG (Vertex Group) and Transformation Constraint, in combination with Displace Modifier and Dynamic Paint, of course. I learned this from Gerardo (Liero).
Remember the "Procedural Flip Card" setup?
http://blendersushi.blogspot.com.au/2013/05/python-advanced-procedural-flipping.html
That was actually the similar kind of setup, using the help of Python to make it happen. Again, I got help from Gerardo aka Liero (Blender Artist) back then to understand this VG + Transformation Constraint trick. It works nicely for all kind of transformations. I have to give Gerardo a credit.
If you like to take it to the next level, we really need to use DRIVERS.
I believe the reason Gerardo suggested me to use VG and Transformation Constraint because it is simpler to modify and setup, it does work amazingly well for Translate, Rotation, and Scale. Usually that is all you need, really.
However, if you then want to drive other things: Material Intensity, Shapekeys, Animation, or even trigger NLA actions animation based on event. I have not gone that far yet. I think I am heading into BGE (Blender Game Engine) kind of thinking, although still far.
In BGE, we can easily Trigger Events, but BGE realtime environment is kind of a different environment to the Blender 3D environment. Currently, I am not sure how to hook them together yet. Neither how BGE really talks to the normal Blender 3D environment. There is a potential there.
DRIVERS WAY
The Recipes:
1. Array of Empty A that will stay in position. Use Parent to Mesh script.
2. Array of Empty B that is driven by Displace Modifier. Also use Use Parent to Mesh script.
3. Array of Drivers that measure the Distance of every array pair of Empty A and Empty B and pipe back the OUTPUT into any properties you like to be Driven.
4. A Dynamic Paint setup that will drive the Displace Modifer.
5. OPTIONAL: Array of Custom Property to store the buffer values
Remember that we need a good naming system to keep everything under control. I wrote one big script that does this setup.
For now, this is really the most logical way that I could think of.
In theory you can use this concept to setup:
Anything that can be Keyframed, can be Drivens. Keep this in mind.
This hidden ability allows you to create all kind of complex function that takes any kind of INPUT and RETURN value to be used to drive the DRIVEN object.
Yes, that is all for now. I let you research about PyDrivers yourself.
I wrote so little of this but I think a lot about what kind of PyDrivers we can plug into Drivers Expressions.
I think, when Blender PyNodes is ready for big exposure, then we have a lot more possibilities. Well, maybe what you wanted to do is "the same", but it will be a lot easier anyways. You can achieve more complexity, but a whole lot simpler.
Talking about PyNodes, I am actually curious about PyNodes implementation thus far for Blender Compositing and Blender Material Cycles. Maybe that is next thing I should look into...
DRIVERS should really attract your curiosity. In this post, I will explain in details on why DRIVERS is cool, and hopefully after you read this you gain some useful knowledge.
DRIVERS: CAUSE AND EFFECT
Previously, I have mentioned about this quite often and also written quite a few blog posts that talked about Drivers and how Blender Dynamic Paint in relation to Drivers can be really powerful.http://blendersushi.blogspot.com.au/2012/02/animation-driven-by-x.html
I will write about DRIVERS again, but this time will be a little bit more detailed and advanced because we will utilize a bit of Python. Even if you are a beginner and never write a code, read along and try the exercise, you will learn something. Before knowing it, you can start connecting, referencing, and using expressions to drive objects.
It was only recently that I started to dig Python, PyDriver, and PyHandler in Blender. Everything started to make more sense once a bit of programming understood.
I feel that we can now starting to get deeper into complexity, while keeping it under control. A complex setup still needs to be simple on the surface, otherwise there is no point.
ANIMATION: VALUE DRIVEN BY TIME/FRAME
Like many of you, my first introduction to Computer Graphics (CG) was as a computer animator. I got driven to learn more about CG animation because it does both thing that I really passionate about: ANIMATION and COMPUTER.
I still remember when I first set a keyframe on an object at a frame and then set another keyframe at different frame, and then when I scrub the timeline, the computer does the in between.
That was amazing, right? We and many computer animators often took that for granted.
Not after few years later in my computer graphic journey that I started to get curious about "How does it really work?", I wanted to understand the technicality of things.
So, what is keyframing in CG?
- In Maya: Driving Channel/Attribute and Value using Time.
- In Houdini: Driving Parameter and Value using Time.
- In Blender: Driving Property and Value using Time.
Keyframing is simply setting up (or a mapping) VALUE to be driven by another VALUE (in this case the other value is TIME).
We can think of TIME as the BEAT/PULSE/TICKER for our VALUE.
VALUE DRIVEN BY X
Sometimes though, we do not want to rely on TIME. We like one VALUE to be driven by something else. By arbitrary value, custom property, by another value that is a return value of a function, or any value that is a result of complex calculation.
Read about Custom Property here:
http://wiki.blender.org/index.php/Doc:2.6/Manual/Extensions/Python/Properties#Dynamic_custom_properties
Anyways, in the end the value will be just INPUT and OUTPUT. It is still VALUE driven by another VALUE. This kind of concept is used by many 3D packages:
- In Maya: Expression, Set Driven Key, Constraint, Node Network
- In Houdini: using CHOP (curve, channel), Houdini Expression (fit(), etc), but in Houdini everything is quite a complex Node Network.
- In Blender: Drivers, Constraints, PyDriver, PyHandler
ONE TO ONE RELATIONSHIP: MANUAL WAY
Let's start by doing an exercise on one to one relationship.
We can just drive TRANSFORMATION VALUES (either location/translate, rotation, or scale) for simplicity.
Firstly, add a single driver to any of this value of an object. RMB+Click on property, choose Create Single Driver. When we create a SINGLE DRIVER, Blender automatically assign a Generator Modifier Polynomial f-curve. This line looks like 45 degree angle steep line.
That Expanded Polynomial Generator Modifier just means we have a linear relationship 1:1 between DRIVER and DRIVEN value. Making the line goes the opposite way will give 1:-1 the inverse value. You can read about this later.
However, this Drivers relationship will do nothing at the moment, NOT UNTIL we specifically tell Blender what INPUT to evaluate.
NOTE: Drivers setup is located inside "Graph Editor" Panel. It is almost hidden.

The DRIVER INPUT is dependent on:
1. Driver Type
2. Driver Variable Type
First we must set Driver Type, you have 5 options:
- Scripted Expression (default)
- Maximum Value
- Minimum Value
- Sum Values
- Average Value
- Distance = measure distance between two object.
- Rotational Difference = measure rotational difference, usually great for Bones
- Transform Channel (default) = all kind of Transform you like to be INPUT
- Single Property = usually for custom property.
For ONE TO ONE relationship, we can usually use Average Value and a single Variable with its type set to Transform Channel or other variable type.
Another way is to use Scripted Expression set to "var" (default variable name) and then set the INPUT value via Variable Type, you can choose any of Variable Type.
TIPS: Do self-exploration Variable Type, they are quite intuitive and powerful.
The advantage of using the built-int Variable Type is faster calculation and real time update guaranteed.
ANOTHER WAY OF CREATING DRIVER
A faster way to add driver to an object is to write EXPRESSION directly via Property by using HASH + SINGLE LINE EXPRESSION.
Exactly how it is explained in here:

Doing above HASH+EXPRESSION inside a Property will pass that EXPRESSION and put it into the Scripted Expression field box.
If you type Scripted Expression directly in the field box, do not use Hash though.
NOTE: Expression function such as "frame", it will nicely updated in realtime, but some other expressions do not always get updated in real time, especially those values that are accessed via the bpy.data. You need to force Blender to update it. Same case if you happen to write your own PyDriver function, you need to hack it so that Blender will auto update the dependency. Read below.
You can use the hash + expression to directly pointing to ANY values via the Blender Python, or the bpy.data.[...]
Simple expression that can drive value is usually just a matter of finding the correct DATA PATH of a particular object in the scene. You need to know a little bit of Blender Python OOP, but not that hard.

I usually try to dig the data directly from Python Console.

Sometimes when I am not completely unsure about the Data Type, I hover on a Property, RMB click and then select Copy Data Path. That is a good hint.
For example, if I have Monkey and default Cube in 3D scene, we can create a quick setup there Monkey's Scale is driven by default Cube's Location. One of such expression is like below:

The expression I use as INPUT for Driver is as below:
bpy.data.objects['Cube'].location.x
Yes, it is a bit long, but we should already know that this is how Blender can directly access the value of any data of particular object because of its library structure.
Remember, almost any value type of data can be passed into another value.
ONE ISSUE: Using Scripted Expression, it does not update automatically in real time!
You may notice that the connection is made but when you move the Cube in Translate X, the Monkey Scale does not update automatically. You need to either: click on Update Dependencies button OR you set keyframe animation on the Cube and scrub the timeline.
There is actually QUICK HACK so that Blender will evaluate the changes: Simply by creating a VARIABLE that monitors and pointing to the object giving the INPUT value.
Even if you did not specify any property, as long the "var" is pointing into the correct DRIVER object, Blender will then forced to update the changes in real time.
Keep this in mind next time you create ONE TO ONE relationship that uses Scripted Expression.

VARIATIONS OF DRIVERS
Apart from assigning and connecting drivers, we can further Modify and Process the Value, before it is being passed on as input to the Driven Object.
VARIATION: Negative Relationship
You could INVERSE the relationship 1:-1 (negative relationship) by flipping the f-curve Generator.

VARIATION: Min and Max Relationship with Custom Curve
Now, in case we want ONE TO ONE, but with FLEXIBLE CONTROL over the F-Curve we can create our own animation Curve, instead of relying on the Generator Modifier F-Curve.
ACCESSING DRIVER F-CURVE MODIFIER VIA PYTHON
# To Create New F-Curve Modifier
# ('NULL', 'GENERATOR', 'FNGENERATOR', 'ENVELOPE', 'CYCLES',
# 'NOISE', 'LIMITS', 'STEPPED')
bpy.context.object.animation_data.drivers[0].modifiers.new('GENERATOR')
# To Delete Existing F-Curve Modifier
# ('NULL', 'GENERATOR', 'FNGENERATOR', 'ENVELOPE', 'CYCLES',
# 'NOISE', 'LIMITS', 'STEPPED')
bpy.context.object.animation_data.drivers[0].modifiers.remove(modifier)
# INCOMPLETE --- still figuring out how this remove works...
# This took me hours of searching around and almost no documentation....
import bpy
fcurvetype = bpy.context.object.animation_data.drivers[0].modifiers[0]
bpy.context.object.animation_data.drivers[0].modifiers.remove(fcurvetype)
To do this, we first delete the default Generator Modifier F-curve and replace it by drawing our own animation curve, simply by CTRL+LMB click on the graph.
For example:
Monkey Scale X to be driven by Cube Location Z.
- First, delete the default f-curve modifier.
- Then for example, set our own curve 2 states:
- Point 1 Frame: 0, Value: 0.1
- Point 2 Frame: 10, Value: 2
This means:
When Cube Location Z goes from range 0 to 10, the driven Scale X of Monkey will go from 0.1 to 2. No matter if the Cube Location goes beyond or under 0-10 range, the Scale X of the Monkey will always be within the limit that we set.
NOTE: This is similar to fit() and fit01() function in Houdini.
Mapping range of values over range of values using Curve basically this one is. I do not know if Python or Blender has its own expression that does the same thing, if not, you can probably set it up using PyDrivers.
PS: This drawing of Curve can be Python scripted as well, I think... still researching how to do this without having to use the bpy.ops.*
NOTE: This is similar to fit() and fit01() function in Houdini.
Mapping range of values over range of values using Curve basically this one is. I do not know if Python or Blender has its own expression that does the same thing, if not, you can probably set it up using PyDrivers.
PS: This drawing of Curve can be Python scripted as well, I think... still researching how to do this without having to use the bpy.ops.*
VARIATION: Ups and Downs Relationship
Use sin() or SINE Modifier.
TIPS ON XYZ:
Usually, for things like Scale that often has 3 value pair: ScaleX, ScaleY, and ScaleZ, we can either Copy and Paste the same Drivers from one to the other, which means it will be creating duplicates of Drivers.
Or we can tell Blender so that ScaleY and ScaleZ are always follow ScaleX value using "referencing". If we assign:
bpy.context.object.scale.x
bpy.context.object == is like "self", not 100% exactly "self", but so far I found that is the quickest way to think of this bpy.
However, I think the most correct is to use the Driver Variable Type, instead of Expression. Just because with Expresion, sometimes we need to hack the "Dependency Updates", etc, etc.
IS DRIVER REALLY THIS COMPLEX?
Blender Drivers is just slightly feels complex because it has a lot of function in it. Expression function, Modifier (function generator), Limit, Value Averaging, and many many things packed into one feature: DRIVERS. Surely, it may be slightly intimidating for first timer, but don't be.Also, the way Blender displays and accessing DATA PATH is also a little bit complicated if you are not used to Object Oriented Programming.
In Maya and Houdini, we can get, set, connect, disconnect, values from data path, by just specifying the Nodes Name and Attribute/Parameter Name. The advantage of node-based architecture and hundreds of simple commands to modify them. Writing expression in Maya and Houdini is indeed easier for general users.
MAYA EXAMPLE OF EXPRESSION
Example expression in Maya to connect Transform node named Suzanne with Cube:
Suzanne.scaleX = Cube.translateY;
In Blender, we need to dig a bit and the path name is long. Pointing to an object named 'Cube', for example, the data path looks like this:
bpy.data.objects['Cube']
# Data Path to Translate
>>> bpy.data.objects['Cube'].location.x
0.0
>>> bpy.data.objects['Cube'].location
Vector((0.0, 0.0, 0.0))
# Data Path to Rotate
>>> bpy.data.objects['Cube'].rotation_euler
Euler((0.0, 0.0, 0.0), 'XYZ')
>>> bpy.data.objects['Cube'].rotation_euler.x
0.0
# Data Path to Scale
>>> bpy.data.objects['Cube'].scale
Vector((1.0, 1.0, 1.0))
>>> bpy.data.objects['Cube'].scale.x
1.0
ADVANTAGE OF BLENDER
Blender processing of expressions is A LOT faster than Maya's Expression. In term of speed, Blender expression calculation is about as speedy as Houdini. While Maya's expression is slowest. Blender also always cache the calculation automatically like Houdini, which is nice.
Blender Python uses Object Oriented Programming (OOP) paradigm to access data, apart from being A LOT FASTER TO PROCESS, is also more flexible, allowing users to quickly customize and make custom functions.
In fact, in Maya, in order to get the Object Oriented Paradigm for scripting, they actually need PyMEL. PyMEL is a more Pythonic wrapper of Maya programming. And PyMEL is slower. Using MEL script in expression is also slow. So that is Maya. With Maya, Autodesk is your boss.
https://code.google.com/p/pymel/
While with Blender, you are the boss, Blender Python is already Pythonic. Everything is Python. Wait till Blender has PyNode and we can continue this kind of topic.
So, anyway the concept of DRIVER, EXPRESSION, is really similar across Blender, Maya, Houdini. Very similar. In fact, you can easily write Python code that will contain the Data Path into simpler variable name.
Once you understand the key concept of Blender DRIVERS, this one feature is really useful for animation, rigging, and lots of complex and exciting effects. This is another reason I write this long detailed post on Drivers to share with you.
One thing I have to mention though, unlike Maya, Blender Drivers does NOT provide:
- Set Driven Key window
- Attribute Connection window
- Create Expression window
- Simple Python script to get, set, connect, disconnect property.
Those "easy to use functions GUI" above in Maya are allowing users to easily create connections. Especially "Set Driven Key" window, which is very similar to Blender Drivers to create custom Curve creation for Drivers relationship.
It would be nice if Blender have those kind of features. However, everything is actually there in Blender. I mean, possible to do your own customization of connection using Python scripting.
I think SOMEONE can certainly make "interface" like above in Maya, inside Blender, to connect things faster and easier, OR make a simple Python script that actually does the job.
I will attempt to show you a little bit of this "automation", although not yet with GUI style.
ONE TO ONE RELATIONSHIP: PYTHON WAY
Ok, now let's take a look on how we could Python script one to one connection. Why do we need to do this? Because eventually setting up DRIVERS gets tedious, especially when we need to drive an array of objects.Let's learn the basic first.
1. Tell Blender what value we like to create a Single Driver.
# drivers for all three location XYZ
myDriver = bpy.context.object.driver_add('location')
# single driver for location X
myDriver = bpy.context.object.driver_add('location',0)
# single driver for scale Z
myDriver = bpy.context.object.driver_add('scale', 2)
# single driver for rotation X
myDriver = bpy.context.object.driver_add('rotation_euler',0)
# add driver to custom property named "myProp"
myDriver = bpy.context.object.driver_add('["myProp"]')
# add driver to shapekeys 'Key 1'
ob = bpy.context.object #currently active selected object
myDriver = ob.data.shape_keys.key_blocks['Key 1'].driver_add('value')
# add driver to modifier 'Mesh Cache'
ob = bpy.context.object
myModifier = ob.modifiers['Mesh Cache']
myDriver = myModifier.driver_add('eval_frame')
Above, I am using variable "myDriver" as container of this Driver, we just created. This will be useful as we go along and modify the Driver. You can use any valid variable name.
How do I know the name of PROPERTY? Simply by hovering on any PROPERTY in Blender, RMB click and select Copy Data Path.
Sometimes you need to be more specific, for example to create driver for specific Material "Diffuse Intensity" property, you use code like below. You need to dig the bpy via bpy.context or using bpy.data until you found that data you need to add DRIVER into.
myDriver = bpy.context.object.data.materials['Material'].driver_add('diffuse_intensity')
2. Specify Driver Type
# by default should be 'SCRIPTED', but in case you want to change
# the driver type, you have other option
# ('AVERAGE', 'SUM', 'SCRIPTED', 'MIN', 'MAX')
myDriver.driver.type = 'AVERAGE'
3. Enable DEBUG mode.
Enabling the feature below will display the actual Value being returned and used by DRIVEN object.
# enable Debug Info
myDriver.driver.show_debug_info = True
4. Specify VARIABLE and VARIABLE TYPE
Here is the fun part. Following the above variable convention, we can add LOCAL VARIABLE to our Drivers setup.
# DRIVER VARIABLE
# create new variable
newVar = myDriver.driver.variables.new()
# variable name
newVar.name = "varA"
# variable type
# PLEASE PICK ONE
#newVar.type = 'TRANSFORMS'
#newVar.type = 'ROTATION_DIFF'
#newVar.type = 'LOC_DIFF'
#newVar.type = 'SINGLE_PROP'
newVar.type = 'TRANSFORMS'
newVar.targets[0].id = bpy.data.objects['myTargetObject']
newVar.targets[0].data_path = 'location.z'
newVar.targets[0].transform_type = 'LOC_Z'
newVar.targets[0].transform_space = 'WORLD_SPACE'
NOTE:
At some point in time, you might want to check the actual Drivers data via bpy.context, below is how you may check it:
list(bpy.context.object.animation_data.drivers)
bpy.context.object.animation_data.drivers[0].driver.expression = 'frame'
Driver is kind of data that is almost hidden and hard to dig, unless shown.
REFERENCE:
http://www.blenderartist.org/forum/showthread.php?287330-Adding-driver-to-pose-bone-constraint-through-Python
I will give some script examples:
EXAMPLE
Connect Monkey Scale X to Cube Location Y.
Make sure you have Cube and Monkey in the scene. Select Monkey and run the script below.
# single driver for scale X
myDriver = bpy.context.object.driver_add('scale',0)
# driver type
myDriver.driver.type = 'SCRIPTED'
# enable Debug Info
myDriver.driver.show_debug_info = True
# specify the script
myDriver.driver.expression = "bpy.data.objects['Cube'].location.y"
# add DRIVER VARIABLE to FORCE UPDATE
# create new variable
newVar = myDriver.driver.variables.new()
# variable name
newVar.name = "var"
# variable type
newVar.type = 'SINGLE_PROP'
newVar.targets[0].id = bpy.data.objects['Cube']
ALTERNATIVE (although limited, probably this is a better way, since we are using the built-in method to track thing)
Make sure you have Cube and Monkey in the scene. Select Monkey and run the script below.
import bpy
# single driver for scale X
myDriver = bpy.context.object.driver_add('scale',0)
# driver type
myDriver.driver.type = 'AVERAGE'
# enable Debug Info
myDriver.driver.show_debug_info = True
# specify the script
myDriver.driver.expression = "var"
# add DRIVER VARIABLE to FORCE UPDATE
# create new variable
newVar = myDriver.driver.variables.new()
# variable name
newVar.name = "var"
# variable type
newVar.type = 'TRANSFORMS'
newVar.targets[0].id = bpy.data.objects['Cube']
newVar.targets[0].transform_type = 'LOC_Y'
newVar.targets[0].transform_space = 'WORLD_SPACE'
ONE TO MANY RELATIONSHIP:
MANUAL VS PYTHON WAY
We already knew how to setup ONE TO ONE relationship manually.
If we want to do ONE TO MANY, we can simply copy and paste the driver into other Property values. Let say, we already create Driver for Scale X, and we want to copy to Scale Y and Z, we simply Copy and Paste Driver. However, this could be tedious.
This is when you want to use Python to script things, in case if you want to connect 1 object to drive 100 objects.
EXAMPLE SCRIPT:
Make sure you have a Cube and many monkeys. Select the monkeys and run the script below:
import bpy
selected_objects = bpy.context.selected_objects
for object in selected_objects:
# make each object active one by one and do everything below
bpy.context.scene.objects.active = object
# single driver for scale X
myDriver = bpy.context.object.driver_add('scale',0)
# driver type
myDriver.driver.type = 'AVERAGE'
# enable Debug Info
myDriver.driver.show_debug_info = True
# specify the script
myDriver.driver.expression = "var"
# add DRIVER VARIABLE to FORCE UPDATE
# create new variable
newVar = myDriver.driver.variables.new()
# variable name
newVar.name = "var"
# variable type
newVar.type = 'TRANSFORMS'
newVar.targets[0].id = bpy.data.objects['Cube']
newVar.targets[0].transform_type = 'LOC_Y'
newVar.targets[0].transform_space = 'WORLD_SPACE'
I hard coded the 'Cube' above for simplicity.
You can of course modify the script below and then create a nice beautiful Python function with kwargs* stuff so that user can:
1. Select a bunch of Driven objects.
2. Select lastly (active) the single Driver control.
3. Run script.
I might as well provide such function here:
### Reminder for myself: Write beautiful ONE TO MANY function here ###
REAL APPLICATIONS OF DRIVERS
One-to-One and One-To-Many relationship can be used to:1. Create directional Eye Rig (translation to control rotation of eyes)
2. Create Advance Facial Rig to drive Shapekeys using "joystick" style.
3. Many other things you can think of, for example:
- If you have 100 doors and you want to create a setup where the door should open one after another... that is possible with drivers. Automated or semi-automated Domino kind of effects can be setup using Drivers.
- If you have a lot of Tentacles kind of joints, you probably want to use Drivers too.
Do a bit of reading of book by Jason Osipa "Stop Staring" for Maya if you are keen. The concept is simple, basically instead of having hundred of Property/Parameters/Channel/Shapekeys to control, we are using few and much less controllers to drive those values. For example:
- Mouth Smile and Mouth Frown will not happen at the same time. So a 2-directional control that goes Up or Down can be used to drive Smile and Frown.
- Mouth Wide, Narrow, Open, Close == can be combined into a single 4-direction control.
There are some video tutorials out there that teach you how to create Advance Facial Rig in Blender. I suggest you to search on that. I will list them in here when I found a good one:
https://vimeo.com/15022068
Anyways, all of these can be automated using Python. But good idea for you to do it manually first. I have a feeling that someone out there has already created such automatic script to create "Osipa Style" Facial Rig setup. If not, maybe I have to do it.
MANY TO ONE RELATIONSHIP: MANUAL WAY
Having multiple Drivers to affect and to drive an object is really interesting and useful.
EXAMPLE:
DRIVERS: 2 x Cube ('CubeA', 'CubeB')
DRIVEN: 1 x Monkey ('Suzanne')
import bpy
# single driver for location X
myDriver = bpy.context.object.driver_add('scale',0)
# driver type
myDriver.driver.type = 'SCRIPTED'
# enable Debug Info
myDriver.driver.show_debug_info = True
# specify the script
myDriver.driver.expression = "var"
# add DRIVER VARIABLE to FORCE UPDATE
# create new variable
newVar = myDriver.driver.variables.new()
# variable name
newVar.name = "var"
# variable type
newVar.type = 'LOC_DIFF'
newVar.targets[0].id = bpy.data.objects['CubeA']
newVar.targets[0].transform_space = 'WORLD_SPACE'
newVar.targets[1].id = bpy.data.objects['CubeB']
newVar.targets[1].transform_space = 'WORLD_SPACE'
REMOVING DRIVERS USING PYTHON
Select an object with drivers first, below are some examples snippet to remove the drivers:
# including custom property
bpy.context.object.animation_data_clear()
# remove animation data from specific materials
bpy.context.object.data.materials[0].animation_data
Sometimes you want to specifically remove driver from particular DATA PATH. So you probably want to LIST DRIVERS' DATA PATH for currently selected object:
import bpy
ob = bpy.context.object
drivers = ob.animation_data.drivers
for driver in drivers:
print(driver.data_path)
# Once listed, we can specifically remove the driver like so:
bpy.context.object.driver_remove('location')
bpy.context.object.driver_remove('scale')
bpy.context.object.driver_remove('rotation_euler')
# To remove Drivers from custom property
bpy.context.object.driver_remove('["myProp"]')
Or just do it all at once:
ob = bpy.context.object
drivers = ob.animation_data.drivers
for driver in drivers:
print(driver.data_path)
ob.driver_remove(driver.data_path)
NOTE: If I understand it correctly,: "Drivers" in Blender does not have particular name that we can point into, it is simply just an index pointing to FCurve data.
MANY TO MANY RELATIONSHIP (ARRAY DRIVERS)
This will be the most complex setup, which usually require a little bit of planning.
The simplest MANY TO MANY relationship is when 1 Driver has connection to each 1 Driven objects. So we have 100 Driver and we have 100 Driven objects. I think some kind of naming system can help a lot in hooking up relationships.
DRIVER: driver.000, driver.001, driver.002, and so on.
DRIVEN: driven.000, driven.001, driven.002, and so on.
We can then use Python to pair them. Can you write Python code that does this? Should not be too hard, just another FOR loop task.
However, do we always want 100 Controls to drive 100 Objects? Hmm.. probably we do not want that. What would be the point?
Just like if we wanted to control Particles, Debris, Crowds or simulation, we need a SINGLE easy to control MASTER/BOSS to drive an array of objects.
In this case, my proposition is to use DYNAMIC PAINT below.
"ATTRIBUTE TRANSFER" USING DYNAMIC PAINT TO DRIVE ARRAY LIKE A BOSS
I call this "Attribute Transfer", just like how it may be done in other 3D package like Houdini. In Houdini, there are many ways to transfer VALUE from one object into another.Similarly, in Blender, we have "Dynamic Paint". In theory, it works similar to Houdini, but more practical. Dynamic Paint transfer "Vertex Weight" and it will also Paint Map if we like. Vertex Weight of Dynamic Paint can then be used by some other Blender Modifier and with Dynamic Paint. This works in real time and it controls ARRAY of VALUES, perfect for what we need.
I have attempted to do this kind of crazy setup in the past. It works, but I actually MANUALLY set everything and it takes me quite a while to step-by-step assign the drivers. I remember to setup 64 array, it took me more than hours.
I said to myself back then "This is not the way to go, I need to learn Python to set all these automatically!"
http://blendersushi.blogspot.com.au/2012/03/vfx-multilayers-triggering-of-effects.html
http://blendersushi.blogspot.com.au/2012/03/demo-dynamic-paint-multi-trigger-in.html
Fast forward to today, I think this is now possible and can be automated using Python. The concept is really super simple and I actually have shown this concept a couple of time in the past.
VERTEX GROUP WAY
One alternative clever hack is by using some array of VG (Vertex Group) and Transformation Constraint, in combination with Displace Modifier and Dynamic Paint, of course. I learned this from Gerardo (Liero).
Remember the "Procedural Flip Card" setup?
http://blendersushi.blogspot.com.au/2013/05/python-advanced-procedural-flipping.html
That was actually the similar kind of setup, using the help of Python to make it happen. Again, I got help from Gerardo aka Liero (Blender Artist) back then to understand this VG + Transformation Constraint trick. It works nicely for all kind of transformations. I have to give Gerardo a credit.
If you like to take it to the next level, we really need to use DRIVERS.
I believe the reason Gerardo suggested me to use VG and Transformation Constraint because it is simpler to modify and setup, it does work amazingly well for Translate, Rotation, and Scale. Usually that is all you need, really.
However, if you then want to drive other things: Material Intensity, Shapekeys, Animation, or even trigger NLA actions animation based on event. I have not gone that far yet. I think I am heading into BGE (Blender Game Engine) kind of thinking, although still far.
In BGE, we can easily Trigger Events, but BGE realtime environment is kind of a different environment to the Blender 3D environment. Currently, I am not sure how to hook them together yet. Neither how BGE really talks to the normal Blender 3D environment. There is a potential there.
DRIVERS WAY
The Recipes:
- Liero's script Parent to Mesh (Padre script) --> this script will do Vertex Parentings for bunch of objects into a single mesh.
- Blender Displace Modifier
- Blender Dynamic Paint
1. Array of Empty A that will stay in position. Use Parent to Mesh script.
2. Array of Empty B that is driven by Displace Modifier. Also use Use Parent to Mesh script.
3. Array of Drivers that measure the Distance of every array pair of Empty A and Empty B and pipe back the OUTPUT into any properties you like to be Driven.
4. A Dynamic Paint setup that will drive the Displace Modifer.
5. OPTIONAL: Array of Custom Property to store the buffer values
Remember that we need a good naming system to keep everything under control. I wrote one big script that does this setup.
SCRIPT COMING SOON, still WIP....
but you can write your own script using what I have written above
and by searching around for similar ideas
but you can write your own script using what I have written above
and by searching around for similar ideas
CONCLUSION
I think eventually this setup can be done more streamlined via Particle System and Dynamic Paint to pipe the values back into Object Level.For now, this is really the most logical way that I could think of.
In theory you can use this concept to setup:
- Simple Crowd system that stand, sit and waves on command
- Piano keyboard that auto triggers based on distance to fingers
- Avatar style plant that shy away or opens up when "touched"
"Shy Plant"
Anything that can be Keyframed, can be Drivens. Keep this in mind.
PYDRIVERS...
Here come the most interesting feature: PyDrivers. Save the best for last.This hidden ability allows you to create all kind of complex function that takes any kind of INPUT and RETURN value to be used to drive the DRIVEN object.
Yes, that is all for now. I let you research about PyDrivers yourself.
I wrote so little of this but I think a lot about what kind of PyDrivers we can plug into Drivers Expressions.
I think, when Blender PyNodes is ready for big exposure, then we have a lot more possibilities. Well, maybe what you wanted to do is "the same", but it will be a lot easier anyways. You can achieve more complexity, but a whole lot simpler.
Talking about PyNodes, I am actually curious about PyNodes implementation thus far for Blender Compositing and Blender Material Cycles. Maybe that is next thing I should look into...
CREDITS TO THE MASTERS
If you are a Visual Artist with high passion in Computer Graphics, you need to learn scripting. Read a bit of Math and expressions. I think it should be easy for you, younger generations of artists.
Python and C++ (eventually) are a must. At least, learn Python, Python scripting is actually one of the easiest programming language to learn.
My Python learning journey is a lot more fun because of Blender.
Below are list of some top Blender Artist at Blender Artist Forum (www.blenderartists.org) that you need to keep eyes on. Read through many of their post on the forum and also at their own blog and scripts:
- Liero
- Atom
- Batfinger
- Oscurart
- Bart (Crouch): https://sites.google.com/site/bartiuscrouch/
- Dealga McArdle: http://blenderscripting.blogspot.com.au/
- Aligorith: http://aligorith.blogspot.com.au/


