|
| Yummy Voronoi Cell with Random Color (using Python) |
PYTHON WITH THE SPEED OF LIGHTAre we ready to continue and dig deeper into Blender using Python? Maybe!
I said "maybe" here because probably it is better to familiarize with the simple things first. Sometimes we tend to go a little fast. With programming, I realized that it is better to go slow but steady. Like a snail.
I am both advising you and keep questioning myself.
- Have I really fully understand the concept of programming? Pretty much.
- Have I understand the Python programming language in general? A little.
- Have I really understand the BPY (Blender Python)? Starting to.
- Have you studied some elegant Python scripts out there? These days, I am searching for it.
At this moment, I kind of just started to understand more.
Suddenly I can do a lot of things that I never thought before, but more than often I have to fall back so many steps because apparently I did not quite understand the fundamentals or there are another way or better way to do things more elegantly.
I found programming is really quite funny after all:
- The language itself can be twisted in the way it looks elegant or horrible. The program may still work.
- It is not the language, but how you use the language that really matters in the end.
- It continue to evolves.
- It is really interesting when programming language is used outside the usual context.
- It is addictive.
In the past few weeks, I have started to dig a lot of Python and Blender Python codes. Whenever I like to do something using Python, the answers are usually out there, but really all over the place. Sometimes it took me hours just to understand or to do a simple thing, because there is simply not enough documentation.
There are many high-end Python coders out there writing some random Python codes, but more often really hard to understand for beginners. The codes vary too: some obsolete for old Blender, some for newer Blender API but no longer working or needs some updating, to latest Blender API, which we are probably trying to learn now.
Sometimes, the older code and documentation can still be helpful to understand the logic and the flow of data. Such as:
http://www.blender.org/documentation/blender_python_api_2_59_0/info_overview.htmlHeap loads of information out there. Our task is to structure and organize it somewhat.
HELPS ARE AROUNDLuckily, there are also some brilliant Python coders that does blog and document their code nicely and explain it for beginner coders like me:, such as
Dealga from
blenderscripting.blogspot.com.au and
Crouch from
https://sites.google.com/site/bartiuscrouch/That
Blender Scripting blog really helps tremendously in understanding the fundamental of Blender Python. And I also talked to another Blender Coders, such as
Liero from Blender Artist, he is also really helpful.
I am also started to get better understanding of Python recently, while doing this CG Workshop on Maya Python with
Shaun Friedberg. The workshop helps to force myself to do some exercise, to understand what you can do with Python and scripting. Even though the workshop is for Maya, it is really applicable to Blender.
One needs to be active and pro-active in finding the answers. Sometimes it is good to stop and think. When asking questions, it is also good to ask question that gives you the understanding, not just the answer.
PYTHON IN BLENDER VS PYTHON IN MAYAI found that Python implementation in Blender is more elegant and complete compared to Maya. Blender one just needs more complete documentation. Python in Maya is still just a wrapper of MEL (Maya Embedded Language).
It is pretty overwhelming once we understand how Blender Data is stored and we can access the Data and manipulate it using Python.
However having Python language that goes around the API, allowing a lot of flexibility in Maya in term of Data flow. That is how I see it. Same thing with Python in Blender.
Python really rocks.
WHAT YOU CAN ALREADY DO WITH PYTHON THUS FAR By now, I am guessing we should pretty much understand how to:
- List. Get and Query information or data from inside Blender or outside data
- Randomize values and list
- Transform values
- Passing, Filtering and Processing data
- Create or Add Values
- Modify or Replace or Combine Values
- Iterate through many objects
- Creating own Functions based on Blender Python API
Those are the basic logic bricks we can use to construct some useful codes. We have not really touch on how to create UI for the script, but that will come a bit later.
Now, I am going to share with you some of my random research and findings and show you some more example scripts to manipulate Object and Component Data inside Blender.
Below scripts are probably rough and mostly I did not even make them into elegant functions yet. They are just a once off script.
In the future, I promise to tidy up some of the scripts and add UI.
OBJECT AND COMPONENT DATAWe need to make distinction between OBJECTS and COMPONENTS. Object will usually deal with Transformation (Location, Rotation, Scale) and keyable attributes in Object Mode. While Component is more like what is happening in Edit Mode (Vertex, Edges, Face) or Paint Mode, or even things like UV information.
A. RANDOMIZE TRANSFORMATION (SCALE, ROTATION, LOCATION)Let's do a simple exercise. This example is one of the simplest and most popular example. Ability to quickly randomize the transform of 3D objects.
I made a quick doodle script like below, but it can probably be enhanced:
SCRIPT: Randomize Scale of Selected Objects
import bpy
import random


# Define a function to randomize scale


def randomizeScale (minScale, maxScale):

    selected_objects = bpy.context.selected_objects

    for object in selected_objects:
        randX = random.uniform (minScale, maxScale)
        randY = random.uniform (minScale, maxScale)
        randZ = random.uniform (minScale, maxScale)

        object.scale = (randX, randY, randZ)


# Example how you would run the function and giving it required arguments
# which is the two value minScale and maxScale


randomizeScale(0.3, 2)
- With above example, I am actually defining a simple function that does the job and calling the function at the bottom. You don't really need to create a function, but it is a lot nicer because by doing that we can reuse it later. You will find this kind of function creations really often with Blender Python.
- The breakdown of above script:
1. User needs to select some objects. I did not write error checking.
2. Tell Blender to put selected objects into a variable named "selected_objects".
3. Do an iteration loop that will create random value in X, Y, Z and then tell Blender to scale the object with those random values in 3 different XYZ axis.
Very simple beginner script.
In fact, Blender already have Built In Script and Function that does above and more, if you search inside Blender bundle, there is a Python script named:
object_randomize_transform.py.
It is a very good idea to look at that script and see the construct. I actually felt embarrassed when I look at that Blender provided script and compare it with my own script above! :) This means there are still a lot to learn, which is good.
The
object_randomize_transform.py is an example of very mature script and you can learn a lot. If you understand the script inside-out, you can certainly modify it for your own usage, maybe you could further improve it.
The resulting Random Transform using
object_randomize_transform.py can also be adjusted once via the UI Tool Panel. Neat.
B. SELECT OBJECTS BASED ON DISTANCE TO EMPTYBased on Example Script "Python In Maya" by
Shaun Friedberg.
http://www.pyrokinesis.co.nz
SCRIPT: Select Meshes Within Specific Distance of Empty
import bpy

def selectMeshBasedOnDistance(distance, empty):
    """
    A simple script to calculate the distance of all
    mesh in the scene relative to the selected camera
    """

    # Firstly, deselect all objects in the scene
    bpy.ops.object.select_all(action='DESELECT')

    # Get all objects in the scene of type 'MESH'
    meshes = []
    for item in bpy.data.objects:
        if item.type == 'MESH':
            meshes.append(item)

    # Check if empty argument given is a type of empty
    if empty.type != 'EMPTY':
        print("Please specify an empty!")

    # Create and clear an array to store mesh within the specified distance
    meshToSelect = []
    del(meshToSelect[:])
    print(meshToSelect)

    # Get the camera positions in world space
    #emptyXform = empty.matrix_world * empty.location
    emptyXform = empty.location

    # Get the mesh xform and distance from camera
    for mesh in meshes:
        #meshXform = mesh.matrix_world * mesh.location
        meshXform = mesh.location
        meshDistanceFromEmpty=(meshXform-emptyXform).length
        print(mesh, meshDistanceFromEmpty)
        if meshDistanceFromEmpty < distance:
            meshToAdd = []
            meshToAdd = mesh
            meshToSelect.append(meshToAdd)
    print(meshToSelect)

    # adding if for error checking, Python does not like selecting empty list
    if(len(meshToSelect))>0:
        for item in meshToSelect:
            item.select=True

# My Test 1:
# selectMeshBasedOnDistance(20, bpy.context.selected_objects[0])

# My Test 2:
selectMeshBasedOnDistance(5, bpy.data.objects['Empty'])
- Basically, we specify a distance value, and then the Python script will check for objects within that radius distance from Empty and select those objects.
- It will measure from the center origin of the mesh.
Based on Example Script "Python In Maya" by
Shaun Friedberg.
http://www.pyrokinesis.co.nz SCRIPT: Shuffle the Positions of Selected Mesh Objects
import bpy
import random

def completeShuffle(listToShuffle):
    '''
    '''

    #
    if not isinstance(listToShuffle, list):
        raise RuntimeError ('Please provide a list of items to shuffle: {listToShuffle}'.format(listToShuffle = list) )


    # Get the length of the list
    numOfListItems = len(listToShuffle)

    # Loop over the list until none are left
    while numOfListItems > 1:

        # Decrement numOfListItems
        numOfListItems = numOfListItems - 1

        # Select an item randomly and shuffle
        randomItem = random.randrange(numOfListItems)
        listToShuffle[randomItem], listToShuffle[numOfListItems] = listToShuffle[numOfListItems], listToShuffle[randomItem]

    # Return our shuffled list
    return listToShuffle

# USAGE testList = [1,2,3,4,5]


def randomlySwapSelectedMesh():
    meshes = {}
    meshes['transforms'] = []
    meshes['mesh'] = bpy.context.selected_objects

    # Check if there is more than one mesh selected
    if not len(meshes['mesh']) > 1:
        raise RuntimeError('Please select more than one mesh to swap!')

    print('ORIGINAL POSITION')

    # LIERO: don't append object location to the list, use location.copy()

    for mesh in meshes['mesh']:
        #meshes['transforms'].append(mesh.location)
        meshes['transforms'].append(mesh.location.copy())
        print('Mesh: ', mesh)
        print('Old Location: ', mesh.location)

    print('-----------' * 5)

    # Shuffle the list of transforms
    #random.shuffle(meshes['transforms'])
    completeShuffle(meshes['transforms'])

    print('AFTER SHUFFLE PROCESS')

    # Iterate over mesh and apply new transforms
    for newTransform, mesh in zip(meshes['transforms'], meshes['mesh']):
        print('New Location: ', newTransform)
        print('Mesh: ', mesh)
        mesh.location = newTransform

    print('-----------' * 5)

randomlySwapSelectedMesh()
- You select some meshes (two or more) and shuffle the location using the script.
- Remember that it will SHUFFLE based on mesh origin.
D. UNDERSTANDING VERTICES, EDGES, FACES OF MESHResources:I sneaked in an additional Python code at the bottom of this old blog post:http://blendersushi.blogspot.com.au/2013/03/python-mix-and-match-code.html
The code I added there will create a simple Mesh Graph (Vertices and Edges only) based on data imported from outside Blender.The idea is really to provide and pass on some data to Blender and tell Blender to create some Mesh component (Vertex Positions, which later converted into Edges and Faces)
Let's try to deconstruct and reconstruct a mesh.
import bpy
### THE CONSTRUCT OF EDGE MESH ###
scn = bpy.context.scene
# Create Mesh DatamyMesh = bpy.data.meshes.new('myMesh')
# Vertex, Edge and Face DatavertData = []edgeData = []faceData = []
# Finally putting all the information together into Mesh ObjectmyMesh.from_pydata(vertData, edgeData, faceData)
meshOb = bpy.data.objects.new('myOb', myMesh)
scn.objects.link(meshOb)
Below construct will create just Vertex inside Mesh Object:
import bpy

### THE CONSTRUCT OF VERTEX MESH ###

scn = bpy.context.scene

# Create Mesh Data
myMesh = bpy.data.meshes.new('myMesh')

# Passing some XYZ data for Vertex Location
vertData = [(0,0,0), (0,4,0), (4,4,0), (4,0,0)]


edgeData = ()

faceData = ()

# Finally putting all the information together into Mesh Object
myMesh.from_pydata(vertData, edgeData, faceData)

meshOb = bpy.data.objects.new('myOb', myMesh)

scn.objects.link(meshOb)
- Creation of Vertices seems to be quite simple, we simply passing some 3 Tuple value XYZ that will later translate as Vertex Position.
- We can leave Edge and Face data empty.
Below construct will create Edges inside Mesh Object: (Vertex data is required)
import bpy

### THE CONSTRUCT OF EDGE MESH ###

scn = bpy.context.scene

# Create Mesh Data
myMesh = bpy.data.meshes.new('myMesh')

# Passing some XYZ data for Vertex Location
vertData = [(0,0,0), (0,4,0), (4,4,0), (4,0,0)]

# Connect pair of Vertices data as Edges based on list order of vertices
edgeData = []

a=[]
b=[]

for number in range(len(vertData)-1):
    a.append(number)
    b.append(number+1)

edgeData = list(zip(a, b))

faceData = ()

# Finally putting all the information together into Mesh Object
myMesh.from_pydata(vertData, edgeData, faceData)

meshOb = bpy.data.objects.new('myOb', myMesh)

scn.objects.link(meshOb)
- With Edge, I am using the zip() method to connect vertices together.
- Edges simply requires pair of two, based on indices of Vertex in the list.
Below construct will create Faces inside Mesh Object: (Vertex data is required)
import bpy

### THE CONSTRUCT OF FACE MESH ###

scn = bpy.context.scene

# Create Mesh Data
myMesh = bpy.data.meshes.new('myMesh')

# Passing some XYZ data for Vertex Location
vertData = [(0,0,0), (0,4,0), (4,4,0), (4,0,0), (0,0,2), (0,4,2), (4,4,2), (4,0,2)]

edgeData = ()

# Normal Facing Up, Clockwise
# Normal Facing Down, Counter-Clockwise
faceData = ((0,3,2,1), (4,5,6,7))

# Finally putting all the information together into Mesh Object
myMesh.from_pydata(vertData, edgeData, faceData)

meshOb = bpy.data.objects.new('myOb', myMesh)

scn.objects.link(meshOb)
- With Faces (polygons), we simply tell Blender to create faces based on the indices of Vertex. We can have a Face with Tris (3 vertices), we can have Quads (4 vertices), and N-Gons.
- Face Normal is Facing Up if we go Clockwise and Face Normal is Facing Down if we go Counter-Clockwise.
Read this thread below, it is both informative and hilarious: (how to create house using Python?)
http://www.blender.org/forum/viewtopic.php?t=25794&sid=3bf3363ed465da77db483777003f1459Anyways, continue with Mesh construction, I found it is easier to understand the Indices and Index stuff if we can visualize the Index of every Vertices.
There is this
Index Visualizer from Bart Crouch:
https://sites.google.com/site/bartiuscrouch/scripts/index_visualizer_25http://blenderartists.org/forum/showthread.php?180683-Index-Visualiser-for-Blender-2-5/page3http://www.pasteall.org/38724/pythonFurther study:
http://wiki.blender.org/index.php/Dev:2.5/Py/Scripts/Cookbook/Code_snippets/Mesheshttp://www.blenderaddons.com/scripts/random_face_color.phphttps://vimeo.com/40389198E. VERTEX COLORSResources:Here we are going to look at the basic on how to get to Vertex Colors of a mesh.
1. Create our own Vertex Colors layer.
The Blender Python scripts below will create the default Vertex Colors layer called 'Col':
A. Via BPY OPERATOR:
bpy.ops.mesh.vertex_color_add()
B. Via BPY DATA MESHES:
bpy.data.meshes[0].vertex_colors.new()
Using BPY DATA MESHES is actually a much more preferable way, because it is directly accessing the component level. I keep telling myself NEVER to rely on BPY OPS.
BPY OPS is more like a shortcut for user to access the tool and commands.
2. Finding where Vertex Color data is really located.
It took me a while searching the Internet for this information. Since I cannot rely on Blender API documentation. There might be information at Blender documentation that I missed, but anyhow, in the end I found the answer by doing this kind of thing inside Blender Python Console.
We can see that the Color Data of Vertex Colors are really stored inside:
bpy.data.meshes[].vertex_colors[].data[].color
I supposed we can started to understand the pattern. We seems to always refer to the index of something.
bpy.data.meshes[0].vertex_colors[0].data[0].color
That zero there inside brackets means we are referring to the first indices of the LIST of big data that you can access in Blender.
We can also apparently get the data by using the KEYWORD:
bpy.data.meshes['Cube'].vertex_colors['Col'].data[0].color
For non-programmer like me, this is quite a big revelation. Especially when I can also use Python to dir(), list(), and ask how many total of data available by using len().
3. Display and Manipulate Vertex Color Data.
To be able to see Vertex Color in Blender 3D Viewport, we need to enable it under Material. So, once you create the Vertex Color Layer using the code above, as so:
bpy.ops.mesh.vertex_color_add()
... you need to enable Vertex Color options under Material Property tab.
You need to also adjust the 3D Viewport to display as GLSL, Textured Solid ON.
This way, we can really see the changes of Vertex Color as we modified it.
NOTE: Remember that I am using the Blender default scene for this, with the default 3D cube, just for the simplicity. You can further modify the script for your own usage.
Let's try something. The code below will apply RGB value (1.0, 0.0, 0.0) = red, to the 1st indices of the Default Cube.
import bpy


# Hard coded Mesh (pointing at Blender default cube)
mesh = bpy.data.meshes['Cube']

mesh.vertex_colors[0].data[0].color = 1.0, 0.0, 0.0
We know above that there are a total of 24 indices for Vertex Color of this default Cube with 6 Faces. Each Face of this cube has 4 different colors (from 4 vertices of single quad Face).
So if we want 1 Face to receive full color, we do something like below:
import bpy

# Hard coded Mesh (pointing at Blender default cube)
mesh = bpy.data.meshes['Cube']

mesh.vertex_colors[0].data[0].color = 1.0, 0.0, 0.0
mesh.vertex_colors[0].data[1].color = 1.0, 0.0, 0.0
mesh.vertex_colors[0].data[2].color = 1.0, 0.0, 0.0
mesh.vertex_colors[0].data[3].color = 1.0, 0.0, 0.0
We can use Python Loop to go over every indices to give the same Vertex Color like below:
import bpy

# Hard coded Mesh (pointing at Blender default cube)
mesh = bpy.data.meshes['Cube']

totalVertCol = len(mesh.vertex_colors[0].data)
colorRed = (1.0, 0.0, 0.0)

for i in range(totalVertCol):
    mesh.vertex_colors[0].data[i].color = colorRed
Further on:
DOODLE SCRIPT: Applying single random color to ALL vertices to Blender Default Cube
import bpy
import random

# Create Vertex Color Layer, if not already set
# bpy.ops.mesh.vertex_color_add()

# Do this once for now

# Hard coded Mesh (pointing at Blender default cube)
mesh = bpy.data.meshes['Cube']

totalVertCol = len(mesh.vertex_colors[0].data)

colR = random.random()
colG = random.random()
colB = random.random()

for i in range(totalVertCol):
    mesh.vertex_colors[0].data[i].color = colR, colG, colB
Everytime you run the script above, the Cube is getting a whole new random Vertex Color:
DOODLE SCRIPT: Applying multiple random color to ALL vertices to Blender Default Cube
import bpy
import random

# Hard coded Mesh (pointing at Blender default cube)
mesh = bpy.data.meshes['Cube']

totalVertCol = len(mesh.vertex_colors[0].data)

for i in range(totalVertCol):
    colR = random.random()
    colG = random.random()
    colB = random.random()
    mesh.vertex_colors[0].data[i].color = colR, colG, colB
DOODLE SCRIPT: Applying single random color to ALL vertices to Blender Default Cube
import bpy
import random

# Create Vertex Color Layer, if not already set
# bpy.ops.mesh.vertex_color_add()

# Do this once for now

# Hard coded Mesh (pointing at Blender default cube)
mesh = bpy.data.meshes['Cube']

totalVertCol = len(mesh.vertex_colors[0].data)

colR = random.random()
colG = random.random()
colB = random.random()

for i in range(totalVertCol):
    mesh.vertex_colors[0].data[i].color = colR, colG, colB
Now, let's tweak the code to be more useful and can be applied to ONE or MANY objects at the same time. Instead of hard-coding it to default Blender scene with default Cube above.
FINAL SCRIPT: Give Random Vertex Color for EVERY Selected Meshes
Basically we wanted to iterate over every object that is selected by user and applying random Vertex Color, this means, we need to create Vertex Color Layer beforehand and then apply the Vertex Color.
import bpy
import random

# Get selected objects
selected_meshes = bpy.context.selected_objects

# Add Materials that respects the Vertex Color for
# each selected and active objects

for mesh in selected_meshes:
    mat = bpy.data.materials.new('VertexMat')
    mat.use_vertex_color_paint = True
    mat.use_vertex_color_light = True
    mesh.data.materials.append(mat)

    # Tell Blender to Update the Material
    bpy.data.materials.is_updated = True

for mesh in selected_meshes:
     # Create Vertex Color for each selected meshes
     # bpy.context.selected_objects[0].data.vertex_colors
     mesh.data.vertex_colors.new()

     # Get Total Length of Vertex Colors for each selected meshes
     # len(bpy.context.selected_objects[0].data.vertex_colors[0].data)
     totalVertCol = len(mesh.data.vertex_colors[0].data)

     # Iterate over every mesh vertex color and give it a single colour

     colR = random.random()
     colG = random.random()
     colB = random.random()

     for i in range(totalVertCol):
        mesh.data.vertex_colors[0].data[i].color = colR, colG, colB
In order for the code to work right away (without user needing to tick some options from every Material), we need to also make sure that each object is assigned a Material which respects the Vertex Color Layer.
So we probably want to automate that using Python script as well. I actually already added extra code above that does exactly that:
for mesh in selected_meshes:
mat = bpy.data.materials.new('VertexMat')
mat.use_vertex_color_paint = True
mat.use_vertex_color_light = True
mesh.data.materials.append(mat)
I separated the code into its own block for clarity. You can actually put the whole block into one.
Make sure that you change the 3D Viewport to reflect the Vertex Color applied:
It will render fine for good old Blender Internal renderer. Below is 9 x 9 = 81 Poly Cube Objects, each of them is assigned Vertex Color 'Col' layer and random color for all faces.

The above script works fine on multiple Objects.
If you want to give random Vertex Color for every Faces of selected objects (must be in quads), you can use the script below:
SCRIPT: Give Random Vertex Color for EVERY FACES of Selected Meshes
NOTE: This script works only for mesh with Quads faces only. Suzanne the Monkey for example, has some meshes that are not Quad. But you can Subdivide it once to make sure ever face is Quads.
'''
    NOTE: The Script only works on surface with Quads Faces ONLY
'''

import bpy
from random import *

# Get selected objects
selected_objects = bpy.context.selected_objects

# Create a single Material that respect Vertex Color
mat = bpy.data.materials.new('VertexMat')
mat.use_vertex_color_paint = True
mat.use_vertex_color_light = True

for object in selected_objects:

    # Get Mesh Data instead of Objects
    mesh = object.data
    object.data.materials.append(mat)

    print('-'*5, ' START ','-'*5 )

    # Create new 'Col' Vertex Color Layer
    mesh.vertex_colors.new()

    # Vertex colour data
    vertexColour = mesh.vertex_colors[0].data
    faces = mesh.polygons

    # Create random vertex colours
    vColour = [(random(),random(),random()) for i in mesh.vertices]

    #print(len(vColour))
    #print(vColour)

    #print(len(vertexColour))g

    #vertexColour[2].color = 1,1,1
    #vertexColour[6].color = 1,1,1
    #vertexColour[7].color = 1,1,1
    #vertexColour[3].color = 1,1,1

    # asign colours to verts
    for i in range(len(faces)):
        v = vertexColour[i]
        f = faces[i].vertices

        print(f[0])
        print(f[1])
        print(f[2])
        print(f[3])

        print(vColour[i])

        vertexColour[i*4 + 0].color = vColour[i]
        vertexColour[i*4 + 1].color = vColour[i]
        vertexColour[i*4 + 2].color = vColour[i]
        vertexColour[i*4 + 3].color = vColour[i]


    print('-'*5, ' END ','-'*5 )
The script above is the update and combination of the scripts suggested below. I still don't understand the whole thing 100% yet, but I will improve the script in the future.
References:
The script above is basically looping over many things (objects, mesh faces, mesh vertices) and finally assign the color into the Vertex Colour.
We know that for Quad, we always 4 vertices to worry about. And for Vertex Colors, it is really expecting 4 Vertex Color, one for every vertex inside Face. So the script can be made simpler like above. If the mesh contains Tris, N-Gons, we have to take that into consideration.
Maybe in near future, we should improve the script so that it will cleverly and nicely loop over the face vertex and assign the color into Vertex Color Array.
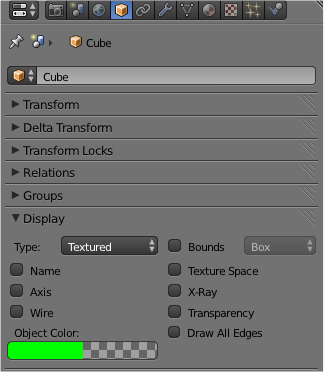
Remember that the above is NOT Material Color, NOR Object Color, it is Vertex Color layer that is being assigned. Make sure you understand the differences.
Object Color will simply kind override the Material Color. It is there for convenient, I supposed. Just for 3D Viewport color.
If you want to access Object Color via Python, you can too. You can supply R, G, B, and Alpha value.
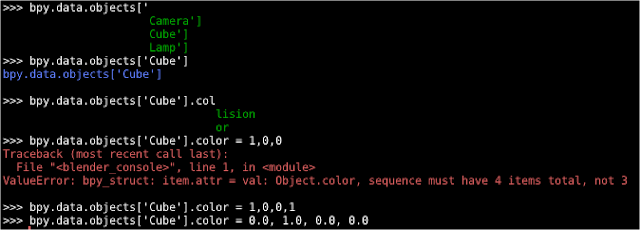
Example doodle Python script to randomize Object Color of currently selected Objects:
import bpyimport random
selected_objects = bpy.context.selected_objects
for object in selected_objects: redValue = random.random() greenValue = random.random() blueValue = random.random() alphaValue = 1.0
object.color = (redValue, greenValue, blueValue, alphaValue)
Will it render? Yes, somewhat you can. If you turn on "Object Color" option under Material that you assigned to that object.
Only works for Blender Internal renderer. Unless I am wrong and you can actually render in Cycles... No idea, how about you?
EXTRA: RGB and HSV COLOR CONVERSION
If you are tired to see the ugliness of random color from RGB, you can instead use random HSV color, which usually gives you a much nicer visual color range.
Since we are still doing Object Color and it is really simple to change, we can touch a bit on HSV Color.
SCRIPT: Example on using HSV Color instead of RGB Color
import bpy
import random
import colorsys


selected_objects = bpy.context.selected_objects

for object in selected_objects:

    randomHueValue = random.uniform(0.0,0.5)

    convertedRGBvalue = colorsys.hsv_to_rgb(randomHueValue, .6, 1.0)
    # This will return Tuple of (R,G,B), you need to extract them using Index

    alphaValue = 1.0

    object.color = (
                    convertedRGBvalue[0],
                    convertedRGBvalue[1],
                    convertedRGBvalue[2] ,
                    alphaValue)
The secret is to use Python built-in colorsys module to convert HSV into RGB:
Really handy and you will see a much nicer random Color result because it goes around Color Spectrum.
It is possible using Python and colorsys module to generate Color Range very specifically, such as:
- Give 10 random colors within range of minValue and maxValue of Hue.
- Give me 24 random colors within range of minValue and maxValue of Saturation
Guaranteed you will get a nicer random colors that way.
Remember that you can also specifically give a very specific List of Colors (that you have chose or selected from something like Kuler) to use to be assigned to the objects.
Below is an example Doodle Python script that does more specific color picker to be randomly assigned to selected mesh:
import bpyimport randomimport colorsysimport math
# Define Python code to create list of range of specific Random Float Value
def frange5(limit1, limit2 = None, increment = 1.): """ Range function that accepts floats (and integers).
Usage: frange(-2, 2, 0.1) frange(10) frange(10, increment = 0.5)
The returned value is an iterator. Use list(frange) for a list. """
if limit2 is None: limit2, limit1 = limit1, 0. else: limit1 = float(limit1)
count = int(math.ceil(limit2 - limit1)/increment) return (limit1 + n*increment for n in range(count))
# Create Specific List of ValuesrandomHueValue = list(frange5(0.0, 1.0, increment=0.25))
# Now, do some stuff in Blender
selected_objects = bpy.context.selected_objects
for object in selected_objects: convertedRGBvalue = colorsys.hsv_to_rgb(randomHueValue[random.randrange(0,4)], .8, 1.0) # This will return Tuple of (R,G,B), you need to extract them using Index alphaValue = 1.0 object.color = ( convertedRGBvalue[0], convertedRGBvalue[1], convertedRGBvalue[2] , alphaValue) It gets a bit complicated, but you will get it eventually.
Understand more about Color Theory using Blender:
BACK TO VERTEX COLORS...
Below is the proof that if I am giving a random Vertex Color inside the iteration loop for every vertex:
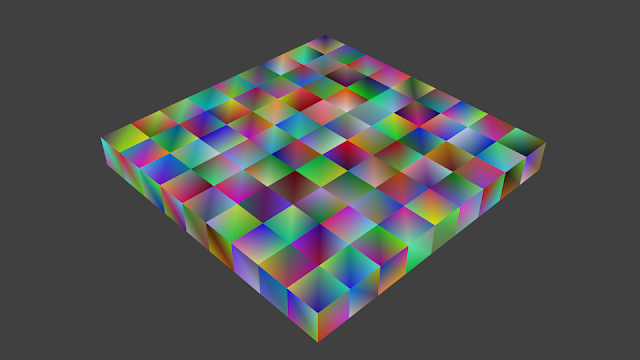
Example above is very generic, but it opens up a lot of possibility once you understand it.
Also one important point to note: With the above script, I am assigning every object with its own unique Material, so we end up with many materials.
But for things like Object Color and Vertex Color, we could actually assigning a Single Material for All, each with its own Vertex Color Data. This is probably much more efficient for some cases.
For example: with Pixel Python Script that I did in previous post, instead of having thousands of Materials with different Diffuse Color, we could just have a single Material, and thousands of Vertex Color layer for each object.
Below is a Single Glass Material for Cycles, with random Vertex Colors.
NOTE: Remember also that for this Vertex Color thingy to work with Cycles, remember you need to pass on the "Col" Attribute Data inside the material in the Node Editor.
Here is Suzanne with each Vertex Color assigned different color:
SELF-CHALLENGE:
- How do we create Python script that Randomize every color of the face using Vertex Color then? It should be smart enough to get N-gons Face and iterate over every Vertices under that Face.
- Apply the knowledge above and optimize the Pixel Scripts.
 |
| Random Color on Cell Fracture + Blender Bullet Physics |